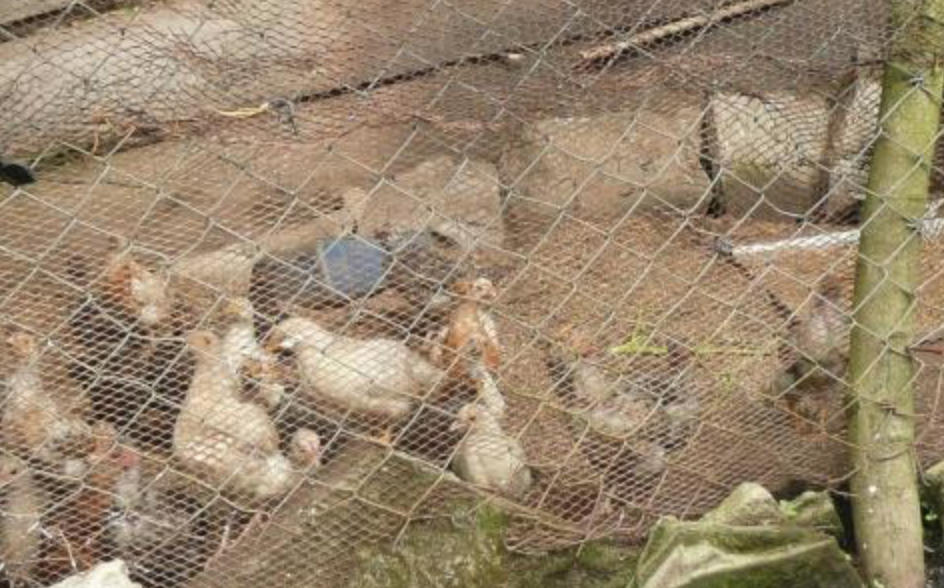
Housing is necessary to protect chicken against predators, thieves, adverse weather (rain, sun, cold winds, low night temperatures) especially during the night, and to provide shelter for egg laying and broody hens. Suitable poultry houses are important for efficient production and management. Poultry houses and shelters vary depending on availability of materials, weather and tradition. Choice of chicken housing should be based on cost, durability and usage. In organic production, outdoor access should be provided, and the hens or chicken can choose whether to be inside or outdoor.
Points to consider when selecting sites for poultry housing:
Provision of dry, friable litter.
Avoidance of key areas that can be patrolled by predators.
Dark areas to be avoided except for nest boxes.
In fixed house situations, either wire mesh or stones in areas immediately outside pop holes.
Air quality (i.e. low ammonia levels, correct humidity, correct temperature and good ventilation) plays a crucial role in health management. The position of a house can influence ranging activity and bird health. Soil type and drainage are instrumental in determining the extent of build up of soil-borne parasites.
Locating houses on free draining, flat, shady, south facing pasture is preferable in order to minimise the build up of internal parasites and coocidial oocysts and to ensure better retention of grass cover.
Poultry houses should have windows on either side for ventilation. In addition a hole or ridge on the roof will ensure proper ventilation and give light making it easier to work in the house. Make sure winds ventilate the house without making chicken cold. Make sure that there are no draughts. Sitting houses should be placed at right angles to the prevailing wind slightly moderates the amount of wind entering the building through the pop holes.
Ideally, houses should be positioned in the centre of the land area, where the hens or chicken should have access, so that a series of radiating paddocks can be created around the unit.
Accessibility during all weather conditions is an important consideration.
Range areas bordered by dense woodland are likely to be at greater risk from predation by foxes in particular. On the other hand, trees and bushes close to the houses provide shade, windbreaks and protect birds from flying predators. Clear grass and bushes for about 3 meters on all sides of the house to keep snakes and rats away.
Use wire (chicken and mesh wire) on windows to avoid predators and wild birds.
Secure premises near the family house. It is important to hear if the chickens get disturbed at night by predators or thieves.
It can be relevant to select a site on which the poultry house faces South or East in wet regions. In a rectangular house the end walls should face East and West to ensure that only the end walls face the hot afternoon sun.
Cheap locally available material can be very good, and natural materials like bamboo, wood, reeds, thatch grass or clay bricks will often give good protection against heat and cold nights.
Remove the bark from the wood to reduce the parasites load. Parasite often hide beneath the bark.
Heat, humidity, and harmful gasses may be considerably reduced through good ventilation. High temperatures may cause deaths, a drop in egg production, low shells quality and reduced weight gain. A combination of high temperatures and high humidity may cause death in young chicks.
Placing perches and nests inside the house to safeguard chickens against various predators. Perches and nests will also help to keep chickens and eggs clean.
Laying nests should be place in a quiet place in the house
Make a house which is easy to clean, to protect against diseases and parasites the house must be easy to clean. It should be big
Make the nests and perches easy to remove when cleaning
If relevant because of disease outbreaks, houses or shelters can be sprayed with lime (or in some cases it can be necessary to use a vermicide) washed after cleaning to disinfect and kill parasite eggs from the walls and cracks. Place ashes on the floor and in the nests to discourage parasites.
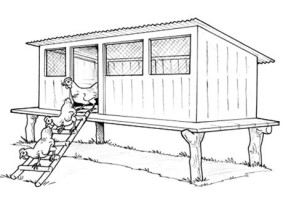
Night houses/shelters should be built on poles, well above the ground to protect the chicken from predators such as dogs, rats and snakes.
Build your poultry house to prevent possible injury to the birds. Remove any sharp edged objects from the house.
All chicken must have an outdoor run.
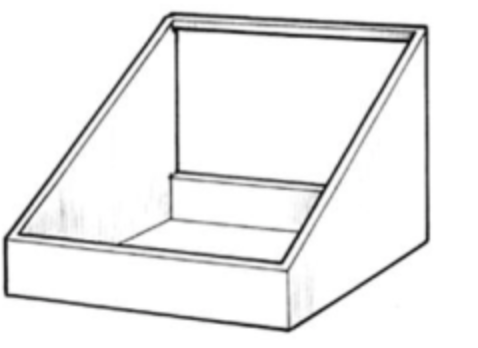
Types of housing
There are two main categories of housing organic poultry: static and mobile.
Chicken housing – building design (c) PSDA 2011
Perches
Chicken perches(c) PSDA 2011
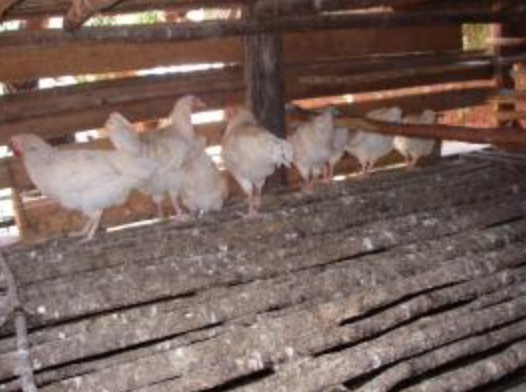
Perches are important for chickens to rest on at night. The provision of perches for laying birds satisfies a natural behavioural activity. Diseases and parasites may attack poultry resting on the floor (in contact with litter). Each one-meter perch may roost five adult birds. Perches are best made of bamboo or rounded sticks and not too big or too small. Treat perches with used engine oil or kerosene to keep away parasites.
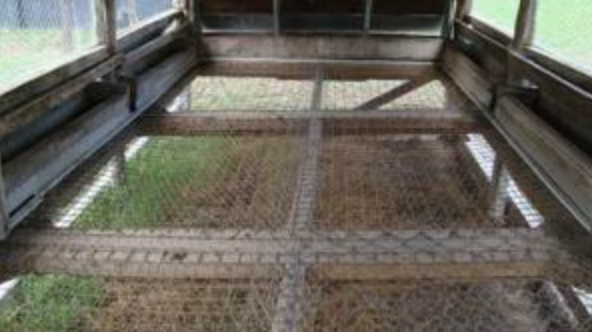
However, if badly designed, these can result in pain and injury. Perches should be arranged so as to enable birds to easily move between them and other equipment, thus reducing the risk of collisions and subsequent bruising and/or other damage. Consideration should be given to minimizing bird stress and downgrading during catching at the end of the laying period. The ability to remove perches aids this process. Floors made of net are not acceptable for chicken, and they are harmful to the feed of the hens and chicken. See the pictures below.
(c) A. Wachira, KARI, Kenya
NOT acceptable housing for chicken. Floors made of net or wire mesh are not acceptable for chicken, and they are harmful to the feet of the hens and chicken.
(c) A. Wachira, KARI, Kenya
Acceptable housing for chicken with slatted floor. They must be allowed outdoor and the slatted floor should only be half of the area.
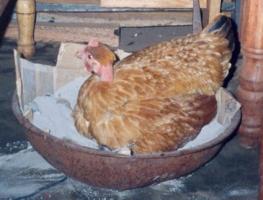
Nests When laying nests are not provided, hens lay eggs on the ground, in tall grass or in natural shelters where they may be difficult locate. Avoid building nests on the ground or outside chicken houses. Nests outside the house expose eggs to predators and thieves. Laying nests ease egg collection and avoids eggs that are dirty and cracked. Eggs should be collected twice a daily at the same time each day (mid-morning and the evening). Removing eggs continuously is important to stop hens from going broody since broody hens stop laying.
Brooding hen (c) A. Wachira, KARI, Kenya
To reduce the impact of excessive aggression within a flock, and to avoid floor laying and wastage, it is important that sufficient nest boxes are available. The provision of perches and of ground-level nest boxes will also encourage the use of nest boxes amongst a greater proportion of hens. It is important that nest boxes are sufficiently accessible so that they can be easily cleaned between batches.
Chicken nest box (c) Marete
Nests should be placed inside the chicken house and preferably above the ground. Provide one laying nest for every 5 hens. Brooding nests are individual nests and should be placed in quiet and dark places where eggs are easily removed. Once the hen is broody it may be necessary to remove her to an isolated place to avoid other hens disturbing her or going broody as well.
Simple nests can be made out of clay, calabashes or baskets made of local fibres, cardboard or wooden boxes. Nests should have the correct measurement for the hen to feel comfortable. An individual nest box measures 30 x 30 x 30 cm. A calabash/nest basket or nests made out of clay measure 40 x 20 x 25 cm (upper diameter x height x lower diameter).
Nests should have the correct measurement for the hen to feel comfortable. An individual nest box measures 30 x 30 x 30 cm. A calabash/nest basket or nests made out of clay measure 40 x 20 x 25 cm (upper diameter x height x lower diameter).
Three steps when preparing an individual nest 1) Ensure the pot or basket is clean and dry 2) Fill the pot or basket with sand mixed with ashes up to 1/3 full 3) Place clean, soft nesting litter material (hay or straw or wood shaving) on top up to 2/3 full.
Nesting material should be changed at least once a week. Ensure that the nest is 1/3 full with litter material to make the hen feel secure. When necessary place ‘dummy eggs’ (e.g. stone eggs) in the nests to train/attract the hens into using the nests. Mix ashes, tobacco leaves or other anti-parasitic substances with the nesting material. This will keep out most external parasites. External parasites reduce hatchability, since brooding hens spend too much time and energy leaving the nest, cleaning and scratching her body hence leaving the eggs cold.
Shelters for mother hen and chicks Upon hatching, it is important to keep the hen and chicks close together in a shelter. Shelter should protect chicks from adult poultry; feed competition with other poultry and protect against predators. Shelters should provide a stable environment for the chicks and shelter from bad weather. Place the shelter on a mat to protect against the cold. A shelter of basketwork with a top hole (diameter 20 cm) is useful, as feed and water may be changed without disturbing the chicks. It also gives the necessary ventilation. A woven mat on the floor may provide additional protection during cold weather. The mat should be cleaned daily to remove droppings and spilled/contaminated feed. Droppings may be recycled as farm manure.
Litter management Litter management is a vital component of managing the welfare of birds as ammonia release from poor litter can lead to conditions such as breast blister, hock burn, pododermatitis and respiratory disease. Management of litter in free range systems presents problems, particularly in winter when the weather is cold and litter is likely to become wet.
Three factors have particularly important effects on litter condition: – litter moisture, – greasy capped litter (resulting from too much fat in the feed or feed of poor quality); and – Nitrogen in the litter.
Chicken runs Chicken runs are a fenced open air space of 25 m2 or more where poultry are kept and protected against predators and thieves. Runs are also used for feeding, watering, for daily flock observation and collection of eggs. The walls are 2 meters high and can be made of clay or woven mat or chicken wire. A chicken run is relatively costly but provides security to the poultry. Allow adult birds to scavenge outside the run during daytime to reduce feeding costs. Protect your vegetable garden against free running poultry Guide to good housing for young chicken
Use baskets for night shelter and day shelter for small chicks to reduce costs and labour involved in constructing permanent houses;
Always use locally available materials to reduce costs;
In permanent or semi-permanent poultry houses use slatted, raised floors to remove droppings and keep out predators;
Always use wire netting (chicken or mesh wire) for the windows to keep out predators;
Provide perches and nests inside the house and make them removable to facilitate cleaning;
Ensure adequate ventilation in poultry houses without making the poultry cold;
Provide adequate drainage in case of flooding and protect birds from the hot midday sun.
Provide nests with clean litter which are easy to access and clean
Always house young chicks with their mother away from adult poultry.
Make sure that houses are easy to access and clean.
A good housing should be spacious, well illuminated, dry and airy, easy to clean and have perches for chicken.
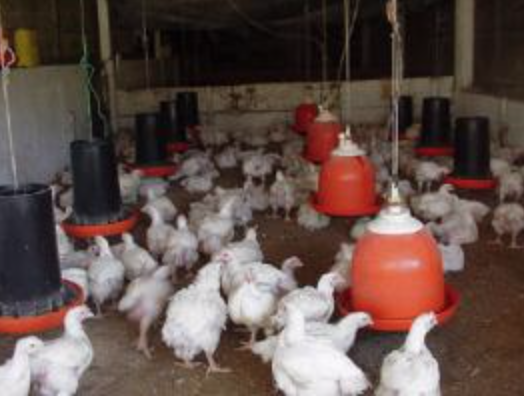
Housing for Hybrid layers on large farms The main types of housing systems for hybrid layers (Egg production), differ mainly in the floor types and are the following and always has an outdoor run:
Deep litter system: Birds are reared on a floor preferably concrete to allow easy disinfection and some litter material placed 15 cm deep. Litter materials may include wood shavings, rice husks, hay, chopped up straw, crushed maize cobs and shredded paper. Allow 3 to 4 laying hens and 12-15 broilers per square metre on deep litter floor systems
Full Slatted Floor system: Birds are reared on a raised floor made of either wooden slats or wire mesh. Slats with s width of 1.5 cm and a height of 4 cm laid 2.5 cm apart are recommended. Wire mesh usually has netting of 2.5 cm by 7.5 cm with 3 mm thickness. Allow 10 to 12 laying birds per square
Free range housing (c) Mette Vaarst
Housing for Broilers Broilers can be kept in similar confinements as layers, but do not need the laying boxes. Organic broilers grow slower than conventional ones and must have outdoor area to run and to prevent bones to be weak. In EU, they have to be 70 days old or more before slaughter. Broilers like some sunshine, which reduces stress in the flock and helps keep the birds healthy.
Partly free range (required in organic herds, where natural behavior and life is favoured)
Both hybrid layers and broiler products improve if the chicken have access to outside exercise area, greens in the diet, sunshine and areas where they can take dust baths. Eggs from layers fed with enough greens have a deep yellow yolk, which is much preferred by the market and fetches premium prices compared to the light yellow to almost white yolks of eggs from battery hens. Broilers produce better quality meat (better texture and taste) if they have access to outdoor facilities such as sunshine, exercise, dust bath areas and green feed. They also have stronger bones and less tendency to break legs during processing.
Broiler housing(c) Mette Vaarst
Housing for Indigenous chicken Poultry are often allowed to scavenge for food in the local environment during day time, getting housed in the evenings. In some cases they roost in the branches of trees or in enclosed baskets in the house to protect from predators and theft. In other cases, keepers build wooden, stone or brick accommodation attached to the family dwelling house. As brick houses tend to be difficult to keep clean. They present a potential threat due to the build-up of pathogens.
In Kenya, there are several housing structures, which include:
The dome-shaped stick basket, known in western Kenya as Lisera, Liuli or Osero, ideal for daytime housing
The stick-built Kiduli and other standard poultry houses
Hygiene It is important to reduce chances of infection to a minimum. Measures for preventing disease include the following;
Keep the chicken house clean and dry at all times
Disinfect all litter material before use
Locate the chicken farm at least 100m away from other chicken farms
Keep away visitors from the chicken houses.
Control rodents and mice
Clean drinking equipment and feeders regularly
Clean the chicken houses thoroughly and disinfect after disposing all birds
Remove dead birds immediately and bury them or burn them
Lighting There should be adequate natural light in the poultry unit. The light should be enough for a person to read a newspaper at the centre of the building. Transparent roofing sheets should be fitted to improve lighting. Light in laying birds stimulates increased egg production. There should be a period of at least 8 continuous hours without artificial light at night to respect the daily rest-period of the chicken.
Ventilation
Poultry unit should have free flow of fresh air.
A chimney aids the flow of air from the back to the front.
Place 0.6 m wire-mesh opening at the back, and 1.0 m opening in front of the building. In hot areas front ventilation should be made as big as 2 metres from the top. During the cold weather cover the ventilation with curtains.
Sunshine/Shade All creatures need some sunshine. The sun helps the birds manufacture Vitamin E. Chicken must have an outdoor exercise area where they can sun themselves and take dust bath during the day. This helps keep down external parasites, reduces stress and keeps the birds more resistant to diseases.
Space
Too many birds kept together in non-challenging and boring conditions may cannibalise/wound or even kill each other, as the stronger ones peck the weaker.
Do not keep local breeds in confinement without free access to outdoor areas. Also hybrid chicken do better with acces to outside runs.
Provide a space of 5 square meters per adult bird in a run system.
When space is limited, diseases are passed more easily from one bird to another.
Bio Security When infectious diseases are known to occur in the region there could some recursions made to avoid infections. In free range chicken hygienic measures focus on:
Burn and bury dead birds
Do not allow wild birds and other fowls into the poultry house or farm
Do generally not mix birds of various ages, which come from different places
In more industrialized chicken farms with confined chicken following advises are given to avoid infections:
Do not allow visitors or vehicles into the poultry farm unless thoroughly disinfected
Use foot baths with disinfectant outside each poultry house
Wear protective clothing for each house
Farmers who regularly add EM (effective microorganisms) or BM to the drinking water of chicken are reported to have very few cases of coccidiosis and other diarrhea causing pathogens. Also vinegar can be used as a water additive if signs of diarrhea appear in the flock.
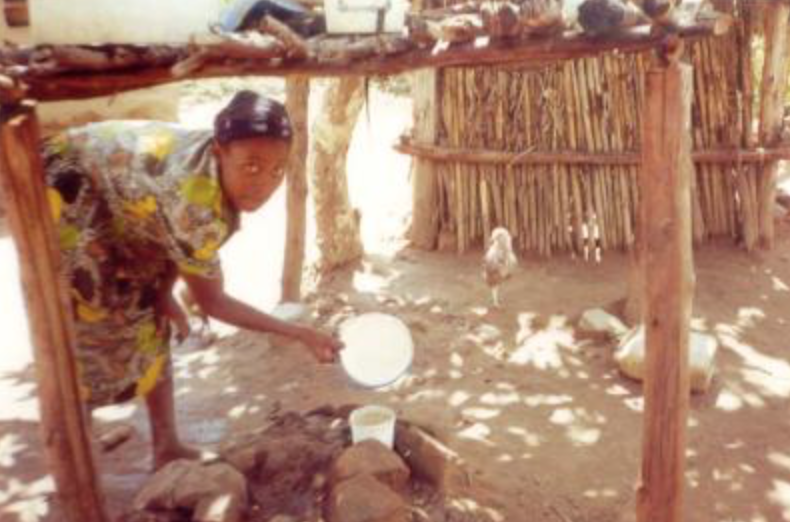
Give clean and fresh water in a specific place (c) Henry Ondwasy, KARI
Normally layer hens are economical to keep for about 2 years. However after about 12 months of laying, we can expect a period of resting or molting. In the natural life cycle of chickens this is the breeding period which should be respected. Molting involves “shedding” of feathers from an otherwise healthy chicken. A molting chicken will appear more ragged than bald, as if the feathers are thinned out. Feathers will lack the normal shining appearance and appear spotty. Good producers molt fast, and normal molting times of layers should not greatly exceed 10 weeks. After this the layers can with good management come back to good production for a second year before they should be allowed to retire. When chicken stop laying eggs – retired chicken
Chickens lay eggs for around 4-5 years. Then they stop, they run out. They sort of go into a chick-menopause state. Chickens that are genetically bred to lay eggs (layers) will run out of their finite egg supply faster. Chickens that lay only occasionally (bantams and exotics) might lay longer as they only squirt out an egg when they feel like it. Even under the very best of conditions, at some point a chicken is going to stop laying eggs. She is going to stop being productive and when that happens you need to figure out what to do with her. Old hens do not eat like the young ones. They are on a lower metabolism. So, ifs fair to keep them until they die a natural death, they can still be part of the flock without costing you too much.
Introduction and management of cocks Introduce one new cock for every 10 hens every two years, in order to avoid inbreeding. Improved indigenous chickens for improving the local breeds can be bought from Naivasha research station in Kenya as well as from private breeders.
Credit:Su Kahumbu GDT
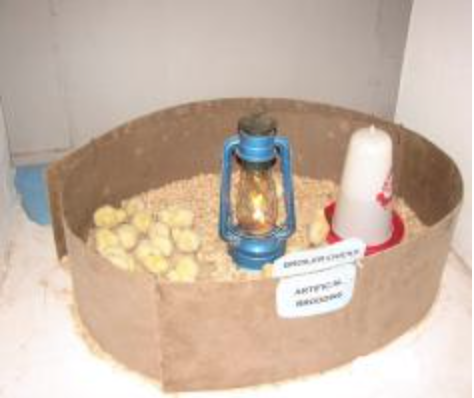
Brooding hens and cycle In the village setting care must be taken to protect brooding hens from predators, rodents and other forms of stress. If a brooder hen is well protected and comfortable she can easily hatch 15 eggs per sitting. A brooding cycle takes minimum 18 days after which the first eggs should start hatching. The mother will normally keep the chicks with her for a day or two before taking them to food and water. Any eggs not hatched after this will go cold and most likely not hatch. It is highly advisable to keep food and clean water available near the brooding hen during this whole period for her to hatch the maximum amount of chicks. Selection of eggs for setting When a hen is broody, she will start laying an egg every day. If she should have a clutch of chicken hatched at about the same time, the eggs are removed from her and carefully stored until there are enough for a whole clutch. Then they are all carefully placed in the nest so that she can sit on them until hatching. A improved nutrition can raise the average quantity of eggs laid per clutch by 100%. For a successfull hatching, the eggs must be handled carefully from laying till setting. Eggs should be stored with the broad end facing upwards, as at this end there is an air sack, through which the egg breathes. Eggs should be stored in a clean and dried place to prevent rotting. Since fertile eggs grow slowly, eggs older than 14 days should not be used for hatching. Shortening of the reproductive cycle By shortening the reproductive cycle, hens lay eggs earlier and double the number of clutches per hen per year. Improved management increase the survival rates of the chicks. Shortening of the reproductive cycle can be achieved by better feeding, protection from predators and rodents, timely vaccinations and (if relevant) deworming, control of external parasites, and culling of aggressive and unproductive birds. Serial hatching Since fertile poultry can be used to sit on eggs continuously for two or more times by removing the chicks every time they hatch and replacing them with new eggs. Ducks can sit on 30 to 35 eggs and can be used for up to six consecutive times. In an organic farm, it is important to think about fairness in this situation, and let the hen have their offspring with them. Combining serial hatching with synchronisation (see below), more chicks will be able to hatch without using an incubator. Turkeys are also excellent chick brooders and can raise up to 50 chicks at the time. The rest of the procedure in introducing a cock for every 10 hens and the selection of the eggs is the same as with non-serial hatching. Synchronised hatching It can be an advantage to have more clutches of chicken hatched on the same days, because it fits well with feeding and vaccination etc., and maybe also with selling the chicken later. When hens that started laying within the same week get brooding, the first hen to reach this stage can be delayed by being given one egg to sit on. This will be repeated for the second and third hens, so that all the hens are set on one day. By the time of setting, all ‘dummy’ eggs should be destroyed. The time between the first hen and the last should not be more than one week. Again, in an organic farm, it is important to consider naturalness and fairness also in this situation. Brooding of purchased hybrid day old chicks Before buying the young hybrid chicks, an appropriate brooding area needs to be prepared: Day old chicks need to be kept warm at all times. As they grow and the feathers start to develop they tolerate cold better. At the same time they need to access feed and clean water at all times as they feed with short intervals. Brooder Preparation
Use hard boards to make a brooding ring of 60 cm height
put at least 5 cm of clean dried grass/leaves (litter) on the floor inside the brooding ring
Start with a density of 50 chicks per square metre
A hover/cover should be provided about the brooder, to reduce heat wastage
Make space for feed and water feeding equipment inside the brooder ring
Brooding of the broiler chicks is similar to that recommended for layer chicks, but the feed is different. Make sure feeds are bought as recommended.
Kerosene brooder (c) A. Wachira, KARI, Kenya
Heat Sources
Charcoal Jiko – one is enough for 500 chicksKerosene lamps – one lamp for 50 chicksElectricity – one infra red lamp for 250 chicks
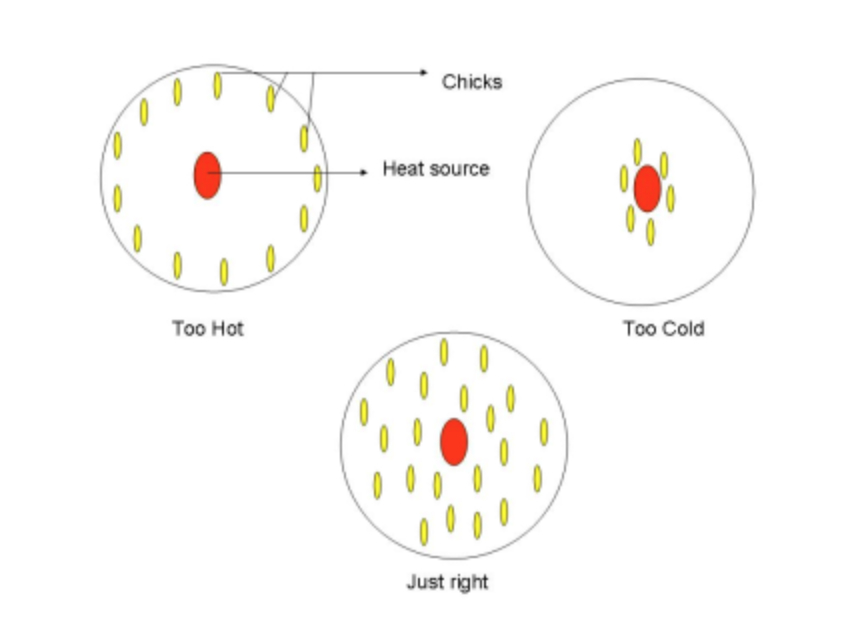
Temperatures
Temperature above the floor should be kept at 32deg C for the first week, and then lowered by 4deg C for each week up to the 4th week.Observe the reaction of chicks to the heat:At correct brooding temperatures, chicks are evenly spread within the brooder ring At low temperature they crowd around the heat source At high temperature the chicks will move away from the heat source
Brooding – temperature (c) A. Wachira, KARI, Kenya
Other Conditions
Fresh air and light should be allowed in the brooder but no drift.
The litter in the brooder should always be dry.
Clean and disinfect brooder areas 1 to 2 weeks before bringing in new chicks.
Beware of brooder fires. Take precautions when using charcoal Jikos
As soon as the day old chicks arrive on the farm it is a good idea to make sure each individual bird gets to drink fresh clean water. They can be dehydrated from travelling. Then release them into the warm brooder ring. Show a few of the chicks where the feed is and the others will learn by example.
The welfare of poultry includes its physical and mental state. Good poultry welfare implies both fitness and a sense of well-being for the animal. Any poultry kept by man, must at least be protected from unnecessary suffering. An animal’s welfare, whether on farm, in transit, at market or at a place of slaughter should be considered in terms of ‘five freedoms’. These freedoms define ideal states rather than standards for acceptable welfare. They form a logical and comprehensive framework for analysis of welfare within any system together with the steps and compromises necessary to safeguard and improve welfare within the proper constraints of an effective livestock industry.
1) Freedom from Hunger and Thirst – by ready access to fresh water and a diet to maintain full health and vigor. 2) Freedom from Discomfort – by providing an appropriate environment including shelter and a comfortable resting area.
3) Freedom from Pain, Injury or Disease – by prevention or rapid diagnosis and treatment.
4) Freedom to Express Normal Behaviour – by providing sufficient space, proper facilities and company of the animal’s own kind.
5) Freedom from Fear and Distress – by ensuring conditions and treatment which avoid mental suffering.
Living conditions of chickens must be established and maintained to “accommodate the health and natural behavior of animals, including access the outdoors, shade, shelter, exercise areas, fresh air, and direct sunlight. Continuous confinement is not permitted.
The welfare of chicken includes its physical and mental state. Good poultry welfare implies both fitness and a sense of well-being for the animal. Any poultry kept by human, must at least be protected from unnecessary suffering.
1. Introduction
Origin of chicken
The term poultry refers to domesticated birds kept for meat, eggs and feather production. Domestication of poultry is thought to have started in South Asia, at least 2000 years ago. The Asian Red Jungle Fowl is generally assumed to be the ancestor of the modern poultry breeds, but maybe the first domestication of the fowl took place much earlier in China. Following this domestication various breeds have originated from isolated groups of poultry, partly by adaptation to the various environments or cultivation by man. Today’s poultry breeds are all different based on appearance and performance.
Understand chicken as the animals they are, information on behaviour
Chicken are animals with a coherent social structure. If they are in groups up to 25 animals, they have a pecking order based on strength, but they can recognize up to 100 other hens. They communicate a lot both using body, tail and voice. They are hunted and eaten by many, and a large part of their alertness, communication and behavior is about predators and e.g. warning each other against them. This emphasizes their need for being managed in a calm way. As humans, we should never make sharp, loud sounds or sudden movements, when we are with our chicken.
They have a wide range of comfort and grooming behavior, such as preening (maintenance of feathers), stretching wings, and keeping themselves clean and well managed. They have a strong incentive for dust bathing, which is a way of preventing attack of external parasites and as such very important for their well-being. They will normally scavenge for feed, both for seeds, greens, vegetables and worms and other small animals. Their search for feed leads to a lot of ground-scratching and pecking, and they have a great need for this type of behavior. They have a need for sleeping and undisturbed resting, and will find the highest point to be protected. Hens can become ‘broody’ which means that they are highly motivated to have chicken, and become very frustrated if they are not allowed to nest building. On the other hand, they cannot be forced to become broody; some breeds become broody more easily than others. They have a strong sense of being mothers and taking care of their small chicken and protect them.
East African and Kenyan poultry population
Village chicken production systems are mostly based on the local scavenging domestic fowl (Gallus domesticus), which predominates in African villages.
Kenya has an estimated poultry population of 29 million birds, with chicken forming the largest proportion. Of these 76% consist of indigenous chicken, layers 9 %, and 13% broilers. Other poultry species like ducks, geese, turkeys, pigeons, ostriches, guinea fowls, and quails make up 2 % of the poultry population. Poultry is one of the most important livestock enterprises in rural households where over 70% (24 million) of the country’s population live and derive their livelihood. Indigenous chicken are kept by 90% of rural households while broilers and layers are mainly reared by urban and peri-urban farmers who target the ready market. Other poultry are kept by farmers with special interests.
On average, each household in Kenya keeps about 10 chickens, mainly for domestic consumption. There is a relatively high mortality because of lack of drinking water and disease control, and predators. On average, a farmer loses up to 40 percent of their stock annually due to these easily controllable challenges. With proper management practices indigenous chicken can become very productive and have a very good potential for improving the income of the owners.
Village chicken systems in rural Africa are characteristically:
an indigenous and integral part of the farming systems, with short life cycles and quick turnovers
low input production systems, the majority free range chicken
a means of converting low-quality feed into high quality protein
Hybrid layers
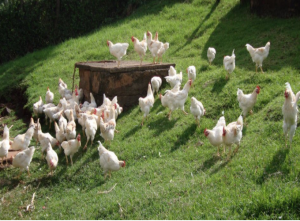
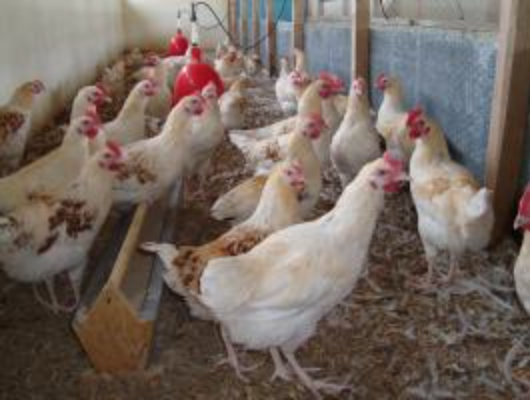
Hybrid layers are mostly kept near potential markets for eggs (such as cities and towns) where space is limited but readymade commercial feed are easily available. In non-organic farms, layers are often kept in individual battery cages, but organic poultry are always is free range with outdoor access. In Kenya they are often reared in deep litter houses where there is free movement and perches are provided.
Broilers
Broilers are heavy breeds, often hybrid breeds specially bred for meat production, and bought as young chicks. In organic farms, less fast-growing broilers should be preferred, and they should have outdoor access. Conventional broiler hybrids are very fast growing birds and need specially manufactured feeds and very controlled conditions, and their bones are often weak. These breeds must be discouraged in organic farms, and they should be allowed exercise areas, preferably outside.
Generally, robust and suitable breeds should be chosen in organic herds. It is ethically right to choose animals which can both lay eggs and where the males can be used for meat production. In many industrial countries, the breeds are specific for either egg production or meat production, and this means that e.g. the males from egg producing breeds are killed just after hatching, because they are not good for meat production. This is an ethical dilemma of organic production.
2. Chicken management and raising according organic standards
The following are required:
Poultry or poultry products must come from chicken that have been under organic management from the second day of life. If one cannot verify this they are not raising organic chickens.
Organic chicken must not be beak trimmed, which is a practice in some conventional poultry productions.
All feed, except minerals and vitamins, must be organically produced. Non-synthetic vitamins are preferred, but synthetic sources are allowed if non-synthetics are not available.
The following feeds are prohibited:
i. Animal byproducts from mammals and poultry, such as meat and bone meal, are not allowed in feed rations.
ii. Fishmeal is not permitted, (except it can be proved that it is organically produced).
iii. Synthetic amino acids are not permitted.
iv. Non synthetic but non agricultural products are permitted.
Organic guidelines
The handling of feed ingredients must comply with organic requirements. Some people may buy organic feed from mills or grow their own ingredients for feed, but organic guidelines must be followed with either choice.
No drugs may be used to promote growth.
Transporting Live Chicken upside down is not allowed, regardless of the distance
Physical alterations such as beak trimming and toe trimming are not allowed, exceptions could be when the welfare of the animal or flock is threatened. Beak trimming and toe trimming are still discouraged and would be handled on a case by case basis.
Living conditions must be established and maintained to “accommodate the health and natural behavior of animals, including access the outdoors, shade, shelter, exercise areas, fresh air, and direct sunlight. “Continuous confinement is not permitted, but temporary confinement is allowed if adequately justified.
Dust wallows are required, as is clean, dry bedding. Any bedding that is of a type typically consumed by poultry must meet all organic standards.
Birds are not permitted to come into contact with treated wood used to construct chicken pens.
Health care measures must include preventive practices such as good nutrition, sanitation, healthy living conditions and vaccinations. Preventive use of antibiotics is not permitted. Synthetic parasiticides including coccidiostats are not permitted. Although some natural alternative products are allowed, health problems must be controlled primarily through good management.
Birds that do become sick cannot be withheld from medical treatment just to preserve their organic status. They should be medicated and then sold into the conventional marketplace.
Chicken manure must be managed in a way that does not contribute to contamination of crops, soil, or water and that optimizes the recycling of nutrients.
3. Breeds and Breeding
Kenya currently has limited chicken breeds namely indigenous chicken, the hybrid layers, and broilers.
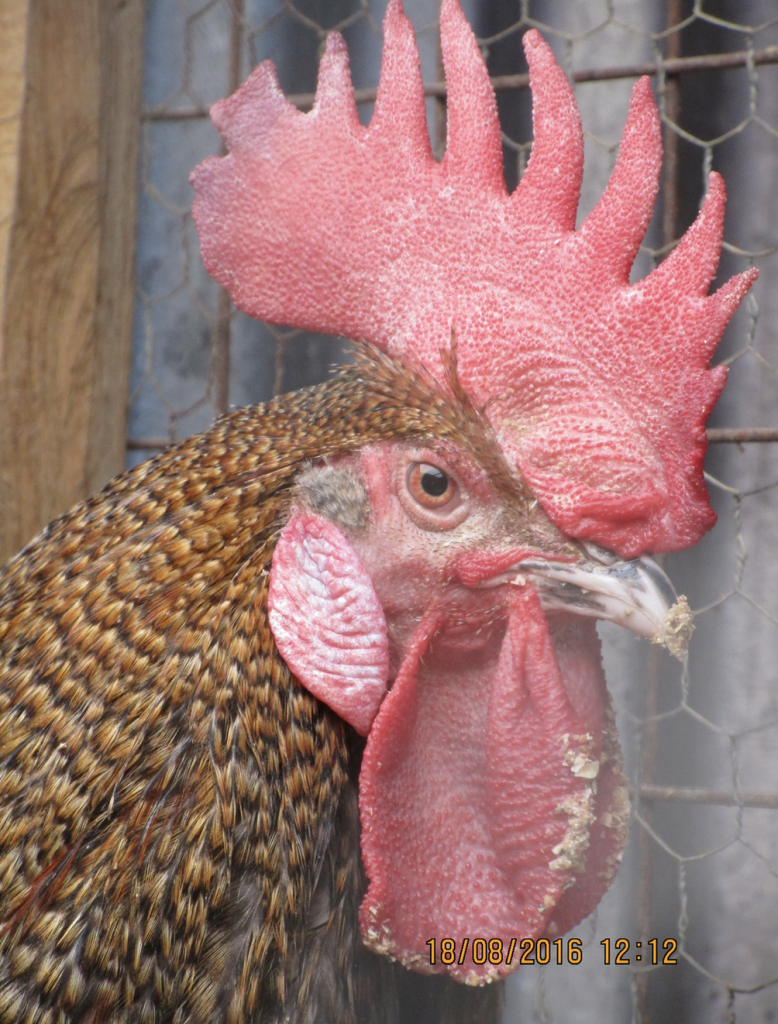
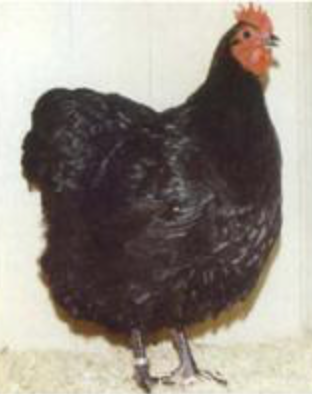
Indigenous chicken breeds
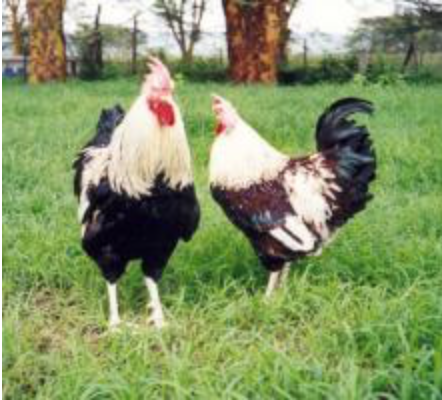
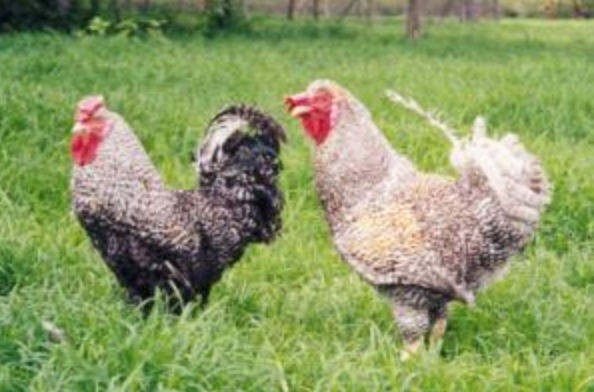
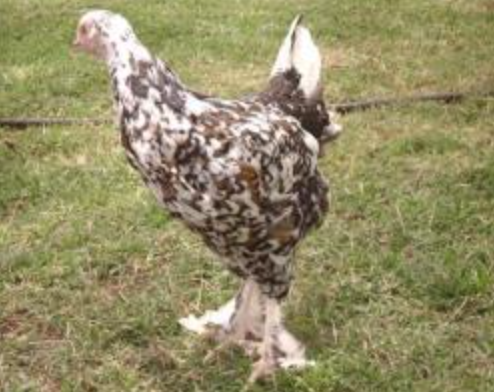
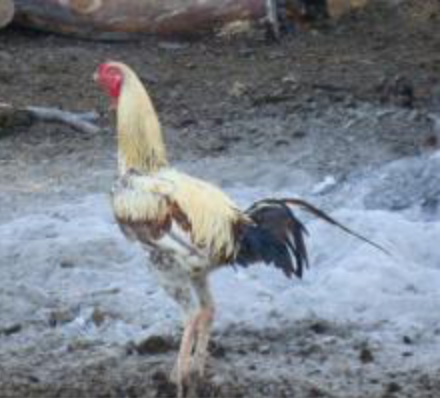
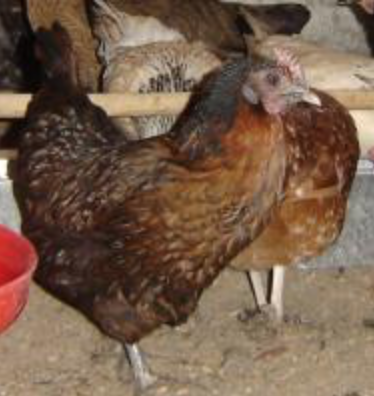
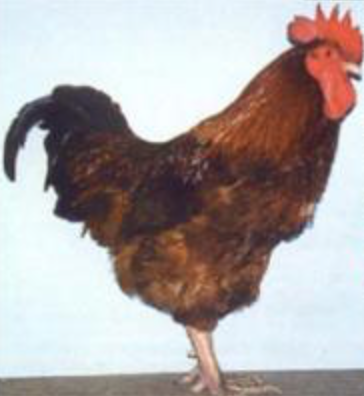
Local chicken breeds are the most abundant livestock species in Kenya with an estimated population of 23 million birds. Indigenous chicken are mostly kept under a free range system in small flocks of less than 30 birds. They are more robust and adapted to local conditions than the hybrids but have a lower productivity. Below some normal features in indigenous chicken. As can be seen many of the above pure breeds features can be found among indigenous chicken, indicating a great amount of mixed genes. Breeding indigenous chicken for improvement of the breed is very feasible for the specialist.
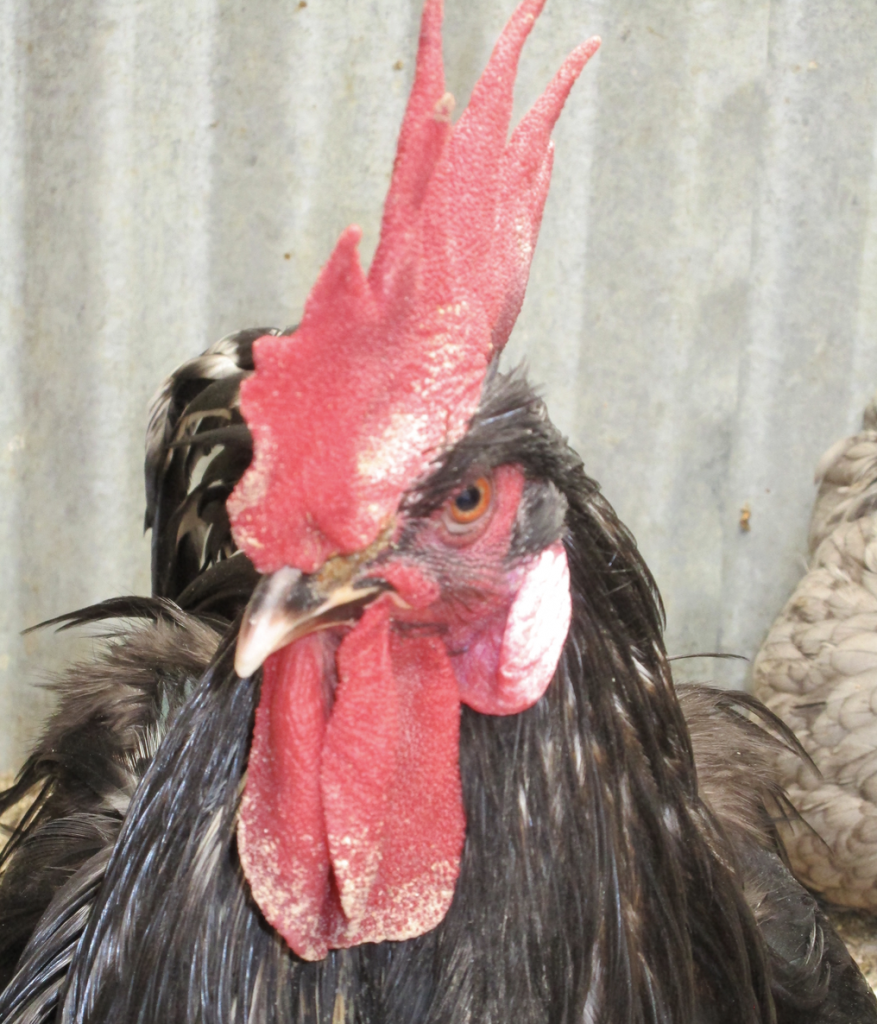
Indigenous cocks (c) A. Wachira, KARI, Kenya
Indigenous cocks (c) A. Wachira, KARI, Kenya
Frizzled feathered chicken (c) A. Wachira, KARI, Kenya
Feathered shank hen (c) A. Wachira, KARI, Kenya
Kuchi game bird (c) A. Wachira, KARI, Kenya
Normal feathered indigneous chicken (c) A. Wachira, KARI, Kenya
Layer breeds
These are chicken breeds selected for laying eggs and maybe divided into several categories: Light breeds
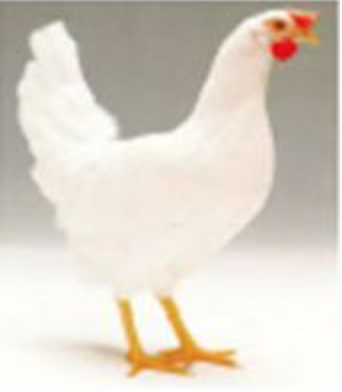
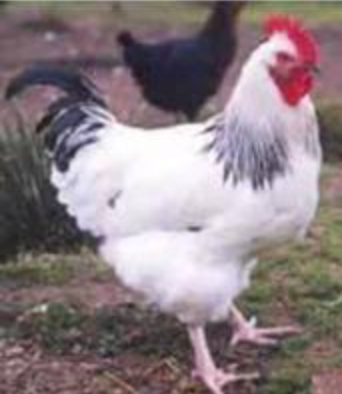
White Leghorn (c) A. Wachira, KARI, Kenya
Light laying breeds include the White Leghorn, Brown Leghorn and Black Minorca. The maximum adult bodyweight of light races is about 2 kg for females and 2.5 kg for cocks. The White Leghorn is known to lay a large number of white eggs. It requires less feed due to its small size and is an efficient feed converter. Its low body weight allows it to withstand high temperatures better than other breeds. However, White leghorns are generally nervous and at the end of the laying period give relatively less meat than heavier breeds. For this reason the use of lighter breeds has generally changed in favour of crosses.
Medium breeds
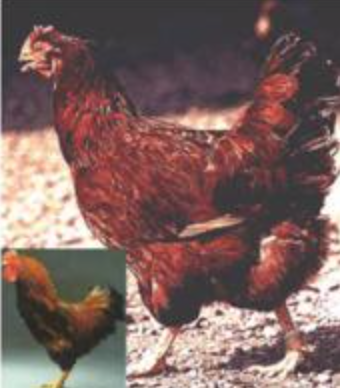
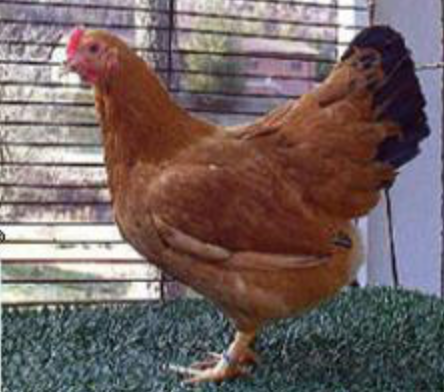
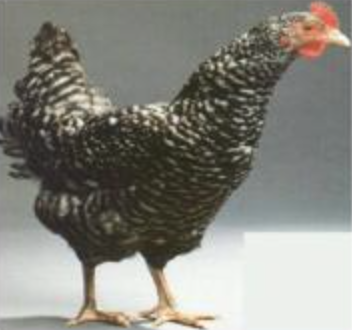
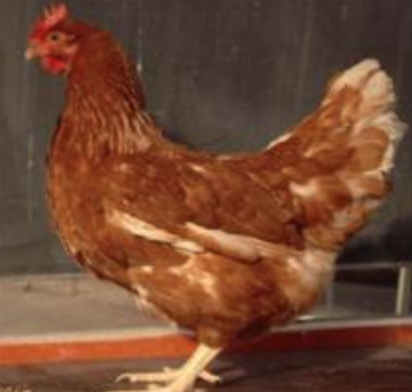
These are the Rhode Island Red (RIR), New Hampshire (NH) and light Sussex (LS). The RIR has dark brown feathers, lays brown eggs and is heavier but more susceptible to high temperatures than the White Leghorn. In poor conditions RIR is more viable than the light breed and has a higher carcass value. The NH has light brown feathers with similar characteristic to RIR. The LS is a white bird with black striped neck feathers and black tail.
RIR (c) A. Wachira, KARI, Kenya
New Hampshire (c) A. Wachira, KARI, Kenya
New Hampshire (c) A. Wachira, KARI, Kenya
Light Sussex (c) A. Wachira, KARI, Kenya
Australorp (c) A. Wachira, KARI, Kenya
Heavy breeds
Heavy breeds include Barred and white Plymouth Rock, Buff Orpington as well as White Jersey Giant and Arbor Acres Hubbard Vantress. These breeds are used for crossing to obtain the fast growing broiler strains available from hatcheries. These are mainly the meat birds commonly referred to as broilers. Breeder stocks consist of the White Cornish (WS) and White Plymouth Rock (WPR). The White Cornish is a heavy, white feathered breed that lays brown shelled eggs. It has been developed for quality and quantity of meat. White Plymouth Rock is similar to the WS but lays more eggs.
Broilers (c) A. Wachira, KARI, Kenya
Plymouth hen (c) A. Wachira, KARI, Kenya
Buff Orpington (c) A. Wachira, KARI, Kenya
Hybrids
These are crossbreds originating from breed crossing. Their performance and viability (hybrid vigour) is better than the pure breeds. Breed crossing is practised in most developing countries including Kenya. Large scale poultry enterprises always use hybrids originating from line crossing due to their superior performance. Commercial Pure and hybrid birds are produced and sold by a limited number of breeding companies to poultry farms in almost every country of the world.
Hybrid Cockerels (c) A. Wachira, KARI, Kenya
Hybrid layer (c) A. Wachira, KARI, Kenya
Day old hybrid chicks (c) A. Wachira, KARI, Kenya
Commercial sources of breeding stock in Kenya Buy day-old chicks from hatcheries such as:
Credit:CADEP-SFM is implemented by the Ministry of Environment and Forestry, Kenya Forest Service(KFS), Kenya Forestry Research Institute(KEFRI) and Japan International Cooperation Agency (JICA).
CH 1:
Intro
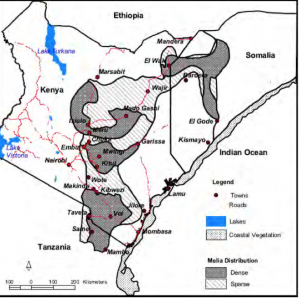
1.1 Melia volkensii and its Natural Distribution Melia volkensii is a multipurpose deciduous tree that is endemic to drylands of EasternAfrica with natural distribution range in Ethiopia, Kenya, Somalia and Tanzania (Figure 1). It grows in sandy-clay and shallow stony soils but prefers sandy soils with good drainage from 0-1,700 m above sea level in areas with mean annual rainfall of between 300 – 800 mm and temperature range of 26-38oC. The species belongs to the Meliaceae family and is locally known as Mukau (Kamba, Tharaka, Mbeere), Tile (Boran), Bamba (Oromo), Maramarui (Samburu), Boba (Somali) and Kirumbutu (Taita) (Kamondo et al., 2016).
Figure 1: Distribution of Melia volkensii in Eastern Africa
1.2 Importance of Melia
Melia is a fast-growing tree attaining a height of up to 20 m and 40 cm diameter in 10 to 18 years, depending on site conditions. It is highly preferred in the drylands because of its drought tolerance, high quality and termite resistant timber. Other products of Melia include poles, posts, fodder, medicine, firewood and bee forage (Luvanda et al., 2015). However, a supply of these products has declined over the years because of over- reliance on natural Melia populations, over-exploitation, and conversion of woodlands into farms.
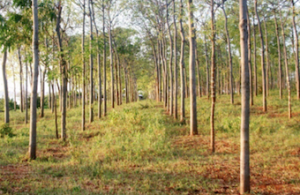
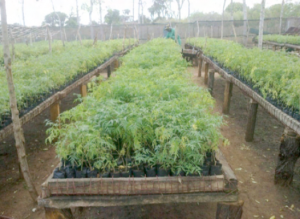
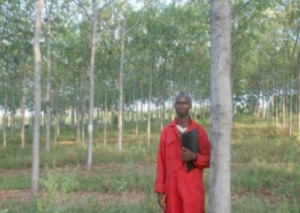
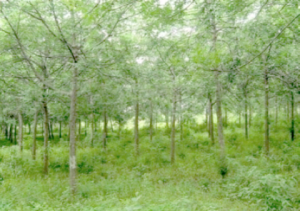
Plate 1: Melia plantation in Kitui, 10-year old with spacing 4 m x 4 m at the shores of Kiambere dam
1.3 Objectives of the Guidelines
Initial attempts to promote plantingof Melia on-farm were constrainedby propagation challenges. However, with breakthroughs in breaking of its seed dormancy, development of technologies for raising seedlings and tree establishment, and promising Melia enterprises, the species is increasingly being adopted as a plantation species in semi-arid areas of Kenya.
The potential for forest and tree growing expansion is more in the arid and semi- arid lands (ASALs) of Kenya. This is unlike high potential areas where there is intense competition for land between forestry and agriculture. This document will be continuously updated as new research and/or information emerge.
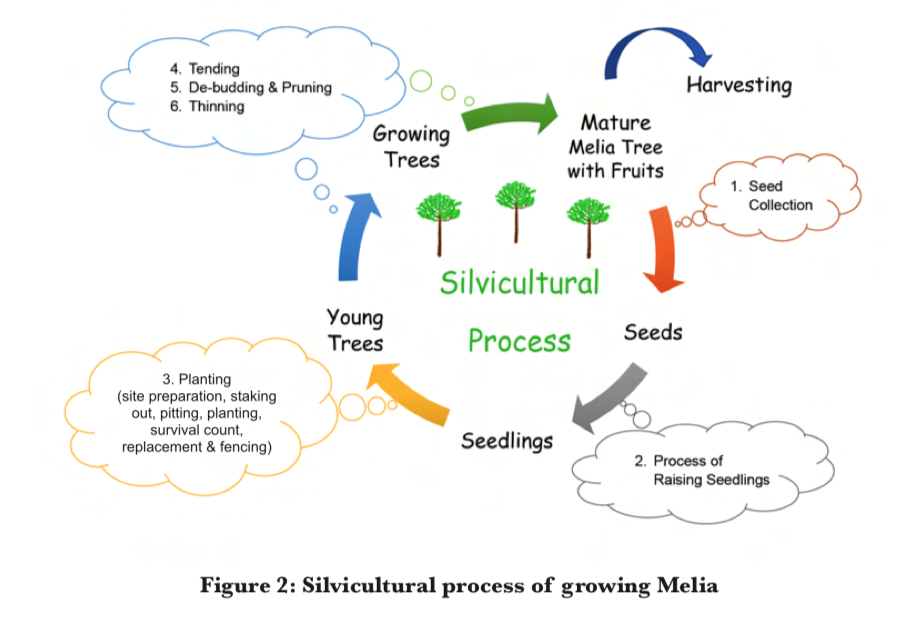
The Guidelines outline the entire process of growing Melia including: seed collection, seed processing and handling for production of healthy seedlings. More emphasis is laid on the field management aspects of site selection, land preparation, planting, tending and all silvicultural treatments of Melia to its harvesting (Figure 2). The Guidelines also provide a cost-benefit analysis of growing Melia for income generation to facilitate farmers or tree growers to make informed investment decisions.
CH 2:
Collection and processing of melia seed.
2.1 Collection of Melia Fruits
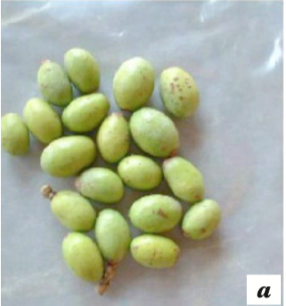
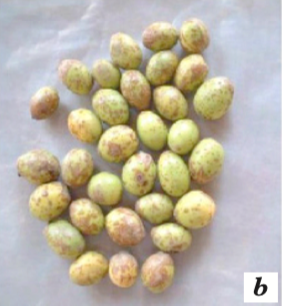
Melia fruits should be collected from the tree crown when they are ripe. While yellowish in colour, fruits may be mature but not ready for collection until they have developedbrown patches (Plate 2a and b). Collection is done from the crown by either hand-picking, use of looping shears to cut branchlets bearing ripe fruits or shaking with a Y-forked stick. Fruits that fall on shaking should be sorted to remove: over-mature fruits that are blackish; immature fruits that are dark green; undersize fruit; and fruits that show sign of rotting (Plate 2c). Naturally fallen Melia fruits should be avoided as they are either immature or infested. During fruit collection, they should be put in bags, which are not air-tight to avoid rotting. The fruits are temporarily stored under shade before being transported for processing.
maturity (a) Mature but not ripe, (b) Ripe and ready for collection (c) Over-ripe
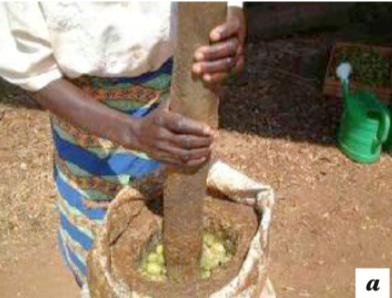
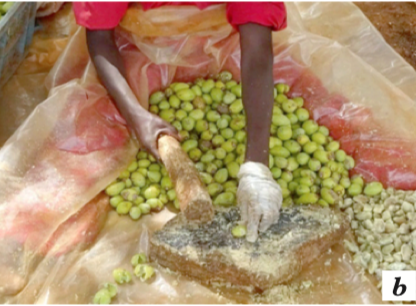
2.2 Seed Processing 2.2.1 De-pulping Immediately after harvesting, Melia fruits are de-pulped using a pestle and mortar (Plate 3a). Alternatively, de-pulping can be done by placing an individual fruit on a piece of timber or stone and hitting with a plank of wood (Plate 3b).
Plate 3: De-pulping of Melia fruits using: (a) Pestle and mortar
(b) A wooden plank and a stone
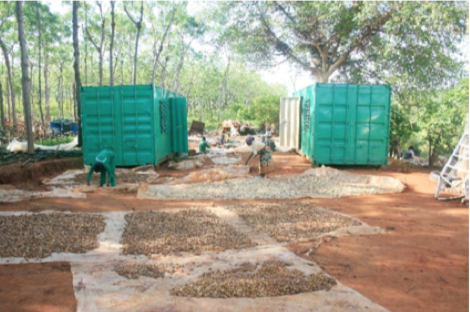
Plate 5: Drying Melia nuts under the sun
Plate 4: De-pulped fresh Melia nuts
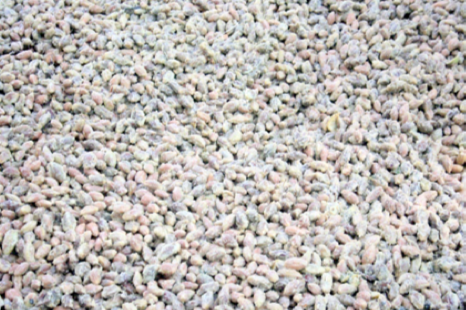
The nuts are then washed thoroughly, and sun dried for at least two days (Plates 4 and 5). Seven (7) kg of fruits yield about one (1) kg of clean nuts.
2.2.2 Seed extraction and packaging
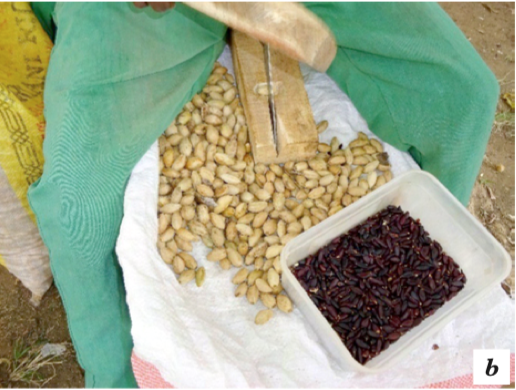
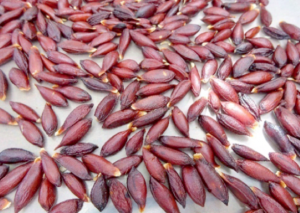
Melia seeds are extracted from nuts using either a Melia nut cracker (Plate 6a) or a knife and wooden plank (Plate 6b). The Melia nut cracker is a tool developed by KEFRI and has adjustable mechanism for cracking nuts of different sizes. When a knife and wooden plank are used in extracting seed, the nut is placed in a groove carved out on the plank of wood. Different sizes of grooves may be made on one plank of wood to accommodate nuts of different sizes. The nut is placed in the groove and a cut is made at right angle, i.e. perpendicular to the nut length, slightly off-centre near the blunt end of the nut. Seeds extracted from freshly de-pulped ripe fruits are brown while those extracted from old de-pulped nuts are black (Plate 7).
Plate 6: Extraction of Melia seeds from nuts using: (a)
Melia nut-cracker and (b) Wooden plank and knife
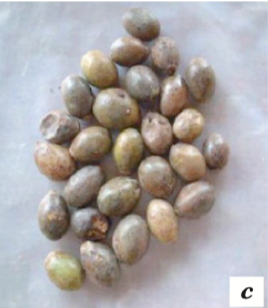
Plate 7: Dried Melia seeds
It is recommended that extracted seeds are sown immediately. It is advisable to extract seeds only by order, so that any extracted seeds are packed and dispatched without delay. The seeds should be used within one month to avoid loss of viability.
Tree growers are encouraged to source their improved certified Melia seeds from the KEFRI Tree Seed Centre in Muguga or Kitui. The current prices of Melia seeds at KEFRI are Ksh. 4,000 per kg for local type and Ksh. 6,000 per kg for improved type as of March 2018.
The advantages of using improved certified seeds are: clean seeds, guaranteed quality assurance, new genetics (better yields, drought tolerance, pest resistance), faster growth and high germination rates.
For any further information, please access KEFRI’s website: www.kefri.org/wpcontent/uploads/PDF/SEED%20CATALOG.pdf.
CH 3:
Raising of melia seedlings
Activities involved in raising of Melia seedlings include: locating and preparing a nursery; seed pre-treatment and sowing; potting and pricking out; and management of the seedlings in the nursery including protecting the seedlings from pests and diseases.
3.1 Nursery Location
The size of the nursery will depend on number of Melia seedlings being raised. It is important that the site selected for the nursery has adequate land to raise the number of Melia seedlings required and for future expansion. Generally, the nursery should besited in an accessible open space that is well protected and secure from animals andcold winds as Melia prefers high temperatures. A reliable water supply is a prerequisite. The topography should preferably slope gently to allow for drainage since Melia cannot withstand water-logging conditions.
3.2 Nursery Seedbeds
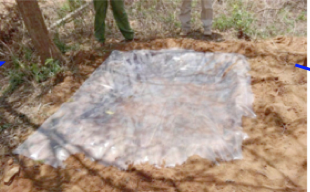
Melia seed should be sown in a seedbed filled with sterilised river sand. The sand can be sterilised by drenching it using 450 millilitres (ml) of sodium hypochlorite e.g. JIK in20 litres of water and sprayed with a fungicide. Melia is best sown in raised seedbeds covered by clear polythene sheet. A non-mist propagator can also serve as a suitable substitute. A non-mist propagator consists of a simple frame of timber covered withclear polythene sheet (Plate 8).
Plate 8: Non-mist propagators for Melia seed sowing
The propagator is filled with the clean river sand to a depth of 15-20 cm and its lid closed to avoid contamination. Small propagators can also be improvised using perforated washing basins covered with polyethylene sheet and tightly wrapped with rubber-band to hold the sheet in place. Tunnels can also be used (Plate 9).
Plate 9: Seeds sown in the tunnel under plastic the sheet
3.3 Seed Pre-treatment
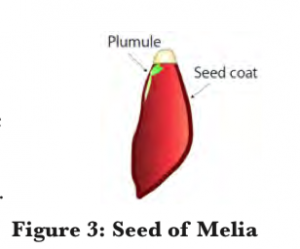
To break dormancy and improve germination (Figure 3),
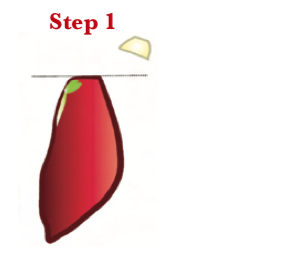
Melia seeds are pre-treated as follows (Figure 4):
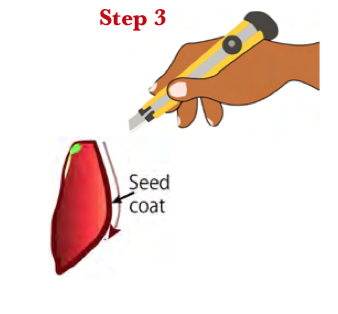
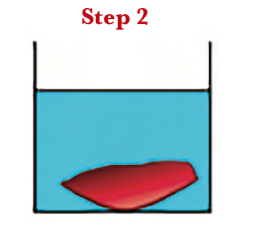
Step 1: Nipping the seeds by breaking the sharp tip of the seed between the fingers.
Step 2: Soaking the seeds in cold water for 12 to 24 hours.
Step 3: Slitting the seed coat longitudinally.
As Melia seeds are very sensitive to fungal attack. It is important to maintain a clean sterile environment during the pre-treatment process. Slitting is achieved by cutting the seed coat longitudinally from the tip that was nipped downward to the other end with a clean sterile sharp blade, taking care not to injure the radicle and endosperm.
Figure 4: Steps of Melia Seed pre-treatment
3.4 Seed Sowing
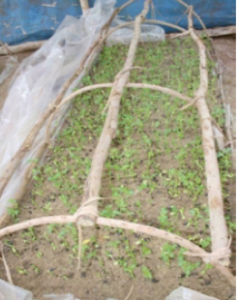
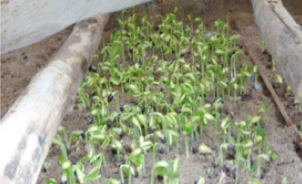
Sowing in the seedbed is done immediately after slitting the seed coat. The pre-treated seeds are spread on clean river sand that has been thoroughly watered and covered with a layer of sand equal to double the thickness of the seed. After sowing, the seedbed is drenched with suitable fungicide. The propagator is closed tightly to ensure that the chamber inside the seedbed remains humid. The months of June, July and the rainy seasons are not favourable for Melia germination due to low temperatures. Germination of Melia seeds occurs within 3-6 days (Plate10).
Plate 10 : Melia seedlings germinated in non-mist propagator
3.5 Potting and Pricking Out
Suitable potting media consists of a well-drained mixture of soil, sand and manure in the ratio of 3:1:1. The media is filled into seedling containers and watered thoroughly. The recommended pricking out (transfer of germinated seedlings to the planting containers) time is 1-3 days after germination. Delayed pricking out of seedlings may cause high mortality and deformed seedlings.
Plate 11: Young Melia seedling from natural germination in discarded sand(right)
3.6 Management of Melia Seedlings in the Nursery
3.6.1 Shading young seedlings
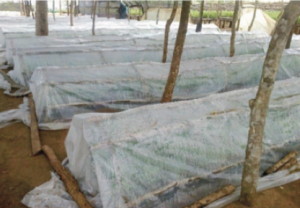
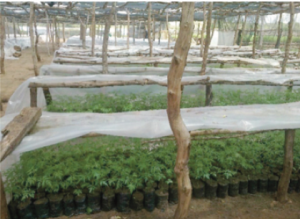
At the time of removing the young seedlings from the seedbed, they are tender and may suffer desiccation and mortality if exposed to direct sunlight. They should be shaded with a shade net or any other suitable material. Initially, a heavy shade (70%) is recommended within the first two weeks. This shall be reduced for 4 weeks after which the seedlings shade should be removed completely. During the rainy season, seedlings should be covered to avoid water-logging that could lead to fungal attack.
Seedlings can also be put in a tunnel during the first 2-3 weeks to protect them against cold spells at night (Plate12). Tunnels are opened during the day and closed at night to observe right temperature and moisture levels.
Plate 12: Seedlings in their first stagesafter pricking out, protected by plastic tunnels and also shade-netting
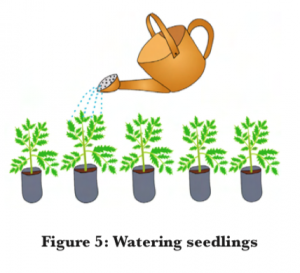
3.6.2 Watering
Melia seedlings are sensitive to water-logging. Therefore, they should be watered only when the potting media is dry. It is good to water seedlings using a watering can or something with small watering holes to reduce the power of water drops which may cause soil erosion and damage the young tender seedlings. The soil should be maintained moist by giving adequate amount of water. Watering of seedlings should be done either early morning or late afternoon (Figure 5).
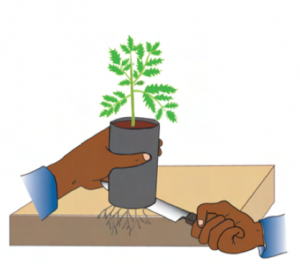
3.6.3 Root pruning and hardening-off
Root pruning refers to cutting of roots that extend from the potting container to the ground. Unpruned roots is confirmed by seedlings sticking on the ground. Root pruning can be achieved either by lifting seedlings off the ground, systematic transfer of seedlings or cutting any roots that have penetrated the ground with a clean sharp knife (Figure 6), (TEAC; FAO, 2013).
Figure 6: Root pruning using a clean knife
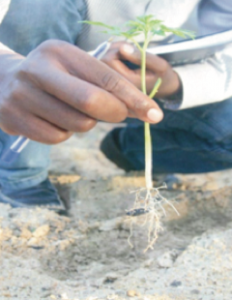
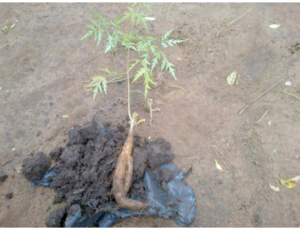
Plate 13: Melia’s carrot-like root, in this case deformed because of hitting the bottom of the bag
Melia seedlings develop a carrot-likeroot which is full of nutrients andoils that allow them to survive dry circumstances (Plate 13).
Hardening-off is the gradual exposure of seedlings to field conditions just before out-planting. This is achieved by reducing the watering frequency and exposing the seedlings to full sunlight. Seedlings are ready for planting out in the field when they are 30 cm tall.
Plate 14: Hardening-off of seedlingsin full sunlight and aerial root pruning (open ended polybags or sleeves)
CH 4:
Diseases and Pest management of Melia in the nursery
Early and prompt monitoring of diseases and pests is important to avoid their spread in the nurseries and in the field.
4.1 Diseases of Melia Seedlings
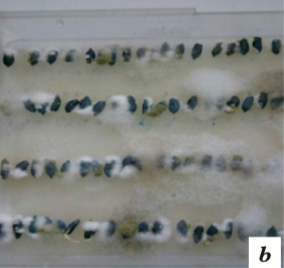
Diseases of Melia seedlings in the nursery are caused by fungi mainly Fusarium spp (Plate 15a). Fungal attack causes seed rot (Plate 15b), root rot (Plate 15c) and eventually no germination or death. Depending on severity of the attack, impacts vary from losses of just a few seedlings to 100% seedling loss. Melia seedlings are also affected by powdery mildews, which attack the surface of leaves and interfere with photosynthesis, resulting in yellowing and stunted growth of seedlings.
Plate 15: (a) Fusarium spp,
(b) Seed rot
(c) root rot
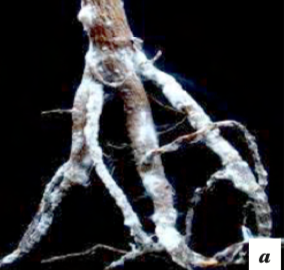
4.2 Pest Problems Associated with Melia Seedlings
Nematode attack in Melia nurseries is often characterized by soft rot of roots and root- collar rot, yellowing and death of seedlings mainly due to over-watering. Other pests that attack Melia seedlings are spider mites (Plate16). Mites suck sap from the leaves of Melia seedlings, which turn yellowish grey or whitish grey and sometimes cause death. Mite infections are favoured by hot and dry weather.
Plate 16: Red spider mite infection on: (a) Melia leaves and (b) Rotten Melia seedling11
4.3 Managing Nematodes in the Melia Nursery
In the nursery, the following steps should be undertaken to reduce or prevent seriousincidences of nematode attack:
• Sterilize nursery media by subjecting it to high temperatures by heating/baking (over 70OC). Allow the soil to cool before it is used for sowing of seeds.
Fumigate soils infected by nematodes.
Cover the soils with black polythene and leave it undisturbed for 2 months. Alternatively,drench the soils with nematicides twice orthrice before planting.
Add nematicide powder such as Nemacuror Mocap to nursery pots during thetransplanting of seedlings (Plate 17).
Avoid over-watering of Melia seedlings.
Mixing Neem extract with the media to actas a repellent to the nematodes.
Plate 17: Death caused by nematode and root infection
4.4 Managing Spider Mites on Melia Seedlings
In managing spider mites, the following steps can be undertaken:
Spray seedlings with termiticide or acaricide at 10 to 14-day intervals until the mite population goes down.
Spray a solution of wettable Sulphur (cheap and non-toxic to humans).
Change the chemicals used after about 4 sprays to avoid the mite developingresistance.
4.5 General Management of Pests and Diseases in Melia Seedlings Production
The following steps can be used to reduce incidence of pests and diseases:
• Pre-soak Melia seed in fungicide solutions for 12 – 24 hours before sowing. • Pre-treat the nipped seeds first with dilute sodium hypochlorite e.g. JIK beforesowing and subsequently spray them every 14 days during the first month. • Control mildews by spraying with Copper oxychloride or Agrocop 50 wp (Copper based fungicides) 45g/20 litres of water at intervals of 21 days until the mildew clears. • Rotate the nursery site to reduce build-up of pests and diseases. • Use of biological control agent (BCA), Trichoderma against Fusarium.
Trichoderma can be purchased from some companies, such as Real IPM Ltd. (Thika, Kiambu County), Dudutec (Naivasha, Nakuru County) and JUANCO (Ngong, Nairobi County).
• As a rule of thumb, plant only healthy seedlings and avoid seedlings from areas of infestation.
CH 5:
Management of melia plantations
5.1 Selection of Planting Site
An appropriate site for Melia planting should be gently sloping such that no water logging can take place. The species requires well drained soils that are either sandy, sandy loam or sandy clay. The tree is fast growing and therefore, requires soils with high plant nutrients. Rocky and poor sites should be avoided (Plate 18).
For the purpose of management, thesites should be accessible to facilitate theimplementation of the various silvicultural operations such as the site preparation, delivery of seedlings, planting, weeding, de-budding, pruning, thinning and harvesting of the trees.
Plate 18: Example of unsuitable site for Melia plantation (rocky land)
5.2 Preparation of Planting Site
Most sites in the drylands are normally underlain by a hardpan that may interfere withthe survival and growth of out-planted seedlings. For Melia, the hardpan limitation is mitigated by deep-ripping the site to break the hardpan. Deep ripping is also effective as an integral part of complete weeding of the site before out-planting the seedlings, as it improves water infiltration and reduces early root growth resistance. The uprooted shrubs and bushes may be used as dead fence to protect young seedlings.
5.3 Methods of Site Preparation
Site preparation can be done in patches (spot hoeing), strips or complete cultivation. Strip cultivation is practiced where some natural vegetation is to be conserved especially on sloping ground to prevent soil movement. It involves clearing strips 1-3 m wide along the contours and spaced at 10 to 30 m depending on the objective of the management. Bushes are cleared along strips followed by ploughing depending on the site conditions. In areas where complete or strip cultivation is not possible, spot hoeing should be done.
The site preparation can be carried out manually or mechanically. The manual preparation involves use of machetes to clear the bushes and shrubs, and hoes to dig out their stumps. After bush clearing, the site is tilled manually by hoe to loosen the soil ready for planting. However, this is time consuming and only possible for a small-scale planting programme. Alternatively, it may be done mechanically using oxen ploughs, tractors and earth moving equipment (bulldozers, excavators). The latter require heavy capital outlay and are applicable in large-scale plantings though they are more appropriate than the others because they enhance the breaking of the hardpan and deep sub-soiling, which greatly improves survival and growth of seedlings. Any planting site can be sprayed with a weed-killer, as pre-planting land preparation. A chemical like glyphosate, is suitable for spraying. This is a cheaper way of land preparation.
Plate 19: Dead dry branches fence
Plate 20: A 10-year-old Melia plantation in Tiva with dead dry branches fence in the background
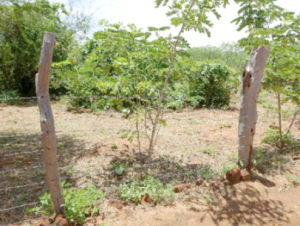
Plate 21: Young Melia seedling protected by a fence (used when a few trees are planted)
Plate 22: Barbed wire fence for tree plantation
5.4 Fencing
The selected site should therefore, be fenced to protect the young seedlings from browsing animals. There are different types of fences that can be used for Melia plantation (Plates 19-22). Donkeys, goats and cows are known to de-bark Melia trees, hence it is recommended that the fence should be maintained throughout the life of the plantation/woodlot.
5.5 Spacing
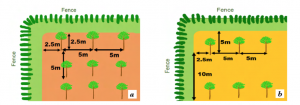
Tentatively, Melia should be planted at a spacing of 5 m x 5 m, giving a stock density of 400 trees per hectare (Figure 7a). At this density, canopy closes at around 6-7 years, necessitating thinning operation to commence.
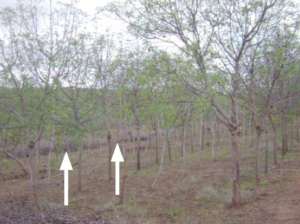
Farmers interested in intercropping Melia with legumes or short period crops such as the green gram and cow peas, can adopt a spacing of 10 m between rows and 5 m between trees. The spacing will result in 200 trees per hectare (80 trees per acre) (Figure 7b). Intercropping is beneficial to trees as they are clean-weeded until harvesting.
Figure 7: Diagrammatic spacing of Melia plantation at (a) 5 m x 5 m and (b) 10 m x 5 m
Spacing can also be influenced by lopping off branches to provide dry season fodder for livestock. Repeatedly lopped trees tend to grow a narrow canopy of columnar shape, which is more conducive to smaller spacing, hence more trees per hectare.
5.6 Planting
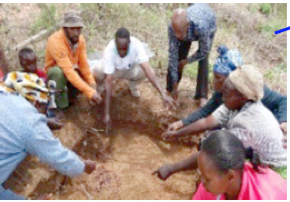
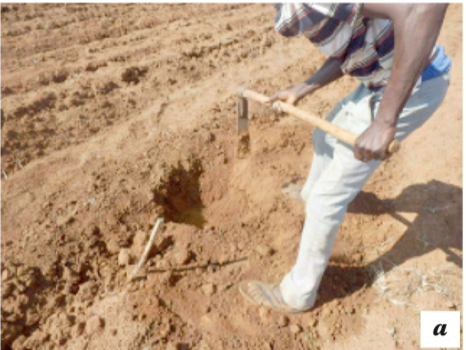
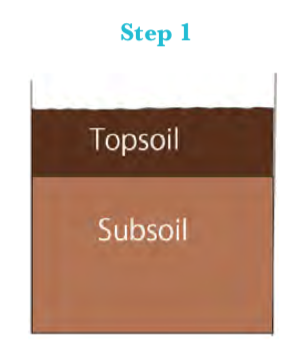
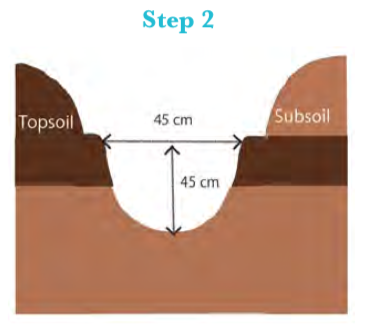
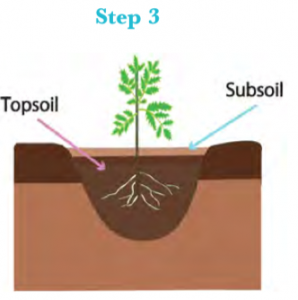
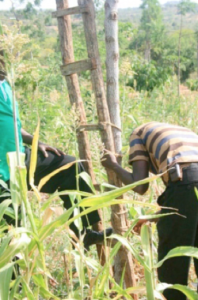
The process of planting starts with staking out the prepared site at the recommended spacing and digging out the holes or pits. The purpose of digging the planting hole is to make the soil loose so that the roots of Melia can easily penetrate into the soil. The loose soil can also hold and retain more moisture. Planting holes should be prepared during the dry season and be at least 45 cm x 45 cm x 45 cm in size. Larger pits are however, advantageous during the initial stages of tree growth as they collect, store more rain water and avail it to the growing seedling for a longer period. When digging the pit, the top soil should be put on one side and the subsoil on the opposite side (Plate 23a).
After attaining the required depth of the pit, top soil should be used to refill it first. Subsoil is then used to top up the pit (Plate 23b) to the ground level. If manure is available, this should be mixed with subsoil and used to refill the pit. This enhances the amount of plant nutrients available to the seedling directly to the roots. Once the hole has been refilled, the stake should be returned at the centre of the pit.
Plate 23: The pitting process: (a) Digging up the pit and (b) Refilling the pitThe above process is shown diagrammatically in Figure 8 below.
Figure 8. Demonstration of the preparation of the planting holes
Transplanting of the seedlings in the field should be as early in the rains as possible, but not before adequate moisture build-up has taken place (this is determined by squeezing the soil into clumps without disintegrating one day after a rain incidence). Early planting ensures the seedlings experience a prolonged wet season for proper establishment and initial growth.
During planting, the seedling container is removed at the pit by slitting one side from the top to the bottom. The root plug (the mass of roots and the soil) should not be broken during the removal of the container. However, once the seedling is placed in the pit, the root plug should be gently squeezed to loosen the soil and to ensure water moves freely into the root plug of the planted seedling.
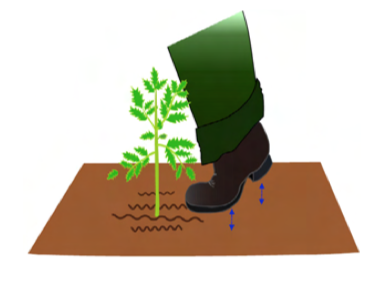
Figure 9: After firming soil by hand, squeeze it more by foot (right)
Root collar of the seedling should be maintained at the ground level while the roots are maintained in a downward position without bending them. The top soil is returned into the small pit and squeezed firmly by hand initially and then by foot while holding the seedling in an upright position.
The firm contact of the soil particles and the root hairs enhances the uptake of nutrients and moisture from the soil.
In the dry areas, water is the major limiting factor. It may therefore, be necessary to construct water harvesting structures to enhance survival and rapid early growth following cessation of the rains. Due to the sensitivity of Melia seedlings to even temporary water logging conditions, seedlings can only be planted on the downward side of the structure, approximately 15 to 20 cm outside the barrier.
Melia seedlings should not be planted inside the water harvesting structures, including in those areas receiving very limited amount of rainfall. On sloping ground, farmers are encouraged to make soil conservation structures along the contours spaced appropriately. An example is a “fanya-chini” terrace where soil is put on the lowerside of the contour trench. The resulting embankment can be used to grow fodderfor livestock. It is useful not only to conserve soil but also to divert water. If possible, the soil to fill the pit can be mixed with manure (fertilizer), ashes (lots of Potassium for drought resistance) or charcoal dust (fixing humidity), in a ratio of soil: manure: ashes: charcoal dust of 6:2:1:1.
5.7 Tending
Melia is sensitive to both vegetative competition and water logging conditions, especially during the early stages of its development. It is therefore, recommended that the planted seedlings be clean-weeded as this encourages fast growth. However, the weeding requirements vary with the site conditions, age of the trees as well as existing weed species in a given area. The annual weeding requirement shall be high if the spacing between planted seedlings is large enough to allow sufficient light to penetrate and facilitate the rapid growth of weeds.
In the areas where intercropping is practiced, trees are weeded alongside the food crops. However, in the other systems where intercropping is not practiced, seedlings should be clean-weeded at least twice during the first two years, where the operations shall be carried out immediately after the short and long rains. Use of oxen ploughs to cultivate is recommended before onset of rains to create furrows that enhance infiltration. Oxen should, however, not plough within 0.5 m of the stem to avoid damage to superficial roots. The subsequent weeding should be done towards the end of the rains to remove developing weeds. Great care should be taken to avoid breakage and injury to the young trees.
Plate 24: Seven-year-old Melia plantation in Kitui County, showing the result of regular spraying with glyphosphate in a 2 m wide strip alongside the tree lines. At this stage, the trees do not need the spraying anymore, because of canopy closure that naturally suppresses the weeds and grasses.
If there is low survival of the planted seedlings due to unreliable weather conditions or any other cause, it is important to carry out beating-up (replanting of the dead seedlings) in the next rainy season.
5.8 De-budding
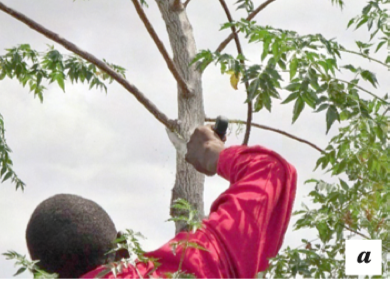
De-budding of Melia should only be done during the first year of planting. The tiny developing buds (Plate 25a) should be removed by hand while preserving the branchlets up to half height of the tree (Plate 2b and c). This exercise should be done as soon as the buds appear during the first year, after which de-budding should be stopped. Whenever it becomes difficult to remove the buds by hand, use of secateurs is recommended
Pruning of Melia should be from the second year. It should be carried out after considering three factors; 1) trees with double leaders; 2) possession of large branches (relative to stem diameter and height, e.g. larger than 1 inch); and 3) presence of whorls. If double leaders are observed, it is recommended to remove one of them as early as possible. This is to ensure that the tree has only one main leader. Removal of branches is applied selectively, by considering their size in relation to the main stem. If the branches are of large diameter and appear to be competing with the main stem, they should be pruned irrespective of their location on the tree. Smaller branches should be left as they have little effect on the main stem.
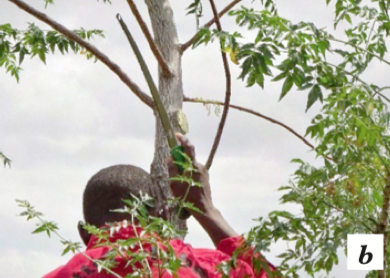
Reduction of branches at the whorls is encouraged to retain an appropriate number that leaves the tree balanced on all sides. The branches that develop from the same position on the tree should be gradually removed. Selective pruning to remove all branches with diameters above 2.5cm should be undertaken as appropriate until the trees attains a clear bole of at least 8 m orup to age 5 years (Plate 26). Selective pruning of individual trees should be up to a maximum of two thirds of their total height.
Plate 26: Properly pruned Melia to 2/3 height
Pruning should be carried out just before the onset of the rains to enhance growth and healing of the wound. Pruning tools should be disinfected by use of disinfectants, e.g. Hydrogen peroxide every time a tree is pruned. The operation should start by making an under-side cut (Plate 27a) and finish with an upper side cut (Plate 27b) to ensure there is no tearing of the bark.
Plate 27: Appropriate pruning method-finish off : (a) with an underside cut, and
(b)with an upper cut
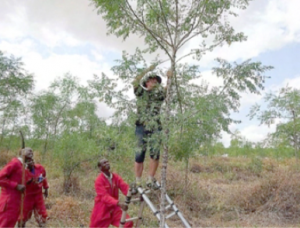
Over-pruning a tree will result in production of epicormic shoots that have to be removed again and will stimulate the tree to grow more branches higher up the stem, where less pruning takes place because it is more difficult to attain. This often results in trees with a clean bole of 3 m high and a dense canopy, while the potential length of the clean bole could be 5-6 m. This results in a serious financial loss for the grower. In particularly good sites, a clean bole of 7-8 m length can be achieved. Most pruning is achieved by year 4, and it is important to prune high up the stem, using a ladder (Plates 26 and 29). In addition, Text Box 1, provides a case study on pruning instruction by Better Globe Forestry (GBF).
Plate 28: Proper pruning. Clean bole up to 5 m
Plate 29: A home-made woodenladder to help in pruning. It is fixedwith ropes to the stem of a Melia tree.
CASE STUDY: Pruning Instruction by Better Globe Forestry
Main objectives:
Producing a clean bole of minimum 5 m longwith 10 cm DBH by year 4. All pruning scars must be inside this inner core of 10 cm diameter.
Produce a stout, fat stem for the young seedling (1-2 years) that is not top-heavy and that does not bend over through a gust of wind.
Steps:
Year one: no pruning, except for removing double leaders and whorls.
Year two: pruning after rains (May/Jun and Nov/Dec)
Year three: 2-4 passages
Year four: 2-4 passagesNotes:2 Branches are removed selectively with the biggest ones (2.5 cm) going and the smaller ones staying. This goes also for whorls.
2 Take care to leave branches along the stem to allow for increased diameter growth so that the stem gets stronger and will not bend easily in the event of strong winds i.e. DO NOT REMOVE BRANCHES LESS THAN 2.5 CM
2 This is NOT the cleaning of the stem of branches like in the case of pine or cypress trees.
2 Special attention to reduce branch density towards the TOP of the tree.
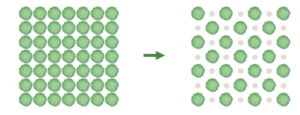
5.10 Thinning
The main objective of thinning is to enhance the growth of the remaining trees for optimum production of timber.The 1st thinning should be carried out at 6-7 years by removing 25% of the original planting density of 400 to leave 300 stems/ha. The 2nd thinning should be carried out approximately 3 yearsafter the 1st thinning or when the canopy closes up. The 2nd thinning reduces the tree density from 300 to 200 stems/ha. During the thinning operation, the dead, weak, diseased, deformed or crooked trees should be removed. In relatively poor sites, the thinning operation may be delayed as the trees grow slowly before canopy closure.
Plate 30: A Melia woodlot showing canopy closure due for thinning
In situations where the criterion applied above does not attain the required density, the remaining trees should be removed in such a way that the trees left are uniformly distributed in the plantation. The removed materials can be utilized as poles, firewood or timber depending on their size. The best time for thinning operation is during the dry seasons when the trees are not growing actively. This period is also off-farm season and easy to get human resources for the operation.
5.10.1 Types of thinning
There are several types of thinning operations that could be employed during theoperation:
a) Qualitative thinning
In qualitative thinning operation, trees with unfavourable characteristics such as the dead, weak, diseased, deformed or crooked are removed. This is the first option to be taken in thinning operation. It is also recommended to classify the standing trees according to a criterion such as good, fair and inferior to mark those trees to be removed before starting the thinning operation (Figure 10). In case the tree spacing after the theoretical removal of the marked trees is considered as relatively high, some of the marked trees can be left standing even though their characteristics are not very good. After qualitative thinning operation, the stock density should be assessed, and if the number of trees is relatively high to create sufficient spaces for remaining trees, some good trees should be removed in order to achieve the target stock density in such a way that the trees left are uniformly distributed in the plantation.
Figure 10: Example of tree classification in thinning (G=good, F=fair, I=inferior, D=deformed, S=substituted tree for proper spacing)
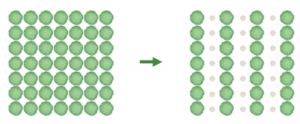
b). Quantitative thinning
Quantitative thinning operation is conducted based on the pre-determined standing density or the number of trees to be left. Most often, selection of the trees to be removed will be done mechanically without considering the quality of trees. Some inferior trees might be retained (Figure 11a). Alternatively, thinning may involve the removal of every other row of trees (Figure 11b). However, this will not require expertise during tree selection and will reduce the cost for the survey in tree selection. Marking of trees might still be necessary to ease the cutting operation.
Figure 11: (a) Reducing stock density by removing intermediate trees
Figure 11: (b) Reducing stock density by removing alternate rows of trees
The contractor buying the thinned material should not be allowed to carry out thinning without proper supervision. However, this can only be done where trees to be thinned are clearly marked and these are the only trees to be cut.
5.11 Harvesting
It is advisable that when the planted trees attain a diameter at breast height (DBH) of at least 30 cm, the trees can be harvested. In sites with moderately poor soil conditions and very low rainfall, it may take about 18 years to reach such diameters. However, the same diameters can be attained earlier in sites that have more favourable conditions and with better management practices. Generally, it is recommended to harvest Melia trees from the age of 12 years because wood properties for timber do not change significantly with age after this. From a sawmilling point of view, bigger diameters like 40-50 cm are more advantageous, and will produce planks of bigger sizes, that command a premium price. On a good site, these diameters will be achieved after 15-20 years.
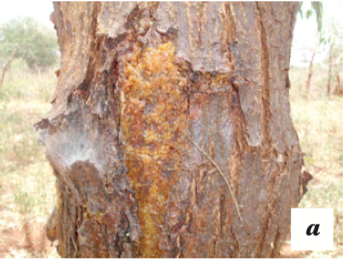
5.12 Pests and Diseases of Mature Melia Trees
Melia trees have few significant pest and diseases in the plantations. However, there are reported cases of cankers, mites and fungal attack on the main stems (Plate 31). Cases of hear rot have also been observed in the field, and they seem to be stimulated by stress conditions (extended periods of drought, unfertile soils). While there may be no known remedies to these cases, any cases of pests and diseases should be reported immediately to the nearest Forest office. Old trees of 20 years and above are susceptible to the disease which affects heart wood, hence the quality of timber. Unfortunately, there is no economically feasible fungicide to use on a heart rot hosting tree. The best way to prevent heart rot is to keep your tree healthy using proper management techniques such as:
Minimize pruning wounds that expose large areas of wood.
Prune trees at an early age so that no major branch will be removed later.
Remove broken branch stubs immediately after they are noticed.
Have trees in the plantation checked regularly by a Forester to ensure infected treesare removed early when they still have sound timber that can be utilised.
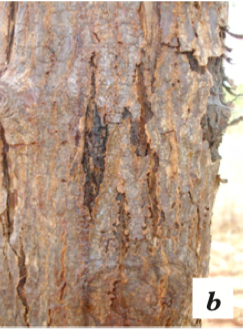
Plate 31: Stem canker on Melia tree (a) most likely from fungal infection
(b) with exudation of gum
CH 6: Cost and benefit analysis of growing Melia
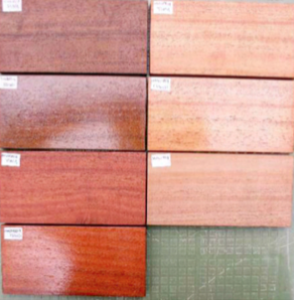
6.1 Advantages of Growing Melia for Timber Production
Melia wood has many advantages, similar to the other high quality of hardwoods, such as mahogany, teak (Tectona grandis) and mvule (Milicia excelsa). Its timber compares well with those of other important valuable indigenous tree species such as Meru Oak(Vitex keniensis) and East African Camphor (Ocotea usambarensis). The timber is suitable for different purposes, such as furniture, panelling, door and window framing, floor parquets and poles. In Kenya, the current timber demand greatly exceeds supply. Dealing with a high quality and valuable timber such as that of Melia will be good business investment as the country meets the high timber demand.
6.2 Costs and Benefits of Growing Melia
A tree grower has the option of selling the trees as round wood (standing trees) or convert them into timber for domestic and/or commercial use.
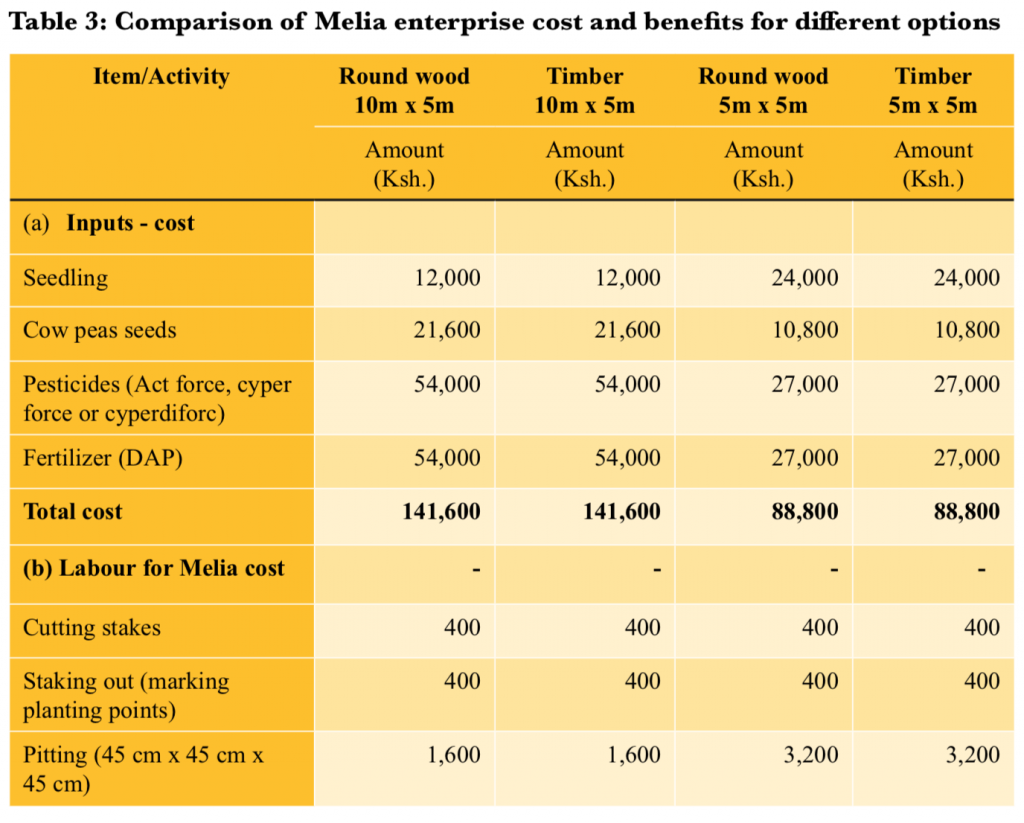
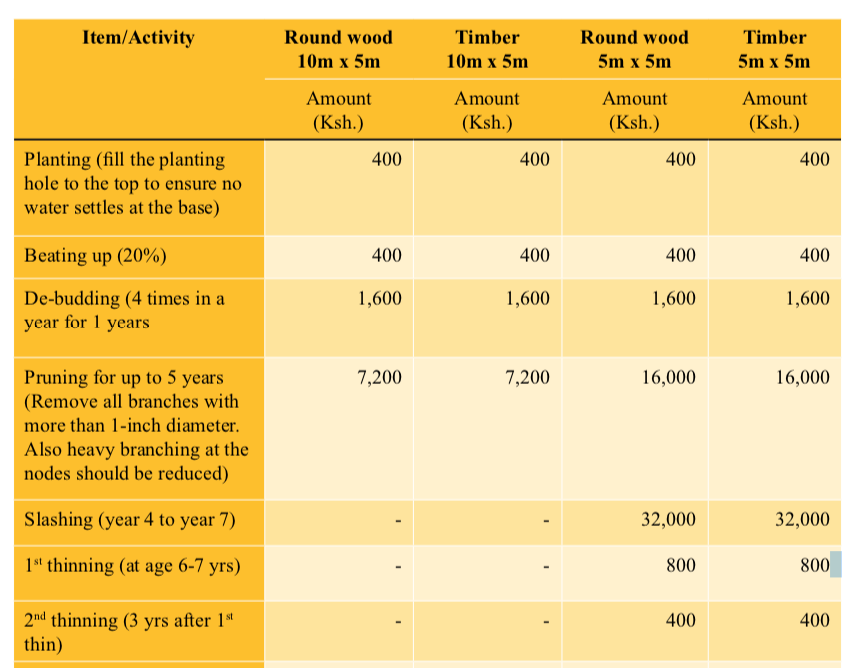
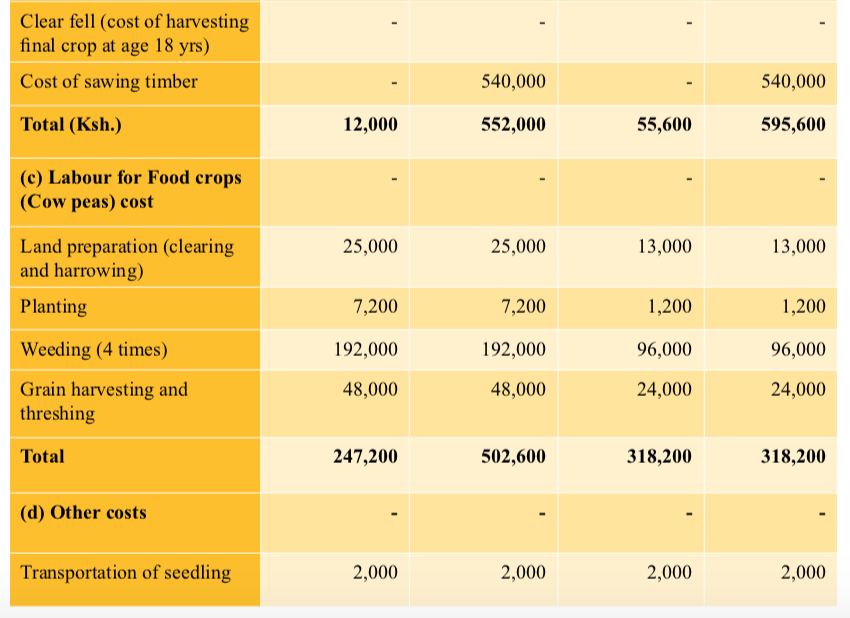
With the correct silvicultural treatments, Melia is expected to attain an average DBH of 30 cm with a height of 9 m in 18 years. The current farm-gate price per tree is Ksh. 5,000 as compared to the expected Ksh. 8,000 from a well-managed plantation with a rotation age of 18 years. However, if the tree grower opts for the sawn timber option, each tree is expected to fetch Ksh. 9,300 after deducting sawing cost. Tree growers are advised whenever possible to sell the final product as sawn timber as this will fetch better returns. The details are described in Appendices 1-2. The summary of the expected revenue from the various Melia enterprise options are shown in the Tables 1 to 3.
*The figures in Table 3 are not based on any research but were generated through field visits to the Melia growing areas and interviews with timber sawyers and merchants.
Assumptions
The tree grower will undertake the silvicultural operations, i.e. weeding, pruning and thinning in the Melia plantation as per the prescribed instructions.
The cover crop (e.g. cow peas) shall be grown using the recommended agricultural practices.
Rainfall during the growth period, will be moderate and not extremely low.
The Melia stand with a 10 m x 5 m spacing option and where thinning operationswill not be undertaken, will grow uniformly to maturity.
Recommendations
Tree growers are advised to saw timber rather than sell standing trees as these will earn them better returns.
The10mx5mspacingoptionisrecommendedforfarmerswhohavelimitedland as this will allow them grow agricultural crops for a longer period before the canopy closes.
Aspacingoptionof5mx5misrecommendedforcommercialtreegrowersasit will ensure quality and fetch more returns from the enterprise.
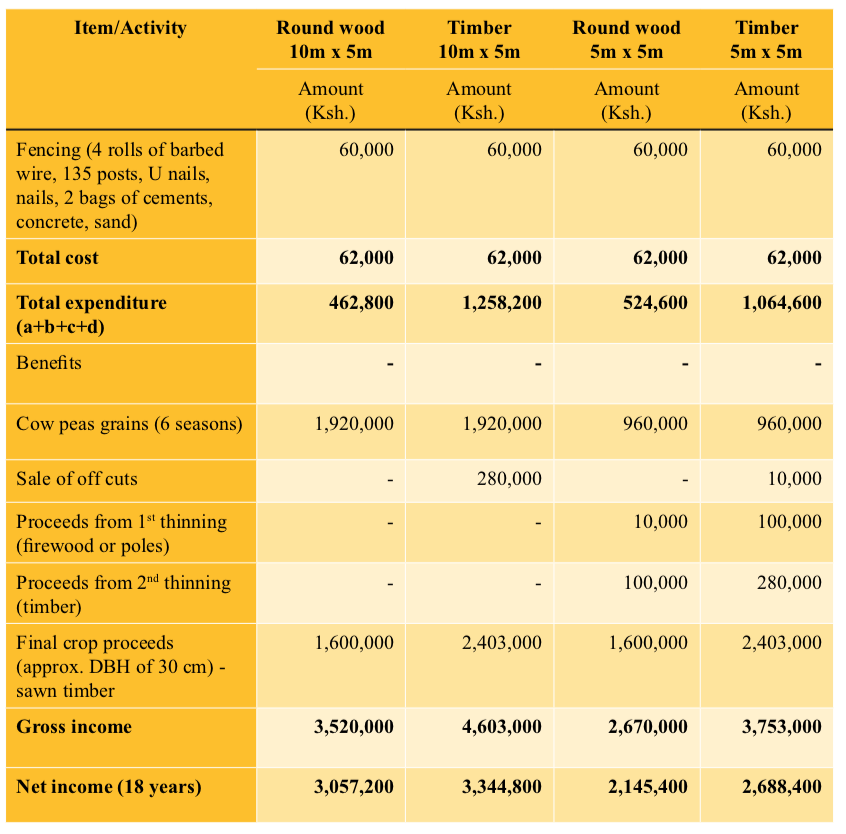
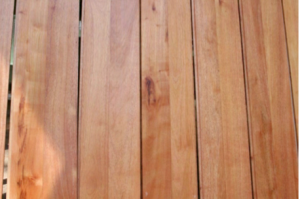
Plate 32: Flooring boards (2 cm thickness) made
Plate 33: Vanished samples of out of Melia timber (1-inch thickness), by H-Tes Melia timber Ltd. Current price for a mahogany wooden floor is about is Ksh. 1,200/m2 (US$ 12)
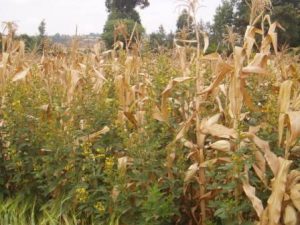
A climate adapted push-pull plot, showing sorghum intercropped with greenleaf desmodium, with Brachiaria cv mulato as a border crop (c) icipe
Intercropping is a multiple cropping practice involving growing two or more crops in proximity. The main goal of intercropping is to produce a greater yield on a given piece of land by making use of resources or ecological processes that would otherwise not be utilized by a single crop. This datasheet contains various types of intercropping practices as well as push pull innovation
1. Introduction
Intercropping is growing two or more crops at the same time in the same field. It is a practice often associated with sustainable and organic farming. It is commonly used in tropical parts of the world, particularly by small scale farmers in Africa, but it is far less widespread in the mechanised agriculture of Europe and North America.
In intercropping, there is often one main crop and one or more added crops, with the main crop being the one of primary importance because of economic or food production reasons. The two or more crops used in an intercrop may be from different species and/or different plant families.
The most common goal of intercropping is to produce a greater yield on a given piece of land by making use of resources that would otherwise not be utilised by a single crop. Careful planning is required, taking into account the soil, climate, crops, and varieties. It is particularly important not to have crops competing with each other for physical space, nutrients, water, or sunlight. Examples of intercropping strategies are planting a deep-rooted crop with a shallow-rooted crop, or planting a tall crop with a shorter crop that requires partial shade.
When crops are carefully selected, other agronomic benefits are also achieved. Lodging-prone plants (those that are prone to tip over in wind or heavy rain) may be given structural support by their companion crop. Delicate or light sensitive plants may be given shade or protection, or otherwise wasted space can be utilised. An example is the tropical multi-tier system where coconut occupies the upper tier, banana the middle tier, and pineapple, ginger, leguminous fodder, medicinal or aromatic plants occupy the lowest tier.
Intercropping of compatible plants also encourages biodiversity, by providing a habitat for a variety of beneficial insects and soil organisms that would not be present in a single crop environment. This biodiversity can in turn help to limit outbreaks of crop pests by increasing the diversity or abundance of natural enemies, such as spiders or parasitic wasps. Increasing the complexity of the crop environment through intercropping also limits the places where pests can find optimal foraging or reproductive conditions.
There are some different variants of intercropping:
Mixed intercropping
Row intercropping
Relay intercropping
Intercropping pigeon peas and maize resulting in higher yield and increased soil fertility
(c) T. Apina, 2008
2. Mixed intercropping
It is the basic form in which the component crops are totally mixed in the field. An example commonly practised in the coastal areas of East Africa is mixed growing of perennials and annuals such as:
cashews, coconuts and mangoes
cassava and bananas
maize, sorghum, millets and sesame
vegetables and legumes such as cowpeas, pigeon peas and green grams
cotton with legumes
Conservation Agriculture adopter farmer from Bungoma appreceates the effect of intercropping maize with lablab
(c) T. Apina, 2009
3. Row intercropping
It involves the component crops arranged in alternate rows. It is also called alley cropping. A variation of row cropping is strip cropping, where multiple rows or a strip of one crop is alternated with multiple rows of another crop.
A popular combination in the highlands of Kenya is a row intercrop of
maize with beans
Other common combinations include:
tomatoes with onions
tomatoes with brassicas
cabbage or kale with lettuce
cabbage or kale with onions
4. Relay intercropping
In relay intercropping, two or more crops are grown in the same piece of land during part of the cropping season. A second crop (usually a cover crop) is planted in the same field as the first crop after the first has achieved reproductive maturity but before it has reached physiological maturity. This helps avoid competition between the main crop and the intercrop. It also uses the field for a longer time, since the cover crop usually continues to grow after the main crop is harvested.
Examples are:
maize and soybean
maize and sweet potato
maize and mucuna
5. Example of an effective intercropping strategy – push-pull
Push-Pull is a simple cropping strategy, whereby farmers use Napier grass or Bracharia grass and desmodium legume (silverleaf or greenleaf desmodium) as intercrops in maize.
Desmodium is planted in between the rows of maize. It produces a smell or odour that stemborer moths do not like. The smell ‘pushes’ away the stemborer moths from the maize crop. On the other hand, Napier grass (Pennisetum purpureum)/ Bracharia grass (Brachiaria cv Mulato ) is planted around the maize crop as a trap plant. Napier grass/Bracharia grass is more attractive to stemborer moths than maize and it ‘pulls’ the moths to lay their eggs on it. But Napier grass/Bracharia grass does not allow stemborer larvae to develop on it. When the eggs hatch and the small larvae bore into Napier grass/Bracharia grass stems, the plant produces a sticky substance like glue which traps them, and they die. So, very few stemborer larvae survive and the maize is saved because of the ‘push-pull’ strategy.
In addition, a ground cover of desmodium (silverleaf or greenleaf), interplanted among the maize, reduces Striga weed. Research has shown that chemicals produced by the roots of desmodium are responsible for suppressing the Striga weed. Therefore, Striga does not grow where desmodium is growing. Being a legume, desmodium also fixes nitrogen in the soil and thus acts to enrich the soil.
Desmodium is perennial and must only be planted once. As desmodium seeds may not always be available, desmodium can also be planted using vines. This can be an easy and cheap method to plant desmodium vines.
Push-pull plot during 2nd season, maize and desmodium with Striga border crop. The plot is bordered with Napier grass.
(c) icipe
There are two types of push-pull farming systems:
Conventional push-pull uses napier grass and silverleaf desmodium.
Climate smart push pull uses two drought-tolerant species: Brachiaria grass (Brachiaria cv mulato II) and greenleaf desmodium (Desmodium intortum). Bracharia grass is native to Africa. Two varieties of Brachiaria known as Mulato and Mulato II, are drought tolerant, recover fast after grazing, show high plant vigour, give good quality forage and are tasty to the animals. Brachiaria does not have stinging hairs, making it easy to cut and carry.
How to plant a push-pull field
1. Plant Napier grass/Bracharia grass in a border around the maize plot. 2. Plant at least 3 rows of Napier grass/4 rows of Bracharia grassall around the maize field. Apply 2 handfuls of well decomposed farmyard manure in each hole. 3. In the first year, plant Napier grass/Bracharia grass before the rains so that is has a start on the maize. The stemborer moths will like the larger Napier grass/Bracharia grass even more than the maize. 4. Get desmodium seeds from seed companies (Kenya seed, ‘Western Seed & Grain Co. Ltd.’ in Kitale, Western Kenya) or your neighbour who has started growing it. For 1 acre of land 1 kg of desmodium seed is needed. 5. Alternatively, you may plant desmodium vines. In this case plant the vines when there is enough rainfall and soil is moist. 6. Prepare the soil carefully so that it is as fine and clean as possible. 7. Using a strong pointed stick, make a furrow in the middle of the rows where the maize will be planted. 8. Mix the desmodium seed with fine sand or fine soil (about 1 handful of seed and 2 handfuls of sand). 9. Plant desmodium with the rains for maximum germination. 10. Plant your maize in the field surrounded by Napier/Bracharia grass. 11. After 3 and 6 weeks, trim the desmodium so that it does not overgrow in between the maize plants. 12. Keep the field weed free so that the Napier/Bracharia has a start on the maize. The moths will like the larger Napier/Bracharia more than the maize.
Benefits of adopting a push-pull strategy
When you adopt a push-pull strategy you will:
Increase maize yield by 25 – 30% in the areas where stemborers are the only problem. Where both stemborers and Striga are problems, you can double your maize yields.
Increase the supply of cattle feed from harvesting Napier grass/Bracharia grass and desmodium.
Fix nitrogen into your farm soil by desmodium legume, so you save on fertiliser costs.
Protect your soil from erosion, as desmodium acts as a cover crop.
Retain soil moisture, as desmodium acts as mulch.
Earn money from the sale of desmodium seed at an attractive price of between Kshs 600 and 800 (US$ 8 to 10) per kg.
Make more money from increased milk production and sales.
Save on farm labour, as you do not have to manually remove Striga weed from the farm.
Protect maize from strong winds, by surrounding it with Napier grass/Bracharia grass.
6. Information Source Links
Berold, R. and Caine, C. (Eds) (1998). People’s Farming Workbook. David Philip Publishers (Pty) Ltd, South Africa. ISBN: 0 86486 431 0
IIRR (1998). Agroforestry Technology Information Kit (ATIK) 3: Crops and Cropping systems. ISBN: 0-942717-31-7
Credit:National Agroforestry Research Project KARI-KEFRI-ICRAF
Calliandra flower
Introduction
Calliandra (Calliandra cabthyrsus) is a small leguminous tree that originates from Central America and Mexico. It was introduced in Indonesia to provide shade in coffee plantations, but the tree has now proved more useful for other purposes such as fodder, fuelwood and land reclamation.
In many parts of the world, including Kenya, calliandra cuttings are now used as fodder for grade dairy cows and other livestock. It is particularly appreciated for the protein it can provide when livestock are fed on low-quality roughage or grasses such as napier, which are often deficient in protein.
As an added benefit, calliandra increases the butterfat content of the milk.
In both Kenya and Indonesia, calliandra has been planted on steep eroded slopes to provide stability and prevent soil erosion.
Although calliandra is not pollinated by bees, it is a source for honey. In Indonesia, bees can produce
1000 kg of honey per year from 1 ha of calliandra. A secondary benefit is the improved pollination of coffee trees in the area. The tree also provides good fuelwood that dries well and burns rapidly.
Calliandra tree
Ecological requirements
Calliandra occurs naturally in some parts of the tropics at altitudes ranging from sea level to 1900 m and where the average annual rainfall is above 1000 mm. It can withstand dry seasons of 2-4 months with less than 50 mm rainfall a month. It can grow on a wide range of soils, including humic Nitosols, humic Andosols and Ferrasols, with a minimum pH of 4.5. But it does not do well on soil that is heavily saturated with aluminium.
It does not tolerate soils with poor drainage that flood regularly. It does not tolerate frost. Calliandra can grow well in Kenya at elevations ranging from coastal lowlands to lower highlands, not exceed- ing 1900 m above sea level.
Establishment
Calliandra Seeds
Seed production
Each flower on a calliandra raceme remains receptive for 1 night only, then wilts the following day. The flowers are pollinated at night by bats or hawk moths, which pollinate as they suck the nectar. Only about 1 flower out of 20 produces a pod. Seed production is much less than for other well known fodder species, such as Leucaena spp. and Gliricidia sept- um, but with a bit of effort reasonable amounts of seed can be produced.
Seed orchards should be established with trees that originate from a well-known seed source. You can establish your own orchards but there should be a minimum of 30 flowering trees, either on 1 farm or spread out over several neighbouring farms. This minimum number prevents inbreeding, which has negative effects on seedling quality. Bigger orchards are more successful in attracting bats for pollination, especially in areas where calliandra is newly introduced and bats still have to discover the nectar source. The orchard should be at least 500 m away from other calliandra provenances.
Wide spacing of the trees, such as 3 x 3 m, provides maximum number of flowers and easy access for pollinators. Trees can be coppiced or pollarded to control their size and to make it easier to collect the seed.
Although seed quality is best when the seeds are harvested dry, in practice this is difficult. When pods are very dry they split open explosively, scattering the seeds over several metres. To avoid this, almost-dry pods that have started to turn brown can be picked by hand and dried in a sack. Seeds must be dry to ensure good viability and germination. When stored in an air-tight container and refrigerated at 4 °C, they can remain viable for at least 5 years. When they are exposed to air and kept at room temperature, they will be viable for only a few month. Seeds can also be planted immediately after drying. Seed can be obtained from
Maseno Agroforestry Research Centre PO Box 25199, Kisumu, Kenya tel: (035) 51163/4
email: icraf-maseno@cgiar.org
Kenya Forestry Research Institute PO Box 20412, Nairobi, Kenya tel: (0154) 32891/92
ICRAF, PO Box 30677, Nairobi, Kenya tel: (02) 524000, email: icraf@cgiar.org
National Agroforestry Research Project, PO Box 27, Embu, tel: (0161) 20116/20873
Mbale township, PO Box 1402, Maragoli, Kenya, tel: (0331)51454; email:fpagencies@kakamega.africaonline.com
VI project, PO Box 2006, Kitale, Kenya
Pre-treatment
Calliandra seed has a hard coat that needs to be soft- ened by soaking the seeds in water. We recommend that seeds be soaked in cold water (room temperature) for a minimum of 48 hours. The soaking should be stopped once most of the seeds have swollen, and the seeds should be sown immediately. Seeds should never be boiled, as this kills them.
Calliandra must be inoculated with Rbizobiumbacteria, which can be the same type as for leucaena or gliricidia. The inoculant is first mixed with soil and then with the soaked seeds. Alternatively, calliandra can be inoculated at the seedling stage. The inoculant is mixed in water and poured on the young seedlings.
Another way is to collect soil from beneath an existing calliandra stand and mix it with the nursery soil.
The inoculant can be obtained from the Kenya Forestry Research Institute, PO Box 20412, Nairobi, tel: (0154) 32891/92 or the University of Nairobi, Soil Science Department, PO Box 30197, Nairobi.
Nurseries
Pruning the roots of the seedlings in the Swaziland bed enhances their chances of survival after they are transplanted
Calliandra calothyrsus seedlings should grow about 3-4 months in the nursery. The raising of the seedlings should be planned so that they are ready to set out in the field at the onset of the rains. The nursery should be located where there is a constant source of water and where the ground is level, with relatively fertile soil and good drainage.
Seedlings can be grown in either polythene bags or Swaziland seedbeds—raised soil beds in which seeds are planted at a relatively wide spacing. The seeds germinate and the plants are allowed to grow in the beds until they are ready for transplanting to the field. Roots are pruned by cutting straight lines in the soil between the seedlings. The bags and the beds are equally effective, but the Swaziland bed method is cheaper.
After the seeds are soaked in water, they are sown directly in the Swaziland beds. If the nursery soil is poor, it should be mixed with compost or old manure, mixing 4 parts of soil with 1 part of compost or manure. The depth of sowing in a Swaziland bed should be 1 cm at a spacing of 10 cm between rows and 5 cm within rows.
Two seeds should be planted per hole and 1 seedling later thinned out if both seeds germinate. After the beds are sown, they should be shaded the same way as for horticultural crops such as sukuma wiki or tomatoes. Plant the seedlings that are thinned out in places where no seeds germinated or plant them in a new row.
The watering regime is twice a day, morning and evening, reduced to a single watering in the last month before field planting. Seedlings should initially be shaded 50% with the shade totally removed in the last month to harden them. The nursery should be weeded as soon as they compete with the seedlings for nutrients, water and light.
In seed orchards, some seeds are likely to fall on the ground and germinate beneath the parent trees. Wildlings produced in this way are also very good for transplanting to the field
Planting
Calliandra seedlings should be planted in the field at the beginning of the rainy season. The bare roots should be kept in water as the planting is done, to prevent the seedlings from drying up. The planting hole should be deep enough to cover the roots. The seedlings can be planted in a line or a block, depending on the land available. Line planting, the most common planting arrangement, creates good hedges. The preferred niches for hedges are external and internal boundaries, around the homestead, along soil conservation structures and under Grevillea robustatrees. Spacing within the hedge should be 0.5 m in either single or double rows. When calliandra is planted in a block, it is best to combine it with napier grass. The planting arrangement is 1 row calliandra to 2 rows napier. Spacing between the rows is 1 m and within rows 0.5 m for both cal- liandra and napier.
Farmer harvesting calliandra fodder
Management
First year
After the seedlings have been planted in a well prepared place, a 50-cm area around them should
be kept free of weeds. During the 1st few months, calliandra grows slowly and cannot compete well with weeds. Feed the soil around the trees with well rotted manure or compost.
Calliandra can be coppiced when it has reached a height of 2 m, which is normally 9-12 months after planting. The height on the tree at which the first cutting is made should be low (30 cm) to induce the tree to spread at the base. Later cutting heights can be higher, 0.5-1 m, as the farmer prefers.
Harvest interval
A well-established stand of calliandra can be harvested 4—5 times a year. During the height of the rainy season the cutting interval can be as short as 2 months, but during the dry season regrowth is slower, and the cutting interval may be as long as 4 months. A regrowth of 50—60 cm is a good indication that the tree is ready for the next harvesting.
Cutting height and method
The recommended cutting height is 1 m above the ground. When calliandra is grown between food crops, however, a farmer might want to cut it at a lower height to minimize the shading effect on the crops. Calliandra can be cut successfully even at ground level.
The best way to cut the fodder is with secateurs or pruning scissors, which many farmers in coffee-growing areas have.
This leaves a minimal wound and promotes fast and healthy regrowth. Calliandra can also be grazed, although this increases the mortality of the trees.
Maintenance of soil fertility
When a fodder stand is harvested frequendy and the fodder removed, nutrients are extracted from the soil. These nutrients enter the digestive system of the animal and a large proportion is excreted through manure and urine. To ensure sustainable fodder production, the manure and urine must be returned to the soil where the calliandra is growing.
If the farm is on a slope, zero-grazing units for dairy cows can be constructed in such a way that all slurry is collected in a pit from which it can flow by gravity to foder plots situated lower down the slope.
When calliandra has nodulated, it can supply its own nitrogen requirement. Although symbiosis with mycorrhiza fungus helps to absorb phosphorus, this element is likely to be the first that becomes deficient in the soil when no manure or urine is returned.
Cow feeding
Dry season feeding
Calliandra can be cut late in the rainy season and conserved for dry season use. The foliage should be dried gently (under shade rather than in full sun if possible) on a suitable surface (e.g. sackcloth) so that leaflets that fall off are not lost. Alternatively, the foliage can be left uncut on the tree and harvested when it is needed. For optimum fodder availability, the trees should be pruned 6 months before they are needed for the dry season. At that pruning, a considerable amount of fuelwood can be harvested as well.
Calliandra used as a live stake for passion fruit in Uganda.
Diseases
Calliandra is relatively free of diseases and pests. However, some of the following might occur.
Root rot {Armillaria mellea) — This fungus affects roots in high-altitude areas from which forest has recently been cleared. If the fungus is present in roots of other tree species and those roots touch the calliandra roots, they get infected as well. The rot results in the death of the tree. Removal of old tree stumps and their roots minimizes the occurrence of this disease.
Scales — These insects attach to the stem and can kill the tree. Some scales appear white and powdery, others are smooth. The stem sometimes turns black. Scales are easily treated by spraying the affected areas with a washing detergent dissolved in water.
Rust {Ravenelia spp.) — These fungi usually appear on the underside of leaves, where they look powdery and occur as small raised dots.
Pink disease (Corticium salmonicolor) — This disease is associated with intense coppicing.
Die back {Nectria ochroleucd) — This fungus occurs in association with other fungal attacks. It causes general blight (discoloration of leaves) and sometimes cankers (swollen or sunken lesion in the wood).
Viral or bacterial diseases have not been recorded on calliandra. Chemical control for pests and diseases is not recommended because of the negative effect residuals have on animals and the environment.
Feeding calliandra to dairy cattle
Nutritive value
The edible fraction of calliandra has a crude protein (CP) level of 20-25% of the dry matter, depending on the cutting interval and the leaf-to-stem ratio of the offered material. This CP content is much higher than that of napier grass (average 8.5%). Calliandra can be mixed with napier in such a way that the CP content of the diet reaches the required 13% for dairy cows.
Cows will usually eat stems up to a diameter of 1 cm when the stems are succulent or 4 mm during the dry season when they are more lignified. Digestibility of fodder in general is determined by factors such as fibre content and certain types of tannins. Fibre of calliandra is comparable with that of other tree fodders (acid detergent fibre 22—31%, neutral detergent fibre 45-50%).
However, calliandra has a high concentration of condensed tannins. These tannins bind with the organic matter and consequently prevent the absorption of the material in the digestive tract. The digestibility of calliandra ranges between 40% and 60%. High-quality fodder supplements normally have a digestibility of more than 65%.
Rations
For the farmer to obtain high economic returns, lactating cows with high milk producing potential are normally fed protein rich supplements like tree fodder. Calliandra is used as a protein supplement; the basic diet normally consists of napier or other grass, weeds, crop residues (banana stems and leaves, maize stover, sweet potato vines), hay or straw.
On station and on farm experiments with dairy cows have shown that it is possible for about 3 kg of fresh calliandra fodder (1 kg dry matter) to replace 1 kg of dairy meal without affecting milk production. In this research, an additional 3 kg of fresh calliandra increased milk production by 0.6 kg, the same increment that is obtained from an additional 1 kg of dairy meal. This would mean that 6 kg of fresh calliandra could replace 2 kg of dairy meal, when the farmer does not have money to buy the dairy meal. In practice, however, this substitution rate is not an absolute, but will vary considerably according to such factors as basal feed composition and animal health. The ratio can be viewed as a starting point for farmers experimenting with the feeding of calliandra, but the actual ratio on their farms may be very different.
Table 1 shows example rations for large dairy cows, for 2 production levels, during the beginning of the rainy season, the middle and late part of the rainy season, and the dry season. When calliandra is in abundance, it can be fed to young stock, bulls and non-lactating cows as well.
Table 1. Suggested rations (in kilograms of fresh weight) for daily cows (Friesian, Ayrshire or large crosses), at different pro- duction levels and during different seasons
Freshness
It used to be thought that even a few hours of wilting would drastically reduce the quality of calliandra fodder. Recent experiments with sheep have shown, however, that drying calliandra can actually increase voluntary intake. Even though drying causes a small reduction in quality, the effects on intake and quality can cancel each other out giving no overall effect on animal production. Where voluntary intake of fresh calliandra is very high, as for dairy cows in central Kenya, the best results may be achieved with fresh leaves. But in situations where leaves cannot be fed immediately after harvesting, such as some cut-and- carry systems, wilted leaves can also be fed with good results. It is also possible to conserve leaves for dry season use.
Calliandra for other livestock
Calliandra can be fed to dairy cattle, local cattle, goats, sheep, rabbits and poultry. Basal diets are similar as for dairy cows (see above). The amount of calliandra fed is normally 1/4 to 1/3 of the total diet. Rabbits are best fed on a mixture of weeds, grains and tubers (not fresh cassava), with 1/3 of the diet consisting of calliandra. Feeding on calliandra alone causes weight loss. Poultry can be supplemented with dried calliandra although this tends to increase feed intake and reduce egg production. The exact reasons for this are not known. A little bit of dried calliandra mixed with layers mash (a small handful to 1 kg of layers mash) improves the colour of the yolks without affecting egg production. It is anticipated that calliandra is not very digestible for pigs, although this has never been tested.
How much calliandra is needed?
The amount of fodder that calliandra can pro- duce depends on factors including climate, soil fertility status and altitude. Productivity of calliandra is often expressed in kilograms of dry matter per metre of hedge per year. It can safely be assumed, for a wide range of conditions, that calliandra produces 3 kg DM (dry matter) per metre of single hedge per year. If a farmer wants to feed 1 cow 6 kg fresh calliandra (2 kg DM) every day in a year, the farmer would need a hedge approximately 250 m long. If the spacing between the trees is 50 cm, the total number of trees required would be about 500.
There are several other benefits of calliandra:
it increases the butterfat content of milk and therefore its ‘creaminess’.
if used as a supplement, it may improve the cow’s health and shorten the calving interval
it provides firewood, fencing, boundary marking,
erosion control,
and ornamental values
Slightly negative impact that a calliandra hedge has on adjacent crops
by shading them or interfering with their roots.
It is also important to realise that calliandra will sometimes need to be fed at a higher level to substitute for the same amount of dairy meal, and this will reduce its profitability.
Opportunities and limitations
Opportunities
Calliandra is palatable to a wide range of livestock species.
The tree grows vigorously and coppices well.
The trees can be planted in many different niches on farm.
Calliandra leaves can be fed dry or fresh.
Calliandra can replace or supplement dairy meal. Both options increase profitability.
The tree supplies its own nitrogen require- ment by fixing it from the air.
Calliandra is relatively free of diseases.
Secondary benefits are erosion control when the trees are planted on the contour and fuel wood.
• The tree does not produce many seeds. • It can suppress the yield of adjacent crops.
Limitations
Digestibility of calliandra is lower than that of other well-known tree fodders
The tree does not produce many seeds.
It can suppress the yield of adjacent crops.
Ongoing research
On-farm calliandra nurseries
Long-term effects of feeding calliandra
Anti-nutritive factors in calliandra
Acknowledgements
The authors wish to thank those people working at research institutes, extension services and farming communities who requested that this bulletin be written. The input of IN Thendiu in the 1st consultative meeting on the bulletin content is gratefully acknowledged. After a series of drafts, a 2nd consultative meeting was convened to deliberate further on technical details and format. A number of people in the Ministry of Agriculture, Livestock Development and Marketing and NGOs attended this meeting and made useful contributions: Maina Kiondo, Kiama Augustus, Elizabeth Kang’ara, Jeremiah Matemu and Cornelius Kasisi. The work that led to this publication was supported by the Swedish International Development Cooperation Agency (Sida), the United Kingdom Department for International Development (DFID), under the Forestry Research and Livestock Production Programmes, as well as the International Development Research Centre (IDRC) of Canada, through a technology transfer grant. Janet Stewart, Oxford Forestry Institute, UK, provided useful com- ments for updating this bulletin. And finally, we appreciate the significant contributions of Hellen Arimi and Mick O’Neill to these projects.
The production of the second edition of this publication is an output from a research project funded by the United Kingdom Department for International Development (DFID) for the benefit of developing countries. The views expressed are not necessarily those of DFID. Project R6549, Forestry Research Programme.
Rwandan TED Speaker Christian Benimana recently reminded us during his TED Talk (https://bit.ly/2msSra6) that by 2050 Africa’s predicted population of 2.5 billion will need 700,000,000 more housing units, 300,000 schools and 100,000 health care centres. To reach these already daunting figures there are even more daunting figures.
Every day for the next 35 years we have to build 7 health centers, 25 schools, and nearly 60,000 housing units.
Every single day.
Christian suggests that to meet these targets Africa must adopt an African centric model of development and has some great ideas to share on the same.
The predictions of growth on the African continent are sobering, and the need to scale infrastructure and services for this growth in merely 30 years, gives us a sense of urgency. We have a lot in our favour. We are the worlds largest and least populated continent and have the youngest population, however it is one of the only regions in the world where childhood stunting is on the increase. Today 59 million children suffer from stunting. Put into perspective, this figure is higher than the entire population of Kenya. Africa is failing to nourish her people.
Looking closer to home, in Kenya, agriculture is said to be the back bone of the economy and contributes significantly to GDP, yet we currently import 30% of our food products, mainly staples, and it is predicted that by 2050, this figure will have reached 85%. By this time our population of the day will be 95m with over 5m suffering from severe malnutrition compared with todays 2.6m. The predictions are grim. And in the face of climate change, they are likely to be worse.
But do they have to be?
We know that climate change is increasingly taking it’s toll on agriculture and we also know how to mitigate the same. We know we need to build our soils and conserve water. We know we need to grow more nutritious short term crops, vegetables and fruit. We know we need to focus on livestock that are adapted to our climate, feeds , diseases and production systems. We know we need to grow trees to capture carbon and produce fuel. We know we need to sequester carbon from the atmosphere. We know we need to build farmer resilience in the face of climate change and one of the best ways is through crop diversity. We know we need to build farmer family health and immunity, and the same for livestock and crops. We know 78% of our food crops depend on pollinators and we need to conserve them. And we know that all of the above can be achieved through regenerative agricultural practices, which include zero tillage, mulching, composting, water harvesting, cropping and livestock diversity, agroecology, agro forestry and so on.
But whilst we know all this , we seem to be back peddling.
Rather than advocating for regenerative agriculture, our agricultural policies in cases, do precisely the opposite. They promote synthetic inputs, fertilisers and pesticides, some of which are banned internationally, and restrict use of natural fertilisers like farmyard manure and the use of harvested rainwater for crop irrigation.
Agricultural finance is another major issue that works against food security. Currently finance is hardly available for the millions of smallholders who underpin Kenyas food and nutrition security. And where finance is available , it is expensive and ill fitting often resulting in debt and blacklisting. With little in terms of securities accepted by large banking institutions, smallholder farmers resort to expensive credit and loans peddled by numerous mobile lenders with monthly interest rates between 5-43%, translating to 92-521% annually. Recent reports show that 2.7 million Kenyans are black listed by CRB most for defaulting on borrowing only 1000 shillings.
Are these gamblers, the youth, farmers?
Irrespective of who they are these predatory loans may be paralysing development and possibly food and nutrition security.
So what needs to be done.
Firstly, knowledge on regenerative agriculture should be made available to farmers, for free 24/7 and Policies and incentives should be formulated that support the same. It can be done. Due to low levels of agricultural extension services in Kenya, Green Dreams TECH Ltd developed this agricultural platform iCow that teaches farmers regenerative agriculture through their mobile phones, both low end and smart phones.
Farmers who are on the platform and execute the lessons they receive, begin to see increases in yields, incomes and profitability within 3 months. Within a year they are doubling their yields.
iCow teaches farmers how to optimise productivity in crops and livestock production and increase farmer family nutrition, whilst building resilience in the face of climate change. And to do so at minimal cost, simply by adopting new practices aligned with nature.
The platform is being used by hundreds of thousands of farmers in Kenya, catalysing economic growth and prosperity from the ground up whilst drawing down carbon from the atmosphere.
If we are to feed our nation, we need to recalibrate our agricultural policies.
We need to let science and sense be the drivers of agricultural development and not the agenda of input providers. We need to scale regenerative agricultural extension services across the country as quickly as possible. By using ICT based systems like iCow and adjusting policies this can be done at haste and at very low cost, and Kenya can lead a new model of agriculture that produces nourishing food for the African continent.
We also need to educate farmers on financial literacy as well as design financial solutions that are farmer centric.
And lastly, we need to recognise, nurture, honour and incentivise smallholder farmers for the climate warrior services they provide us. The backbone of the Kenyan economy is made up of the backbones of millions of smallholder farmers. Most do not even have health insurance. Let’s rethink this too.
They are carrying you and I.
Article : iCow CEO, Su Kahumbu, September 22nd 2019.
This active ingredient has been listed and banned as carcinogen in the EU.
Carcinogenicity is the ability to induce tumors, (benign or malignant) or increase their incidence or malignancy or to shorten the time of their occurrence when the chemical is inhaled, ingested, dermally applied, or injected.
Active ingredients
Chlorothalonil,
Clodinafop,
Fenchlorazole,
Oxyfluorfen,
Permethrin,
Pymetrozine
Mutagens
This active ingredient has been listed and banned as mutagen in the EU.
Mutagenicity-is the permanent damage of hereditary DNA material -sperm or egg- or critical cells like blood, skin and lymph, resulting in various cancers and hereditary diseased across familial lines.
Active ingredients
Dichloropropene,
Carbendazim,
Dichlorvos,
Thiophanate-methyl,
Trichlorfon
Development reproduction toxins
This active ingredient has been listed and banned as Development / Reproduction toxin in the EU.
Development reproduction toxins impact sexual function/fertility- decrease sperm count, increase testicular cancer, and lead to malformations in male genitalia and feminization in adult as well as malformed offspring.
Active ingredients
Abamectin,
Carbendazim,
Carbofuran,
Chlorothalonil,
Chlorpyrifos,
Dimethoate,
Gamma-cyhalotrin,
Glufosinate-ammonium,
Imidacloprid,
Mancozeb,
Oxydemeton-methyl,
Permethrin,
Tebuconazole,
Thiacloprid,
2,4-D-Amine
Endocrine disrupters
This active ingredient has been listed and banned as endocrine disrupter in the EU.
The endocrine or gland-system produce hormones that regulate metabolism, growth and development, sexual reproduction, sleep, and mood, among other things.
Active ingredients
Acephate
Bifenthrin
Carbaryl,
Carbofuran,
Deltamethrin
Fenitrothion
Flubendiamide
Flufenoxuron
Omethoate
Permethrin
Thiacloprid
Neurotoxins
This active ingredient has been listed and banned as a Neurotoxin in the EU.
Neurotoxins affect the chemistry, structure or function of the brain, the spinal cord and nerves and sensory organs that control major body organs and functions.