Traps and Bagging
Credit : Biovision-Infonet

(c) https://www.iscatechnologies.com
(c) A.A. Seif
(c) A.A. Seif

(c) A. M. Varela
(c) A.A. Seif
Sticky traps can be used against the following pests (clicking on underlined pests takes you to pests’ page): Thrips, Whiteflies, Aphids, leafminers, Fruitflies
1. Introduction – What is a Weed?
Insect traps for monitoring and control
Insect traps are useful tools for monitoring insect populations to determine the need for control or the timing of control practices. In some instances, attractants and traps also can be used to control insect populations directly by mass trapping or mating disruption. Mass trapping is most likely to be effective when the density of the target pest is low and immigration into the trapped area is minimal, as is the case in restricted environments (e.g. greenhouses).
Insect traps consist of a visual (colour, shapes and light) and/or chemical (scent) attractant to attract the target insect, plus a device to capture the insect once it arrives. Most insect traps either use glue to immobilise insects or have funnel structures to prevent them from escaping.
Coloured sticky traps (blue, yellow or white) or water traps
They are useful for monitoring adult insects in the nursery or field.
- Yellow sticky traps and water traps have been used for monitoring adult leafminers, whiteflies, aphids (winged forms) and thrips among other insect pests. Thrips are also attracted to white and blue. As the yellow colour attracts many insect species, including beneficial insects, use yellow sticky traps only where necessary. Coloured traps can be easily made at home (see below).
(c) A. M. Varela
- Water traps are also useful for trapping aphids thrips and leafminer immatures that drop to the soil to pupate. Sticky and water traps need to be checked regularly; the trapped insects should be identified and counted and the traps serviced.
The sticky boards have to be changed, or the water replenished, once they are covered by insects, dust and/or debris, otherwise they will not be effective.
Light traps
They can be used to catch moths such as armyworms, cutworms, stemborers and other night flying insects. Light traps are more efficient when placed soon after the adult moths start to emerge but before they start laying eggs. However, light traps have the disadvantage of attracting a wide variety of insects. Most of the attracted insects are not pests. In addition, many insects that are attracted to the area around the light traps (sometimes from considerable distances) do not actually fly into the trap. Instead, they remain nearby, actually increasing the total number of insects in the immediate area.
Pheromone traps
A scent lure may smell like food to an insect pest or, more frequently, like pheromones. Many insects, release an odour to signal their readiness for mating, specially the females (sex pheromones), or to attract other insects (male and females) from the same species (aggregation pheromones). These odours can be reproduced in a laboratory. This material is then applied to a rubber cap or other device and the scent is released slowly over several weeks, attracting the insects to the collection device.
Several types of pheromones traps have been developed for monitoring and mass trapping African bollworms, cutworms, fruit-flies, etc. and are widely used. However, in East Africa pheromone traps are, in the rule, not locally available, and imported ones are not affordable to smallholder growers.
Because pheromone traps are so effective and specific, they are useful for mass trapping pests. For that purpose, numerous traps have to be placed throughout a pest’s environment, so that enough insects are trapped to substantially reduce the local population and limit the damage it causes. When aggregation pheromones are used to attract adult beetles of both sexes, traps may reduce the feeding damage caused by the adult insects and reduce reproduction by capturing adults before they lay eggs. When sex pheromones are used to capture moths, success depends upon capturing males before mating occurs. Pheromone lures must be changed on a regular schedule.
2. Colour and water traps for thrips and blister beetles
Adult thrips can be monitored and in some cases be reduced by mass trapping with coloured (blue, yellow or white) sticky traps or water traps in the nursery or field. Research in California, has shown that hot-pink sticky cards attract more thrips than blue-coloured traps. The colour spectrum of the boards is important for the efficacy of the sticky traps. Bright colours attract more thrips than darker ones.
The location of the traps varies depending on the crop and on the developmental stage of the crop. Sticky traps with cylindrical surfaces are more efficient that those with flat surfaces. They are best placed within a metre of crop level; traps should not be placed near the borders of fields or near shelter belts.
Water traps should be at least 6 cm deep with a surface area of 250 to 500 cm2, and preferably round, with the water level about 2 cm below the rim. A few drops of detergent added to the water ensure that thrips sink and do not drift to the edges and escape; a drop of formaldehyde prevents algal and fungal growth. They are best used at vegetation level but not where leaves and debris can fall into them because this discolours the water. A coarse wire-netting guard may be necessary to prevent birds bathing in them (Lewis, 1997).
Blister beetles are attracted to blue (and possibly pink, purple and red) colours. This fact can be utilised to create traps for them:
- Take any light blue container, fill with soapy water and place around susceptible crops like beans, cowpeas and pigeon peas. The beetles fall in and drown.
- Dig holes, line them with blue plastic bags and place soapy water in the bottom.
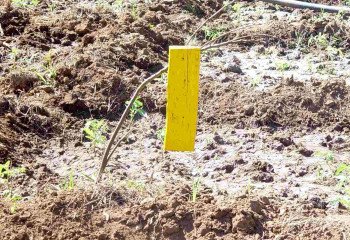
3. Yellow sticky traps for whiteflies, aphids and leaf mining flies
- Yellow plastic gallon containers mounted upside down on sticks coated with transparent automobile grease or used motor oil. These should be placed in and around the field at about 10 cm above the foliage. Clean and re-oil when traps are covered with flies.
- Yellow sticky boards. To use, place 1 to 4 yellow sticky cards per 300 square metres field area. Replace traps at least once a week. It is difficult to determine the population of newly trapped insects on a sticky card from those previously trapped. To make your own sticky trap, spread petroleum jelly or used motor oil on yellow painted plywood, 6 cm x 15 cm in size or 30 cm x 30 cm. Place traps near the plants but far away enough to prevent the leaves from sticking to the board. Traps when hung should be positioned 60 to 70 cm zone above the plants. Yellow sticky traps are mainly used to monitor, whiteflies, winged aphids and leaf mining flies.
- Yellow plastic trapping sheets. A 2 m x 75 cm yellow plastic sheet coated with motor oil, both ends attached to bamboo or wooden poles and carried by two persons through the field to mass capture adult flies.
- Yellow plastic drinking cups coated with adhesives and stapled on stakes above plant canopies to trap flies
- Note: the yellow colour attracts many insect species, including beneficial insects, so use yellow traps only where necessary.

(c) https://www.iscatechnologies.com
4. Traps for house flies and fruit flies
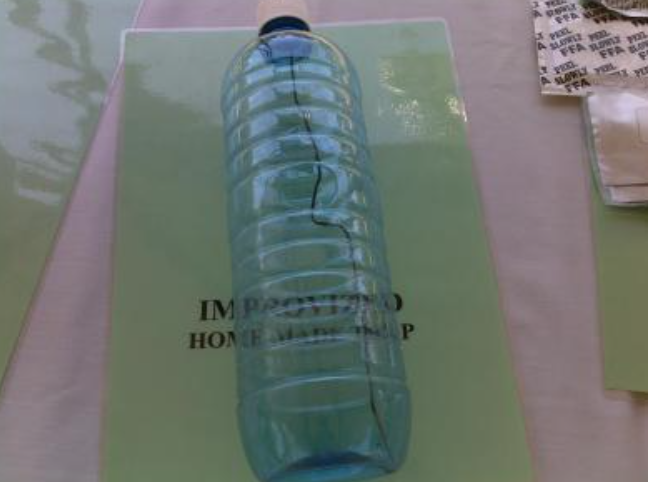
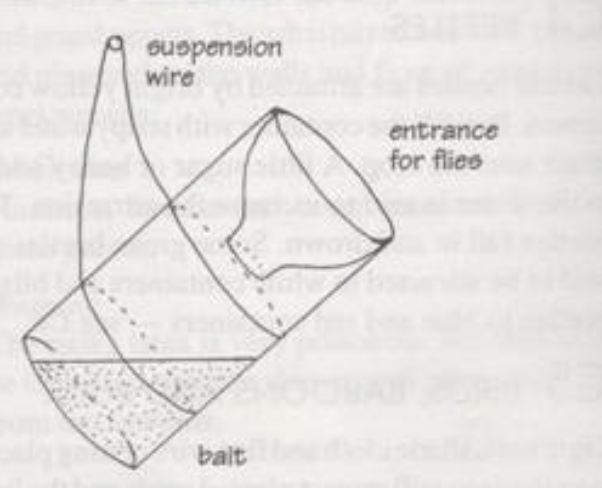
Fruit flies and house or barn flies are attracted to fermenting fruit juice. The top of a plastic bottle can be cut off and inverted as shown in above sketch. A little sugar water or honey can be smeared around the rim of the bottle to further attract the flies, which will then enter the bottle containing sweet/ fermenting fruit juice and be trapped.
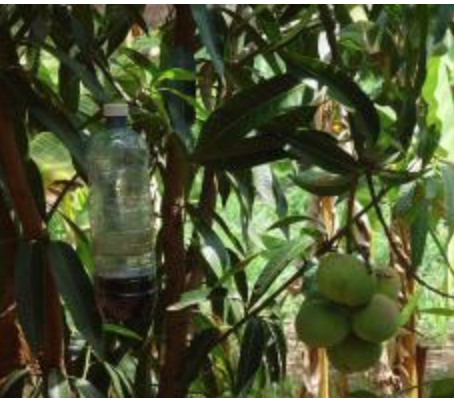
Fruit fly traps can be made locally using an ordinary jar with a lid, ‘Kimbo’ or ‘Blue Band’ tubs or similar plastic containers or plastic bottles, in which holes have been cut. They can be used with food baits such as protein hydrolysate, yeast or sweet/fermenting fruit juice.
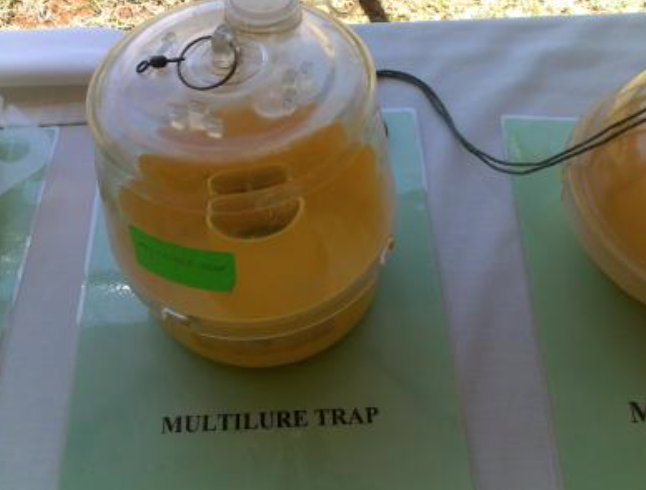
Fruit fly trap (Lynfield or bucket trap)
The Lynfield trap is cheap and easy to make. It is made of a cylindrical plastic container with 4 holes evenly spaced on its sides, a lid, a wire hanger and a bait basket (if it is to be used with a dry attractant). Similar traps can be made locally using ‘Kimbo’ or ‘Blue Band’ tubs or similar plastic containers or plastic bottles.
They can be used with either specific attractants such as methyl eugenol or food baits such as protein hydrolysate, yeast or a peace of fruit (banana, mango). Also vinegar is a very good attractant. Methyl eugenol attracts males of Bactrocera species and of a few Dacus species. Food baits attract both males and female fruit flies, they are not species specific, and also attract other insects, including natural enemies.
Several types of commercial fruit fly baits exist but are not locally available or registered.
Use food baits that attract a whole range of fruit fly species in the orchard such as protein hydrolysate (Nulure(r), Buminal(r), Solbait(r)). An alternative is waste brewers’ yeast at a rate of 45 ml per litre water. Use about 250 ml of the mixture in each trap. Add 1 tablespoonful of borax (di-sodium tetraborate) to each trap to prevent rotting of the flies caught.
A simple fruit fly trap is made as follows:
– Take a plastic bottle
– As bait, use 1/2 cup vinegar, mix with water,
– Add 4-6 drops liquid dish soap (it heavies down the wings and the fruit flies drown), don’t stir
– Then take a pen or pencil and poke 4 to 5 holes in the plastic, just big enough for a fruit fly to fit into, about 7mm. Once a fruit fly crawls in, it can’t get out. You would think they would just fly back out through the holes, but they won’t! If you see fruit flies crawling around on the surface of your plastic container but not going inside, make the holes larger
– Hang the bottle in an area where you have seen most fruit flies. Depending on the amount of fruit flies you have, you can expect to start seeing the bottle fill up within just a few hours.

The trap is filled with bait and hanged on the tree about 2-4 m above the ground within the canopy layer, in a semi-shaded spots, preferably in the upwind part of the canopy. The trap should be hanged in such a manner that branches and leaves are nearby, but not touching the trap. Traps should be hanged 10-50 m apart, depending on the bait used. Collect catches weekly and sieve them.
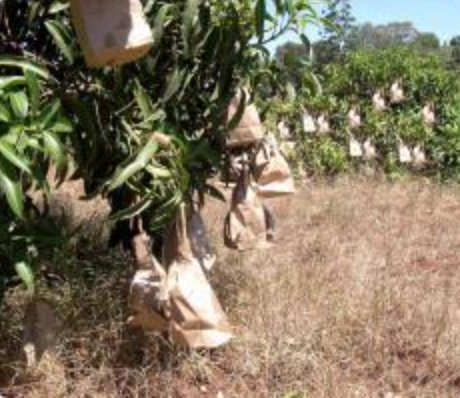
5. Fruit bagging
Bagging prevents fruit flies from laying eggs on the fruits. In addition, the bag provides physical protection from mechanical injuries (scars and scratches). Although laborious, it is cheap, safe, and gives a more reliable estimate of the projected harvest. Bagging not only protects fruit from fruit fly damage but protect the fruit from physical damage improving the market appearance of fruits. However, it is only practicable on small trees.
How to make a bag?
Cut old newspapers measuring 15 x 22 cm or 12.5 x 27.5 cm for mango and for fruits of similar size. Double the layers, as single layers break apart easily. Fold and sew or staple the sides and bottom of the sheets to make a rectangular bag.
How to bag a fruit?
Blow in the bag to inflate it. Remove some of the fruits, leaving one on each cluster. Insert 1 fruit per bag then close the bag using coconut midrib or firmly tie top end of bag with string or wire. Push the bottom of the bag upwards to prevent fruit from touching the bag. Use a ladder to reach as many fruits as possible. Secure the ladder firmly on the ground and for bigger and higher trees, secure or tie the ladder firmly on big branches.
Reminders
Bagging works well with melon, bitter gourd, mango, guava, star fruit, and banana. Whole banana bunches may be bagged inside banana leaves. Start bagging the mango fruit 55 to 60 days after flowering or when the fruits are about the size of a chicken egg.
When using plastic bags, open the bottom or cut a few small holes to allow moisture to dry up. Moisture trapped in the plastic bags damages and/or promotes fungal and bacterial growth that can cause fruits to be diseased. Plastic also overheats the fruit. Bags made of dried plant leaves oe brown paper are good alternatives to plastic.
Remove the bags during harvest and dispose of them properly.
6. Light traps
How to make a light trap:
- Construct a tripod made of wooden poles (e.g. bamboos). The construction must be strong and well anchored, so that it can’t blown away by wind or thrown down by animals
- Mount an oil lamp or an electric bulb on the tripod. If electric light is used, make sure that neither the cable nor the bulb contacts the water to avoid electrocution or catching fire
- Place a shallow bowl of water underneath, about 5 cm away from the lamp
- Add a few spoons of oil (or soap powder/liquid) to the water. Moths will be attracted by the light and will have oil sticking to their wings, hindering them to fly away.
Use the light trap from evening until early morning.
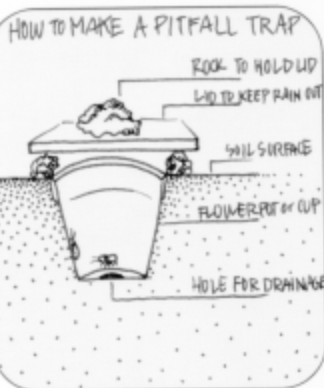
7. Pitfall traps
Pitfall traps are used to catch insects and other organisms that crawl about on the ground (e.g. caterpillars of the African armyworm, ants, ground beetle adults and larvae, spiders, etc.). They walk into the trap (container) and then cannot find the way out.
Pitfall trap consists basically of a jar, a plastic cup, a glass or a metal container, placed in the soil having the top level with the soil surface. Occasionally, collectors place a funnel in the top of the container to reduce the likelihood of escape or evaporation of the fluid in the containers. In addition, some collectors place a tile or similar object on top of the trap to make it more attractive to crawling insects.
8. Benefits of insect trapping
- Traps work 24 hours a day. Even if you scout for insects each day, you won’t see nocturnal insects that may be damaging your plants
- Traps often target adult stages of pests. These appear long before the caterpillars or grubs that feed on plants. Therefore, traps facilitate early detection of pests before they cause damage to crops, and can help you correct certain problems before they cost you money
- Traps can indicate problem areas, or hot spots, requiring corrective action or spot treatments without having to treat all of your plants, and thus help reduce the use of pesticides
- Trapping programmes give the information needed to base and document your management decisions
To get the most from your traps
- Check traps regularly (at least weekly)
- Identify (correctly) pests and other insects
- Keep accurate records
- Remove trapped insects to avoid confusion during subsequent counts
- Service (change sticky boards or water) or change traps regularly
9. Information Source Links
- ATTRA (2004). Thrips Management Alternatives in the Field. By George Kuepper. NCAT agriculture specialist. ATTRA publication IP132. www.attra.ncat.org
- Elwell H.and Maas, A. (1995). Natural Pest and Disease Control. The Natural Farming network, Zimbabwe. ISBN; 0-7974-1429-0, Mambo Press, Gweru.
- For more information on fruit bagging see: Secretariat of the Pacific Community, (2001). Fruit fly control methods for Pacific Island Countries and Territories. Pest Advisory Leaflet No. 40. Plant Protection Service, Secretariat of the Pacific Community. www.spc.int
- Koppert Biological Systems (K) Ltd. P.O.Box 41852 – 00100 Nairobi, Kenya. www.koppert.com
- Lewis, T. (1997). Field and Laboratory Techniques. In Thrips as crop pests. (1997). Edited by T. Lewis. CAB International Institute of Arable Crops Research-Rothamsted, Harpenenden, Herts, UK. pages 435-475. ISBN: 0-85199-178-5.
- Stoll, G. (1998). Natural crop protection in the tropics. Margraf Verlag. Weikersheim.
- Weinzierl, R., Henn, T., Koehler, P. G. and Tucker, C. L. Insect Attractants and Traps. University of Florida. IFAS Extension. edis.ifas.ufl.edu
10. Contact Links
- For traps, contact: The Real IPM Co.(Kenya) Ltd. P.O. Box 4001-01002 Madaraka, Thika, Kenya.Tel 0725 806086, email: info@realipm.com. https://realipm.com