Please give me a formula of making high yield dairy meal.
iCow Smart Farmer, James, Kiambu
Dear James,
A dairy cow requires a balanced diet with energy, proteins, vitamins, mineral supplements and free access to clean soft fresh drinking water. Feed your cow enough quantity and high quality forages. A Friesian cow requires 90 – 100 kgof quality forages per day. Feeding of concentrates based on different bran such as; maize, rice, and wheat bran is beneficial to cows as they have better milk production. Of these, maize bran feed is nutritionally better. On low cost to benefit ratio there is high milk production from wheat bran. Milk production in dairy cows increase in the order of; maize bran highest, followed by wheat bran, then rice bran. Crushed or grinded maize cobs can replace forage grass during dry months when green grass is not available. Maize cobs when crushed and mixed with maize stalks are palatable and nutritious and molasses may be added for better fermentation and taste. Other types of feed concentrates are; dairy meal, sunflower cake, soya beans cake, dairy cubes and maize germ. A simple formula like; Maize germ – 35%, maize or wheat bran – 35% , sunflower or cotton seed cake – 30% , mineral supplements – 1%,is advisable. During milking, feed I kg of concentrate and challenge feed her by adding a half kilogram in the next one month. A standard guideline for feeding is 3 kg of high energy concentrate per day. Please tell friends and farmers to dial *285# to register and join iCow. Visit iCow menu for much more by dialing *285# including registering your livestock with us under No. 4 Precision farming.
Thank you. Your friend and advisor, Dr. iCow
Dear Dr. iCow,
I have received the guideline of how to feed dairy cow and I thank you once again for it. iCow is all what we need to improve our dairy farming. God bless you as you continue to inform us of the new development.
Please share some tips with me on how to look after a new calf.
iCow Smart Farmer, Mr. Njora from Nyeri
Dear Mr Njora,
Calves require good feeding regime & a clean environment. At birth and on standing, allow the calf to suck colostrum from the mother. Colostrum contains antibodies which give the calf immunity from the mother and is highest absorbed from birth to 4 hours, best within 12 hours, good within 24 hours, and very low after 24 hours. Colostrum ends after six milking and is rich in nutrients as it has high energy and proteins than normal milk. In week 2, the calf continue to depend on liquid diet; milk or milk replacer for growth and health, and should consume about 10% of its body weight, about 4 litres of milk, 2 litres in the morning and 2 litres in the evening. Week 2 to week 3, introduce high quality forage which has fine texture and mixed with legumes like sweet potatoes vines. Supplement the calf with calf starter pellets at this time. Give the calf clean fresh drinking water, about 4 litres divided into 2 portions between milk feeding. This continues for up to 6 weeks. From 6 weeks of age reduce the amount of milk, encourage taking of dry feeds, introduce mineral supplements by giving a mineral block as a background lick. Water intake increases with age, allow free access. Week 9 to 12 weeks of age wean the calf. At weaning there is withdraw of milk, which should be done gradually, e.g. to once daily, 1 litre once daily, eventually to nil so as to avoid stress and also allow her digestive system to adjust to new diet. The calf is by now dependent on other feeds.
My cow gave birth two weeks ago and was affected by mastitis. After treatment the teat which was affected produces nothing. What do I do?
Yours, iCow Smart Farmer, Priscilla
Dear Priscilla,
Mastitis in a cow is caused by pathogens especially staphylococci and streptococci germs. These could have caused extensive damage of tissues in the affected quarter after the invasion and that is why there is very little or no milk from this quarter. These contagious germs are mostly spread during milking by the milker’s hands, beddings used in the cow’s house, contaminated water used for udder preparation before milking, teat wounds and flies. To avoid new infection it is important to practice proper milking hygiene by using; milking salve, an infective germicide as after-milking teat dip, like Mastrite, maintain clean and dry beddings for the cow and keep the milking shed clean and dry. Please tell friends &farmers to dial *285# to register and join iCow. Visit iCow menu for much more by dialing *285# including registering your livestock with us under No. 4 Precision farming, and also learn more from our Library.
My cow which is an Ayrshire breed only produces two litres a day. I have tried giving her everything but there is no change.
Yours Sincerely: iCow Smart Farmer James Mwangi
Dear Mr. James Mwangi,
An Ayrshire dairy cow requires a balanced diet with energy, proteins, vitamins and mineral supplements. Feed her with quantity and quality forages. The mineral supplements should have correct amounts and proportions of major minerals and trace elements for optimal health, growth, milk production and reproduction or fertility. Major minerals; calcium and phosphorus are critical components in dairy cow’s mineral supplement as they are essential for growth, milk production and fertility. Trace elements, e.g. selenium, zinc, iodine and cobalt, are essential for animal’s daily needs, immune system and tissue growth. Feed your cow mineral supplements by; 1. – Free choice in a box or a trough. 2. – Top dressing on the forages. 3. – Mixed with concentrates. There are many products in the market, e.g. from Coopers, Unga Ltd, Ultravetis, Eagle-Vet. Make sure you buy from a registered agro-vet to avoid buying fake products. For first calf heifers, milk production may be low but will increase in later lactations especially after the third calving. Give her concentrate feeds during milking as a routine, it stimulates milk letdown. Try to challenge feed her in this early part of lactation by adding an extra half kilogram of concentrate. If she does not respond the level is reduced.
Geographical distribution of Tomato in Africa. Updated on 4 July 2019. Source FAOSTAT
2. General Information and Agronomic Aspects
Tomatoes are native to South and Central America, and are now cultivated widely throughout the world. Tomatoes are one of the most widely cultivated vegetable crops in Africa. They are grown for home consumption in the backyard of almost every homestead across sub-Saharan Africa. They are important source of vitamins and an important cash crop for both smallholders and medium-scale commercial farmers. Tomatoes acting as taste enhancers in food are always in high demand both for fresh consumption and processing.
Tomato yields in smallholder cropping systems in the region are generally far below the potential of the crop. Average yields as low as 7 tons/ha have been reported from Tanzania and 10 tons/ha from Uganda, while yields as high as 100 tons/ha have been recorded from commercial farmers in Zimbabwe. There are several reasons for low yields. Among these are low quality seeds, non-availability of inputs, sub-optimum crop husbandry and a large number of pests and diseases.
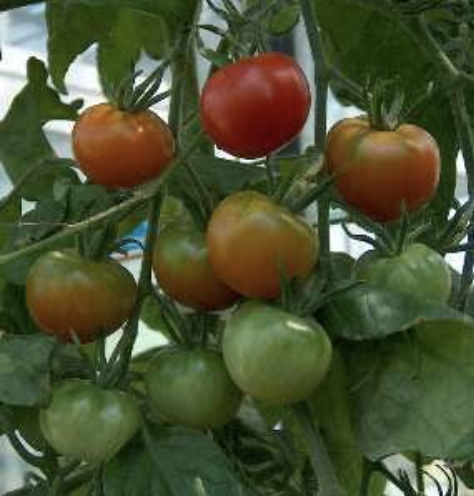
Cherry Tomatoes are a fast expanding export crop in Kenya. These are miniature tomatoes with a preferred size of around 15 g per fruit. Cherry tomatoes are easier to grow organically than most other tomatoes as many of them have a high tolerance to diseases and can be grown successfully both under green house and open field conditions.
Climate conditions, soil and water management
Ideally, tomato requires a relatively cool, dry climate for high yield and premium quality. However, it is adapted to a wide range of climatic conditions. Tomatoes have been grown as far north as the Arctic Circle (under protection) and down to the hot and humid equator. The optimum temperature range for growth and development is 21 to 24degC. Prolonged exposure to temperatures below 12degC can cause chilling injury. Mean temperatures above 27degC severely impair growth and fruit set. Destruction of pollen and egg cells occurs when the maximum day-time temperature is 38 deg C or above for 5 to 10 days. Fruit set is also generally poor if the night temperatures are above 21 deg C just before and after flower formation. Hot dry winds can also cause flower abortion. Tomatoes are not sensitive to day length and set fruits in photoperiods ranging from 7 to 19 hours. Tomatoes can be grown in many soil types ranging from sandy loam to clay-loam soils that are rich in organic matter. The ideal soil pH range is 6 to 6.5; higher or lower pH can cause mineral deficiencies or toxicities. Long periods of flooding are detrimental to tomato growth and development.
Small-holder farmer tomato seed production
For own seed production it is not recommended to use hybrid varieties. These varieties carry a label “F1”. However, if a hybrid variety is preferred, it cannot be used for more than one generation (one crop cycle).
Conditions to be followed when producing seed:
The tomato seed should be multiplied only once.
Buffer zone for tomato seed plot should be 25 m from any other tomato crop.
The plot should not previously have had tomatoes planted recently.
The tomato crop should be scouted regularly for pests and diseases.
The first step fruits should not be included for seed extraction.
After planting the seed the off types should be uprooted early as when seen.
Weeding of plot should be properly done.
Proper crop management is needed i.e. fertiliser application, pruning, staking irrigation etc.
Seed extraction process
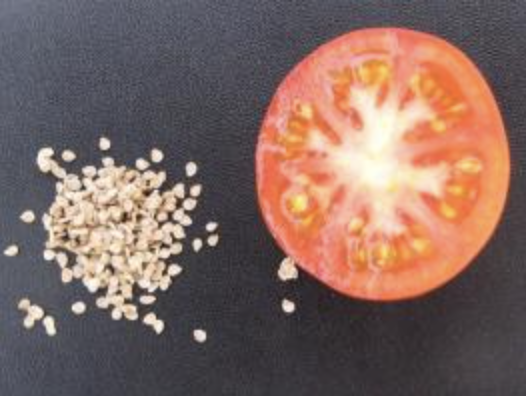
omato seed extraction by smallholder farmers (c) A.A. Seif, icipe
Pick ripe fruit at second cluster from only robust, disease-free plants (plants not infected with diseases: bacterial canker / bacterial speck / bacterial spot / anthracnose fruit rot / early blight / late blight / tomato mosaic virus).
Wash the fruit, preferably with a soap (potassium based) to decrease the chance of infection by diseases.
Cut the fruit in two pieces and remove the seeds with a spoon. Or the pieces can be squeezed out into a clean bucket, plastic, glass or ceramic bowl until only the seed-jelly and fruit sap is left.
Cover the bowl with cloth or paper to keep away dirt and other possible contaminants but do not make it airtight.
Let the seeds stand for 1 to 5 days (usually 2 to 3 days in warm areas).
Locally produced tomato seed (c) A.A. Seif, icipe
Stir the seeds daily to ensure uniform fermentation and to prevent seed discolouration.
Wash the fermented seeds in clean water. Any seeds that float during washing should be discarded because they are either not fully ripened or filled properly.
Dry the seeds in indirect light and in well-ventilated places. The seeds could be spread out over a clean manila sack to dry.
In case seeds cannot be sown immediately, they should be stored in a waterproof container (transparent plastic bag / non-coloured glass bottle). Transparent materials allow sunlight, which reduces mould development. Place a bit of ashes in the bottom of the container to absorb any moisture and to prevent the seeds from moulding. In case where pots or bottles are used for seed storage, the tops should be covered with plastic film to stop possible water seepage and mite infestation.
Store seed container in a cool place, as dry as possible.
Check the seeds regularly (at least weekly) for mould development. If mould is detected, dry the seeds again.
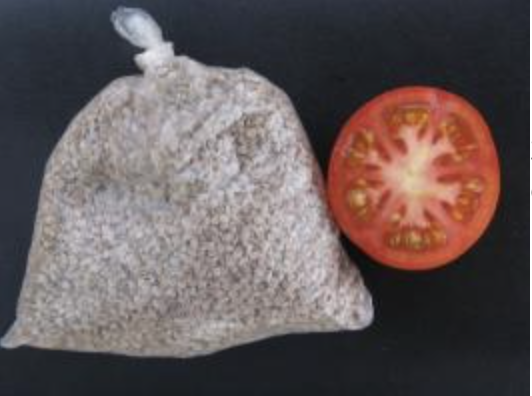
Storage of locally produced tomato seeds in plastic bag (c) A.A. Seif, icipe
Seeds can be stored, if properly dried, up to 2 years. One kg of tomatoes will produce between 1 and 4 grams of seeds.
(This information is based on a Biovision Project carried out in Taita Hills, Kenya, under Eastern Arc Mountains in conjunction with Wild Life Services)
Propagation and planting
Tomatoes can be direct-seeded or transplanted in the field, but this method is expensive as large amounts of seed are required (about 500 to 1000 g of seeds/ ha) and adds about four weeks of weeding labour to growing costs. In contrast, raising the young transplants in a special nursery enables growers to achieve great seedling uniformity, requires smaller quantity of seed and saves on weeding costs.
Nursery bed preparation:
Construct raised seedbeds of maximum one m width in a place where no potatoes, tomatoes, eggplants or peppers have been grown for about 3 years.
Incorporate about 5 kg of good compost/ m2 into the seedbeds, which are finely cultivated on top.
Drill shallow seeding furrows with a pointed stick. One ha of tomatoes requires 150 to 200 g of well germinating seed.
Sow seeds in the furrows and cover them lightly with soil.
Pat firmly with the flat side of a rake or similar tool, mulch and water liberally.
Never use fresh manure on a seed bed as it will burn young seedlings.
After emergence of seedlings push away the mulch from the rows to allow sunlight to get through to the young seedlings.
Individual plant raising in banana leaf pots or plastic seedling trays will greatly improve eventual plant establishment, by reducing transplanting shock and root damage during transplanting.
The young seedlings require sufficient water to sustain good, healthy growth.A week before transplanting, reduce watering to harden the seedlings. Three- to four-week-old seedlings (15 to 25 cm high with 3 to 5 true leaves) are ready for transplanting. Seedlings must be thoroughly watered 12 to 14 hours before they are lifted out of the seedbed, to avoid excessive damage to the roots. Transplant seedlings in the afternoon or on a still, cloudy day to reduce the transplanting shock, and water them immediately. As little as a cup of water per plant immediately at planting will greatly speed up plant establishment.
Spacing between plants and distance between rows depends on the cultivar’s growth habit and whether the plants are to be supported by stakes or left to grow on the ground.
Indeterminate varieties are generally staked while determinate varieties can be grown in the field without staking. Common configurations are plants spaced 30 to 60 cm apart in single or double rows on 1.0 to 1.4 m wide beds.
Husbandry
Tomatoes respond very well to liberal amounts of well-rotted compost or manure. In addition a spoonful (or 3 teaspoons) of rock phosphate should be added to each planting hole. If the soil is poor in organic matter it is advisable to grow a crop of good quality green manure such as cowpeas, mucuna, soybean, or crotalaria before transplanting tomato seedlings. Avoid commercial nitrogen fertilisers as excess nitrogen is associated with fruit puffiness and blossom-end rot, and generally causes excessive vegetative growth. Excess free nitrogen in the soil also causes softer leaves and makes the plants attractive to pests and diseases. Competition with weeds, especially in the hot and humid tropics, can be very severe. To control weeds on open land crops, slash regularly emerging weeds as close to the ground as possible between rows of tomatoes is recommended. Leave slashed weeds on the soil as mulch to help prevent erosion, reduce soil temperature and conserve soil moisture. This should be supplemented by manual weeding in rows and mulching the beds with straw.
Staking:
For tall growing indeterminate varieties, put a 2 m stake firmly in the ground for each tomato plant and tie the stems loosely as the plant grows. Alternatively put a stout pole in the ground at every four m and two wires run – 1 at 2 m and another one at 0,15 m above the ground. Tye a fairly strong string between the two wires behind each tomato plant. The plants can then be carefully twisted around the strings as they grow.
Pruning of tomato plants is necessary for indeterminate varieties. One or two main stems should be allowed to grow and the side branches (laterals) pinched off as the crop grown on a weekly basis. When 6 to 8 flower clusters are formed, the growing top should be pinched off to encourage the growth of good size marketable fruit. Leaves close to the ground should be removed to help prevent entry of blight infection. No pruning and regulation of fruit number and clusters are normally practised on determinate cultivars. Semi-determinate cultivars may be grown either as a determinate or indeterminate crop. Smokers should wash their hands carefully with soap before handling tomato plants as they may otherwise transmit tobacco mosaic virus disease. Tomatoes need adequate irrigation during the early plant growth, fruit set and fruit enlargement stages. Consistency of water supply to the plants plays a major role in attaining uniform maturity. It also reduces the incidence of blossom-end rot, a physiological disorder normally attributed to calcium deficiency during fruit enlargement. In dry weather watering is essential at least two times a week. Drip irrigation is the most efficient and risk free method of irrigation, as it does not create water splashes onto the plants.
Cherry tomatoes although indeterminate can produce quite well even when not staked in the field, but must then be given adequate space as they spread quite extensively ( one m2 per plant is minimum). Higher production and easier field management are benefits of the expensive staking procedure.
Harvesting
Fresh-market tomatoes are often harvested at the mature-green stage and ripened in transit or in storage before they are marketed. Ethylene is sometimes used to rapidly and uniformly ripen mature-green tomatoes prior to shipping them to the market, but this adversely affects quality. This is not a common practice in Kenya. Generally, tomatoes harvested at pre-ripe stages tend to be of lower quality (lower soluble solids, ascorbic acid and reducing sugars) than plant-ripened tomatoes. The nature of the growth and ripening pattern of fresh-market tomato cultivars require frequent pickings for either mature-green or plant-ripe fruits. In contrast to the fresh-market or table tomatoes, processing tomatoes are picked fully ripe. In developed countries, harvesting is often by machine. Tomatoes used for pureed products such as soup, juice and sauces, are left on the plant until over 85% of the fruits are ripe. Those for whole tomatoes are picked while still firm, but often only 65% of the crop may be ready to be picked all at once.
After picking, tomatoes should be stored in a shady place either in the field or at home to prepare them for the market. Properly sorted and graded fruits generally command a better market price than ungraded fruits. The marketable fruits are then packaged in suitable containers, often 20-kg wooden boxes, bamboo baskets, plastic boxes, or other locally available packaging materials. Proper packaging protects fruits from injury and reduces water loss. The storage life of tomatoes depends on the maturity stage at which they are harvested and on the desired quality of fruits. Quality is highest when completely ripe, whether artificially or on the plant. Ideally mature-green tomatoes should be stored for 7 to 10 days at 13 to 18degC at 85 to 90% RH so that they will ripen properly. Colour is the single most important visual parameter of tomato quality. Lycopene development at temperatures above 30degC is generally poor. This is the main reason that tomatoes grown in the hot tropics tend to have a pale red or yellowish colour and are poorly flavoured.
Harvesting and packaging of cherry tomatoes depend on market requirements. For distant markets, the fruit clusters may be cut when the fruits start turning to a red or pink colour depending on the cultivar. Firm red ripe fruits are required for the domestic market. However for the export market, cherry tomatoes are graded and packaged into pre-packs before shipment direct to supermarkets in the export destinations. On the whole a marketable yield of 20 tons /ha and above is considered a good yield. Yield of up to 60 tons/ha have been obtained under experimental conditions at KALRO,Thika Horticultural Research Station.
Many trees and tree planting programs fail to succeed due to poor tree selection, poor planting and neglect. If you take the time to plant trees, it is really wise to figure out 4 things first.
Why are you planting
What are you planting
Where are you planting
Tree seedling after care
Why are you planting.
Trees are a huge investment in your time and resources. They can take anything from 1-40 years to grow but meanwhile they can give you multiple benefits during this period. These may include:
Timber
Fruit
Windbreakers
Conservation benefits
Honey
Mulch
Fodder
Medicine
Aesthetics
Fuel
Shade
Clean air
Clouds
Posts
Nitrogen fixing-Soil improvers
Trees will always offer value, few if any, are useless.
Different Trees grow in different areas, and where a tree is planted in an area that it is not suitable, then it will fail to thrive. Given that tress can take a long time to grow it is really important that you minimise your risks of selecting the wrong trees before you start planting.
Given the various benefits different trees offer, it is a wise decision to select a variety of trees to grow that will give you multiple benefits over a period of time. These can be planted around the farm homestead as well as along borders of cropping blocks and timber blocks and in forests.
If you are planning on planting a timber block, your selection of trees will differ and your projections on returns of your investment will be longer term.
It is important thus to first decide on why you are planting so that you can select the best trees to grow.
What are you planting
Once you have decided why you are planting trees, the next question is the varieties you will select. This will not only depend upon the zone in which you intend to plant the trees but also the purpose, level of care and security you can provide the seedlings.
You can get expert advice from your local forestry centres or Forestry research centres in your area. On iCow you can Select My Farm>My Experts and look through the list to see if there are any experts in your location that you can contact easily through the iCow platform. You can also search for nursery sellers on iCow Soko. (Dial *285# Select 6 Soko..Kenya only)
NB: You must do all you can to ensure you are selecting trees that will grow in your area. It is pointless and a waste of investment and time in selecting and planting trees that fail to grow and remain stunted.
Where are you planting.
The decision to plant in a specific location should also be considered and matched with the type of tree and it’s purpose. If you are plating fodder trees, it makes sense to plant them near your livestock unit for ease of harvesting and carrying. If you are planting fruit tree, you would want them in a secure area from monkeys and theft. Timber trees that may require a lot of room will also need a specific area to grow. Take your time to really plan where you will plant your trees.
Tree Seedling After care.
Too many seedlings never make it past the first few months or years of their lives. Like children, young trees require attention and protection until they are established enough to manage on their own.
They need regular supplies of water and protection from being grazed or damaged by domestic livestock wildlife.
How to plant a tree
Tree seedlings are generally sold in planting bags or pots of varying sizes, depending on the type and age of the seedling.
At panting it is important to ensure that the tree seedling will be planted in an appropriate hole, with appropriate feed, water and protection.
Dig a hole as deep as the rootball of your tree, that is the part of your seedling in the bag. Make the hole 2-3 times wider than the root ball.
Remove the covering from around the tree seedling and lie the seedling or sapling on its side. It is likely that the roots are circular due to growing around in the tight space of the planting bag. The older the seedling/sapling is, the more circular rooting. This can be a problem as the tree grows as the roots my cut off the flow of water and nutrients to the rest of the tree. Tease open the roots and align them to grow outward from the sapling. Cut off any stubborn circular ones taking care not to cut through the main tap root.
Mix the soil from the hole with equal parts of well rotted manure or compost.
Hold the tree in the hole ensuring the roots will all be covered but the tree trunk will be above the soil just where the roots start.
Fill in the soil and compost/manure mix around the roots and press down gently to secure the tree in position.
Build up a collar above the ground around the tree trunk using soil. Make this collar shaped into a bowl. The purpose of this collar is to allow you to water the tree adequately and for the water to seep through the bowl slowly , to the roots below. The bowl like collar must be about 12 inches wide measuring out from the tree stem. (24 inch diameter)
If the tree is tall you can build a protective structure around it that you may tie the tree to. This will help it grow straight.
Protect the tree from domestic animals and wildlife. You can do this by wiring or shade netting a small enclosure around the tree.
Water your tree the by pouring 20-30 litres of water in to the basin like collar . From now on do this once a week until your tree is established.
Cover the basin around the tree with about 3-4 inches of mulch, wood shavings etc to retain moisture and prevent weeds for growing.
Check on your trees every few days to see that they are doing well and that they have enough water. It is vital that you give your trees after care if you want them to survive.
Congratulations~~~~~~! It does no matter what tree you are growing, always give it the best start possible`!
Plant trees for your children and grandchildren so they may inherit a healthy planet.
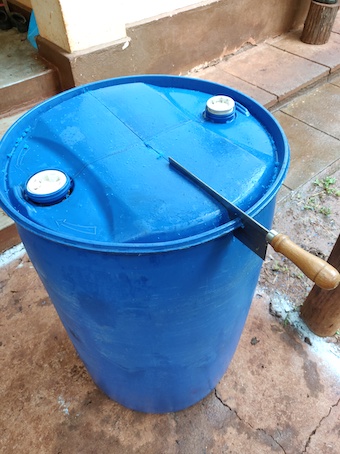
The quality of material used to make a vermiculture/worm composter tank is very important. It is best to use plastic as metal will corrode . A plastic 200 lt drum is ideal.
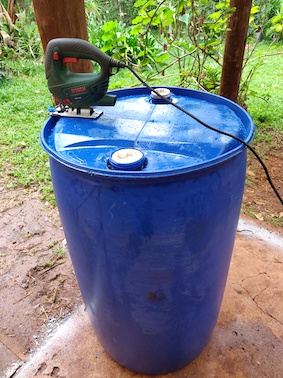
You will only need half a drum, so cut it in half using a saw or an electric saw.
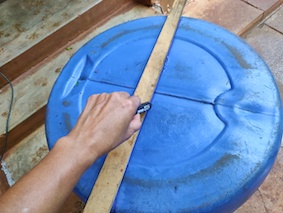
Carefully draw the guiding line across the bottom of the tank to make sure you put it as evenly as possible.
Try to choose a drum that has caps for the openings so that you can fasten these holes closed and one that has not been used to store toxic materials.
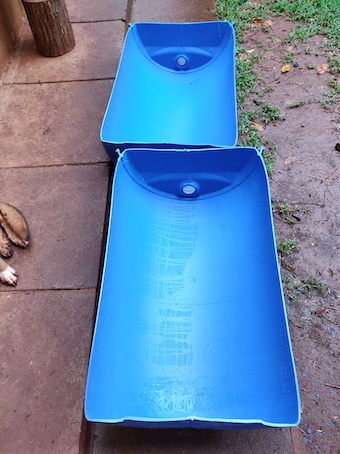
Clean the two halves of the drum thoroughly with detergent and then rinse with clean water. Try to remove all residues and any foreign smells.
Holes draining water
Drill two holes about one inch from the edge of the drum. These will be used to drain the worm juice fertiliser.
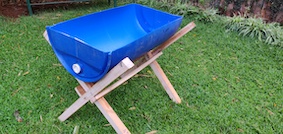
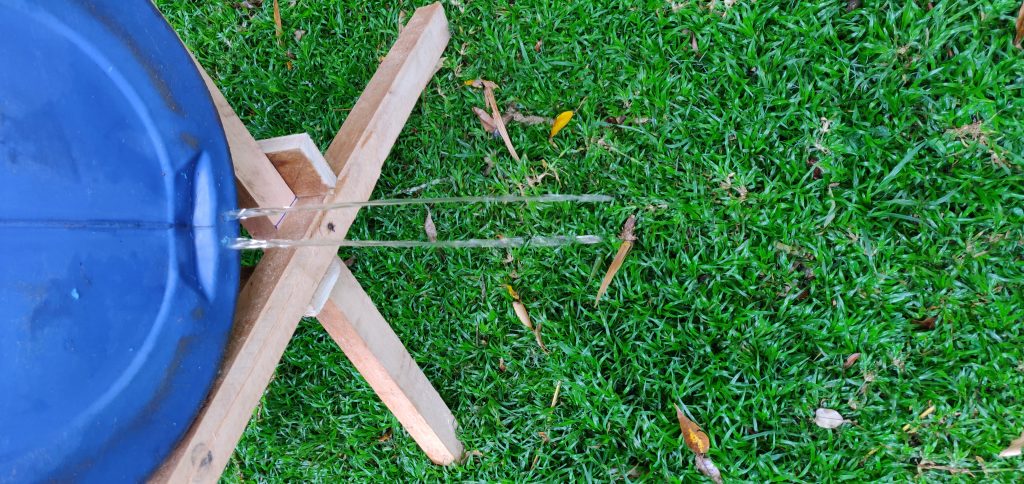
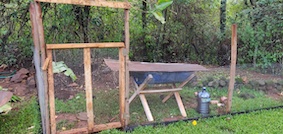
Trestle Credit: Will Wood
Make a wooden trestle/frame to hold the drum. The measurements for the X legs are 43 inches and the centre piece is 35 inches
Add a layer of stones in the bottom of the tank and cover them with a piece of shade netting. This is important to ensure the materials and worms stay in the tank when you harvest the worm juice.
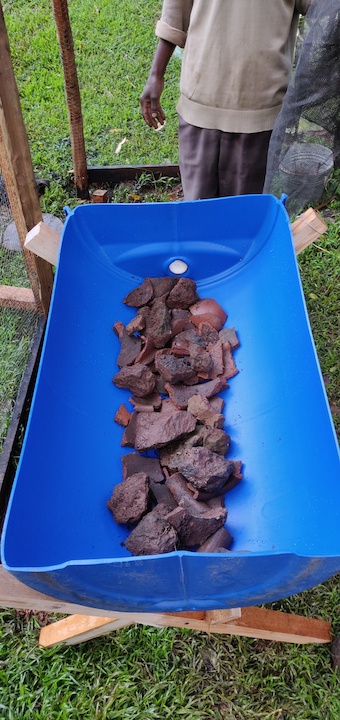
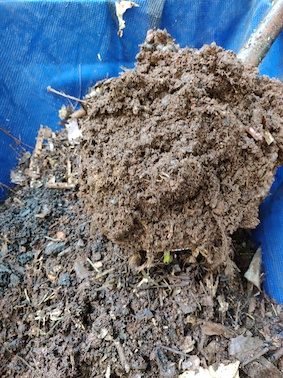
Manure
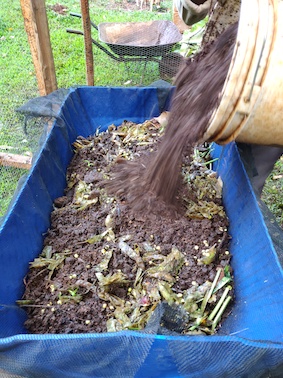
Add a layer of soil, manure, vegetable waste, leaves and grass cuttings to the drum. It must not get deeper than one foot.
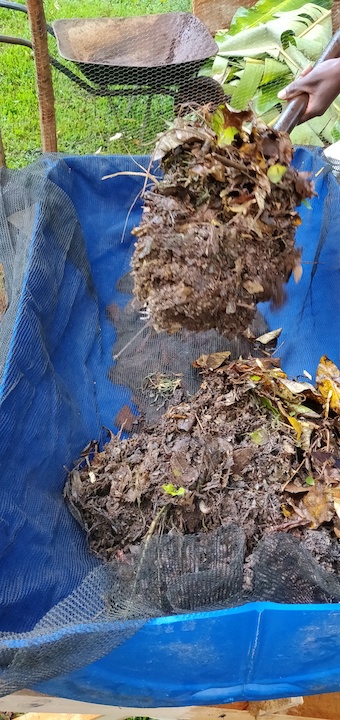
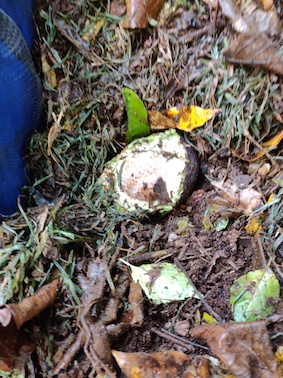
Adding worm food
Add some pockets of food like old avocados and other kitchen waste
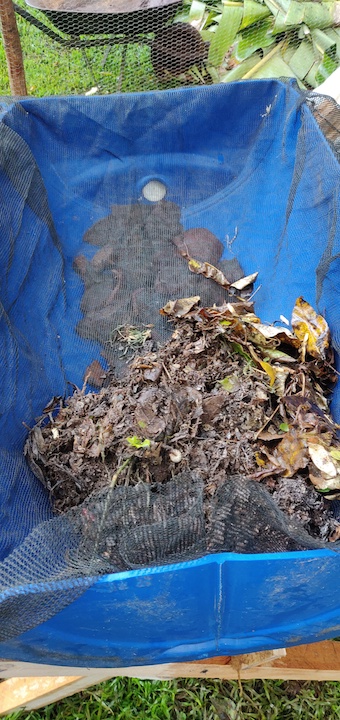
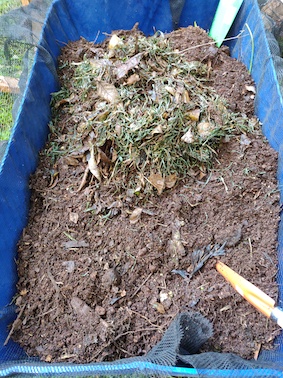
Grass cutting
Cover the top of the tank and bedding with a layer of grass cuttingS. This will help to keep in the moisture
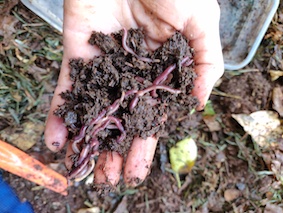
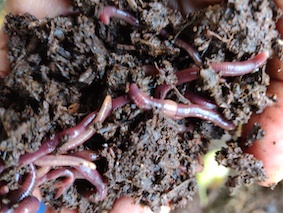
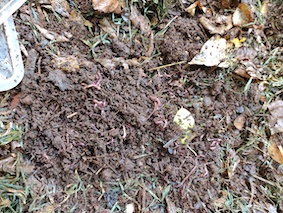
Worms
Earthworms Red wrigglers
Add worms to the system, they will wriggle their way in and begin to feed.
Cover the system with a mabati sheet to prevent predators like birds, ants and dogs from damaging the system or eating the worms. Leave the system now like this for at least one month before harvesting your first worm juice. Make sure it stays moist by adding a little water every week and a also add a few handfuls of food every week increasing in amounts as the worms breed. You will notice tiny green eggs. These are a sign that your system is doing very well. Congratulations!!!
Go to “Vermiculture -Worm Farming “ to learn how to maintain your vermicuture system and harvest the worm juice
Earthworms eat, digest and decompose organic matter like vegetable waste, food waste, livestock bedding materials, weeds and crop residue. The end product from the worms is their excretion which is called vermicast which is rich in minerals like nitrates, phosphorus , magnesium, potassium and calcium. In effect, earthworms efficiently unlock the nutrients held in complex organic matter making them readily available to be taken up by plants.
The process of farming earthworms, called vermiculture, allow us to capture these nutrients and reuse them to fertilise new crops. This is a very safe and cost effective way of ensuring safe and strong crops.
How do we capture the nutrients in the worm excretion or vermicasts?
There are two ways to do this
Grow the worms in your cropping beds.
Grow the worms in a special vermiculture enclosure.
Growing the worms in cropping beds in the field.
The best way to improve soil fertility is to continually feed your soil. Your soil in turn will feed your crops. The most efficient way to do this is to feed your soil with composted material. Hot composting is the process of breaking down organic material in a compost pile. Organic material is added in layers and may include adding effective microorganisms. The compost pile heats up and the materials break down into rich humus with nutrients readily available for plant uptake. Due to the heating process, earthworms cannot survive in a compost pile, they take part in cold composting where instead of using micro organisms, the earthworms themselves break down the organic materials.
In a field growing environment, this can done by digging one foot deep trenches and filling them with the waste organic materials, including farm yard manures and other material you would like to compost, then covering the trenches with a layer of soil. The earthworms will be drawn to the material and will break it down. After about one month you can then grow your crops along the top of the trenches, and they will benefit from the nutrients that have been released below, by the earthworms.
2. Grow the worms in a special vermiculture enclosure.
Simple vermiculture system
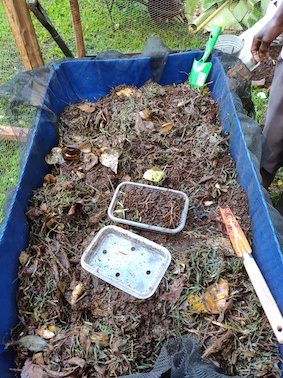
Growing the worms in a special vermiculture enclosure allows you to collect the vermicast nutrients directly from the worms and use it as a foliar feed or top dressing fertiliser. This is done by creating a confined environment where you can grow the worms. To do this you need to simulate the conditions they like, and feed them every so often so that they grow , breed and produce the vermicasts in volume. We can do this using a plastic tank or drum. The drum is filled with materials that the earthworms like to eat and the earthworms are introduced to this space where they now live in confinement.
The worms need a dark moist environment with plenty food.
To extract the nutrients from the worms, 20 lt of water is poured over the system once a month, and collected. This water will have dissolved nutrients from the vermicast and can now be diluted 1:10 and used as a top dressing or foliar feed.
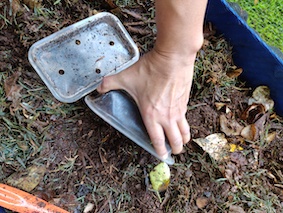
It is of great importance to feed the worms at least once a week. To do this, take a few hand fulls of kitchen waste or other degradable organic material and burry it in the drum. The worms will make their way towards it. You can also add a couple of Kg of livestock manures every month too. And always check that the worm bedding is moist. Add a little water every week if necessary. You will notice the worm bedding begins to resemble soil.
After a few months 6-12 you will need to remove all the bedding from the system and rebuild it a new. To do this you will need to separate the worms from the soil so you can use them again.
The best way to do this is to withhold feeding for at least 2 weeks, then add feed in the top area of the tank. The worms will all head in that direction and begin to feed. After about 5 days, remove the lower 3/4 bedding materials and add this to your garden crop beds. You can now rebuild the worm bedding again without removing them or you can put them in a bucket whilst you rebuild.
Caution:
Keep you vermiculture tank covered during the rains and protected from other challenges like birds and ants which will try to eat the worms. You can do this by painting the legs of the structure that holds the tank, with used engine oil, and by covering the top with a small piece of shade netting or a mabati sheet or even banana leaves.
Do not let the vermiculture system dry out. This will kill the worms. They need to live in a moist environment.
Do not worry if you put earthworms into your soil in the garden, they will not harm your crops at all. Earthworms do not eat growing material unless there is no dead material available. They also create great passages for air and water filtration. This allows your soil to capture and retain rainwater and allows oxygen to reach your plant roots. Both of these benefits ensure your pants have deep root penetration and are more resilient to weather related issues like flooding and drought. In a nutshell earthworms are soil manufacturers. They are great for our soils and we should use them and appreciate their free ecosystem services that help us produce sustainable, safe and nutritious foods. Using earthworm juice as a fertiliser means we no longer need to go to the expense of purchasing synthetic fertilisers, many of which damage our soils, often creating acidic soils that are hazardous to earthworm life and may result in toxins in our foods and growing systems.
Making a vermiculture system
Go to “How to make a worm Composter” for a step by step lesson on how to start vermiculture.