Quality honey starts with a good apiary. An apiary is a place where small groups of beehives are kept. A good way to begin beekeeping, especially in Africa, is to bait an empty hive to attract a swarm. Set up a hive and either rub it inside with some bees wax or lavender (plant leaves) to give it an attractive smell, or leave some attractive food for the bees. Granulated sugar or cassava powder will work. You could also put some honey on the top of the top bars. The bees will not be able to get at it and take it away to another hive, but the scent will remain and attract them. This will only be successful in areas where there are still plenty of honey bee colonies. Another option is to transfer a colony from the wild into the hive. The wild colony will already have a number of combs and these can be carefully tied on to the top bars of the hive, making sure that you include the brood combs and the queen. One of the best ways to get started in beekeeping is with the assistance of a experienced local bee keeper.
The following steps are necessary in starting a good apiary:
Step 1: Site selection
Easy to access
Away from human activity and noise
Safe from thieves
Near a place where bees can find water
Near flowers, and trees that produce flowers
Protected from strong sun and winds
Usually a place that is not useful for other activities such as crop farming
Step 2: Site Preparation
Clear obstacles and vegetation around hives to allow easy movement
Protect against unwanted visitors such as thieves and large animals
Plant nectar-producing plants to provide forage
Step 3: Placing the hives: Things to observe
If you decide to use stands they should be at least 1 metre high. They must be made of strong, termite resistant wood, so they will last. Live stands will not rot and you can use types of wood that will grow easily into new plants when stuck in the ground. Otherwise, the legs of stands must be covered with grease or put in tins of oil so ants cannot climb into the hive.
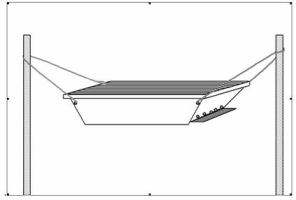
Use suspension wires if honey badgers are a danger. The wires need to be well greased to keep ants away. The suspension wires must allow the hive to swing easily to keep animals away.
Hang hives at least 1 metre from the ground.
Leave enough space (10-20 m for scutellata bees) between hives to make it easy to work without disturbing bees in other hives.
Make sure the hive entrances face away from footpaths.
Limit the number of hives.
Step 4: Hive Preparation and Maintenance
The hives need to be clean and to contain a good bait to attract honeybee swarms to live there
Hanging a KTBH posts 2 meters apart and the hive 1 metre from the ground (c) Apiconsult
Use plenty of bees wax around the inside of the hive and at the entrance. A top bar with a fresh bees wax starter strip is excellent for attracting bees. Bees are also attracted by a comb containing brood
If possible use wax starter strip on each top bar. This will force the bees to build in the desired direction
The bees like the odour of some leaves, which are always known locally and are sometimes used as extra baits
Inspect hives regularly to check if bees have moved into them.
If there are no bees check hives are clean and dry and that no pests, such as ants and spiders or snakes have moved in
Add more wax bait if needed. The best time to colonise hives is when bees are swarming or migrating
Discuss with experienced local beekeepers when the best colonising times will be
Bees need a supply of food and water to live, and during dry periods the beekeeper may have to supplement these natural resources. As a general rule, attempts to begin beekeeping should start with the area’s existing bees, techniques and equipment, which will all have been adapted for the local circumstances.
Seasonal management Depending on many factors in environment, climate and weather, the bees behave differently and react to their surroundings in different ways. As bee-keeper, the following behavioural aspects of bees will influence how the bee-keeper will manage them:
1) Swarming
This is a natural way by which bee colonies multiply their numbers. About half of the colony leaves the hive together with the old queen. Overcrowding in the hive normally causes swarming. Signs of swarming: i. Increased number of bees at the hive entrance. ii. Increased number of drones iii. Presence of swarm cells along the edge of the combs. iv. Increased defensiveness Control: i. Provide ample space in the hive by either dividing the colony or harvesting some of the combs. ii. Decrease overheating by providing some shade. iii. Destroy the queen cells so as to stop the emerging of new queens.
2) Absconding
This is an abrupt departure from the hive by the whole colony Causes: i. Physical disturbance of the hive e.g. poor harvesting methods, attacks by honey badgers, ants, termites etc ii. Presence of pests e.g. insects, spiders, ants iii. Bad odour iv. Starvation The colony does not take time to prepare, hence there are remnants of food, brood, eggs etc. Control: Proper management e.g. proper harvesting, handling of bees, proper hanging of hives, clearing the apiary and greasing the wires. 3) Migration
This is a natural phenomenon whereby a colony moves from one habitat to another mainly due to unfavourable weather conditions. Nothing is left behind in terms of brood or food reserves. Migrating bees seasonally follow well-established routes. Control: Feed bees in times of food shortage. 4) Supercedure
This is the replacement of a failing queen by the bees. Signs: i. Irregular egg laying pattern ii. Weak colony iii. Queen cells on the comb surface 5) Dangerous conditions
Period caused by: – Prolonged dry spells, heavy rains or cold weather What to do: – Provide shade, feed colonies, provide water, provide protection for wind but still allowing the space for the bees to fly in. 6) Production period during onset of flowering.
Build up period: – Start of forage and egg laying – Colony increases What to do: – Regular inspection – Remove old black combs – Unite queenless colonies
Agricultural Information Centre Documentation Unit, Ministry of Agriculture, Kenya
Adjare, S. O. (1990). Beekeeping in Africa. FAO Agricultural Services Bulletin 68/6, Food and Agriculture Organisation of the United Nations Rome, ISBN 92-5-102794-3. www.fao.org
Adjare, S.O. (1984). The Golden Insect. A handbook on beekeeping for beginners. Practical Action Publisher. ISBN-10: 0946688605 / ISBN-13: 978-0946688609
Bees for development publishes the ‘Bees for Development Journal’. A highly recommended publication for beekeeping in developing countries www.beesfordevelopment.org
Carroll, Thomas (2006). A Beginner’s Guide to Beekeeping in Kenya. Legacy Books, Nairobi, Kenya. ISBN: 9966-7078-6-7
Honey is harvested at the end of a flowering season. It can be considered more fair to the bees to harvest it a bit before, especially in hives where the whole comb is removed, to allow the bees to re-establish the comb and collect more honey for themselves. Under all circumstances, the beekeeper selects those combs which contain ripe honey, covered with a fine layer of white beeswax. These combs are usually the outer ones. Combs containing any pollen or brood should be left undisturbed. Honey will keep a long time if it is clean and sealed in an airtight container, but will deteriorate rapidly and ferment if it has absorbed water. Preventing this from happening is crucial in honey harvesting.
The principal idea in harvesting honey is identifying the comb with ripe honey, free it of bees and take it away for processing. This entails shaking the bees off the combs, young bees normally cling on the comb therefore they are brushed off using a bee brush.
Reasons to increase honey quality through processing
– Processing eliminates all foreign particles and dirt from honey. – Warming (not over 40degC) honey during processing destroys yeast which cause fermentation (but only if the honey contains juice from crushed bees or bee larvae). (Do not overheat the honey on the open fire) – Warming honey delays crystallisation. – Processing adds value and therefore honey fetches more money. Honey extraction
The honey comb can be simply cut into pieces and sold as fresh cut comb honey. Alternatively, the honey and comb can be separated and sold as fresh honey and beeswax. It is important when processing honey to remember that it is hygroscopic i.e. will absorb moisture, so all honey processing equipment must be perfectly dry.
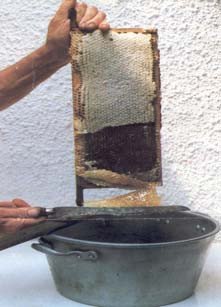
Squeezing the honey out by hand The most common traditional methods of honey extraction are squeezing or melting the combs. Melting the honeycomb is wasteful and makes the quality of both the wax and the honey inferior; it should be avoided. If your quantity of honey or financial resources are small, then squeezing the honey out by hand is probably the most viable option. Honey combs should be scraped with a knife or fork on both sides to open the capping of the cells, then left to drain through a fine dry sterilized muslin cloth into a clean container. Make sure there are no crushed bees or bee larvae among the honey combs, as this reduces the quality.
Honey combs cut from a KTBH or Log hive can be strained with a straining net as illustrated
The honey extracted by this method will have to be strained through several increasingly finer meshes to remove any bits of wax or debris, ending with something like muslin cloth. It is very important that this procedure be carried out hygienically, and that the honey is not left exposed to the air, where it will pick up moisture and deteriorate.
With a Langstroth hive one can use the bee escape (clearer board). Fix the bee escape between the brood box and the super. After 24-48 hrs all the bees will be cleared off the honey supers. The supers can then be removed for honey extraction. Ensure the clearer board is removed and the supers replaced with empty ones.
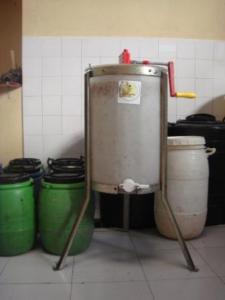
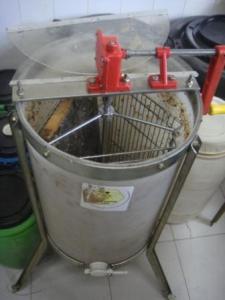
Extractor
Manual extractor (Centrifuge (c) S. Fontana, Biovision
Manual extractor (c) S. Fontana, Biovision
Honey storage
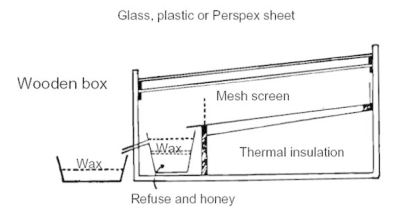
Solar wax melter (c) Practical Action
Store the honey in glass jars or plastics buckets with well-sealed lids or in a metal container which is coated with a layer of food grade varnish. In humid areas the honey must be stored in airtight containers to prevent water absorption and consequent fermentation within a few days after extraction. If you want to sell your honey you should add a label describing the source of the honey (for example sunflower, mixed blossom, tree honey), the country and district it was produced in, the net weight and your name and address.
Beeswax processing
The comb from which bees build their nest is made of beeswax. After the honey has been removed from the combs, the beeswax has to be extracted. This is to save it from destruction from the wax moth.
Put the wax into an open container which sits in a water bath. Bring the water to a boil and skim off any debris floating on top. Afterwards pour the liquid wax through a fine filter for a final clean.
Another option for processing the wax is a solar wax melter. This appliance is easy to make and consists of a wooden box with a galvanised metal shelf with a spout, a bowl or container that sits under the spout, and a glass or plastic cover. When placed in the sun the temperature inside the box will melt down a comb and the wax will flow into a container inside the box. Any honey that was left in the combs will sink to the bottom; it is usually used for cooking or beer making as its taste is spoiled somewhat by this process.
Beeswax does not deteriorate with age and therefore beekeepers often save their scraps of beeswax until they have a sufficiently large amount to sell. Many beekeepers still discard beeswax, unaware of its value. Beeswax is a valuable commodity with many uses in traditional societies: it is used in the lost-wax method of brass casting, as a waterproofing agent for strengthening leather and cotton strings, in batik, in the manufacture of candles, for making polish, and in various hair and skin ointments. Beeswax is also in demand on the world market. Beeswax for export should be clean and have been re-heated as little as possible.
Before you can put the beeswax on the shelf for the purpose of selling it you must prepare it well having the following general requirements in mind.
– The colour of beeswax varies from whitish yellow to yellowish brown. This will depend on the type of combs one used when making the beeswax. – Beeswax should be free from organic matters such as bees, brood, debris, sand or any other undesirable materials. – It should not be adulterated by blending it with other types of wax such as paraffin wax, synthetic wax or any types of oil or fat (animal or vegetable).
Uses of wax
Uses of wax (c) Mette Vaarst, Biovision
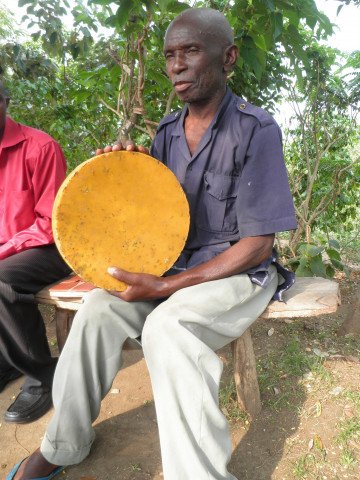
Once beeswax has been extracted from the combs, the beeswax cake maybe remoulded into desired shape. There is a high demand for beeswax for making candles.
Procedure: Melt the piece of beeswax using a water-bath (indirectly), quickly pass the molten wax through a clean cotton cloth, the desired mould (smeared with detergent solution) should be ready to receive this wax. Let it cool for several hours. Remove and clean the beeswax cake with a soft damp cotton cloth.
Value addition for bee products
Honey is a major ingredient used in the preparation of various products that are of benefit to the human body. It is also used as a sweetener in various recipes.
The following recipes were popular on a bee product training course of Apiconsult conducted in Somalia. Ingredients are generally available in Kenya. Be innovative where something is missing and experiment with what is at hand. Many bee farmers in Kenya make additional income making and selling simple beeswax based creams which are reputed to have medicinal properties. Add value and make more money from your beekeeping!
1. Candles
There are many possibilities such as dipped, moulded, balloon shell, scented, engraved and herb candles
2. Leather Softener
When old leather such as belts, gloves and shoes become hard. This formula softens leather and makes it waterproof.
30g beeswax
240g of petroleum jelly
Melt the ingredients in a double pan. Brush the hot mixture onto the leather and allow it to penetrate. If possible place the item in the hot sun to allow the mixture to penetrate the leather. Polish the leather with a cloth to remove excess waterproofing.
3. Wood Dressing
This finish protects floors and outside timber which have not been painted and where paint is not desired.
60 g of beeswax
1 litre of linseed oil
Melt the beeswax and stir in the oil. Apply the mixture with a brush.
4. Chapped Lip Balm
1 Tablespoon of Shredded Beeswax
1 Tablespoon of Petroleum Jelly
1 Teaspoon of Honey
1 Tablespoon of Lanolin
3 to 4 Drops of Essential Oil
Melt the wax lanolin and petroleum jelly in a double pan. Add the honey and essential oil. Stir the mixture until it cools.
5. Honey Ointment
1 part honey
2 parts petroleum jelly
Combine the ingredients. Honey has well documented healing properties.
6. Saddle Soap/ Skin Cream
75 g of beeswax
120 g of anhydrous lanolin
2/3 cup of baby oil
3/4 cup of water
1 teaspoon of borax (sodium borate, C. P.)
Fragrant essential oil (optional)
Chemically pure borax is sold in a pharmacy. Lanolin can also be purchased there. In a double pan melt the oil beeswax and lanolin to about 70 degrees centigrade. Melt the borax and water in a separate container to the same temperature. Add the water mixture to the oil mixture while stirring briskly. When white cream forms stir slowly until the mixture cools to 38 degrees centigrade. Pour into small wide mouth jars.
7. Petroleum Jelly
Petrolium Jelly is easy to make and is an ingredient in many other products. Naturalists preferring not to use petrolium products may use a natural oil instead of the mineral oil such as coconut oil, olive oil, corn oil etc to give an “un-petrolium jelly”
30 g of beeswax
1/2 cup baby or mineral oil
Melt the ingredients in a water bath. Remove the mixture from the heat and stir until it cools.
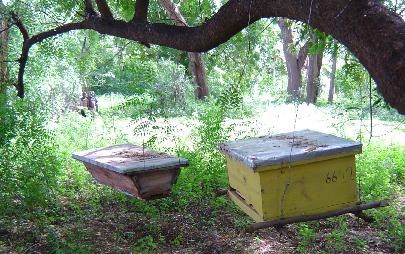
Examples of Kenyan Top Bar Hives (left) and Langstroth hive (right) Hives in Turkana District. Beginners should go for the simpler and cheaper KTBH. (c) Thomas Carroll, Kenya (2006)
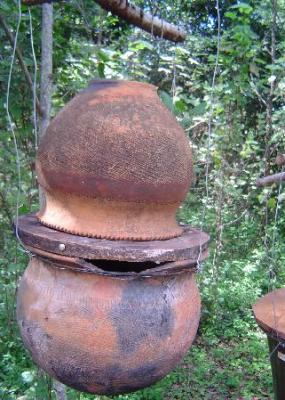
The pot hive The pot hive has a super or honey chamber on top. (c) Thomas Carroll, Kenya (2006)
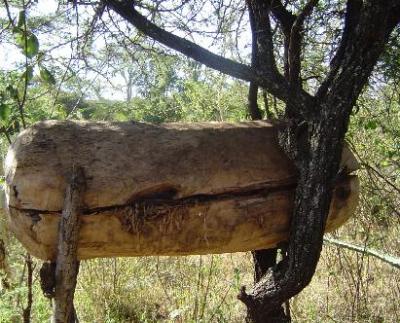
Traditional log hive This traditional log hive is located in Koibatek District. (c) Thomas Carroll, Kenya (2006)
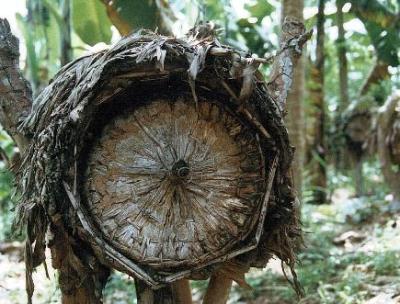
Ugandan basket hive The lid is removed to harvest honey. Care in harvesting yields top quality honey. (c) Thomas Carroll, Kenya (2006)
Introduction
Beekeeping in Africa has been practised from time immemorial. The traditional beekeepers use simple hives often made from hollowed logs. The empty hives are placed high up on trees, become occupied by passing swarms and in due course are harvested by the beekeepers. This method of honey harvesting may destroy the colony and and result in a poor yield of low quality hive products. In organic agriculture this is not viewed as fair to the animals and should therefore be avoided. Fortunately, hives and methods of bee-keeping have improved with time which allows harvesting without destroying the bees. It is important to keep in mind that bees are not only honey providers: they are living individuals and pollinators, which are very crucial to our production of food in general. On a global scale, a third of our food is dependent on pollination, and bees are very important for this.
What are the benefits of bee keeping?
Bee farming has many benefits. It has the following advantages over other farm enterprises:
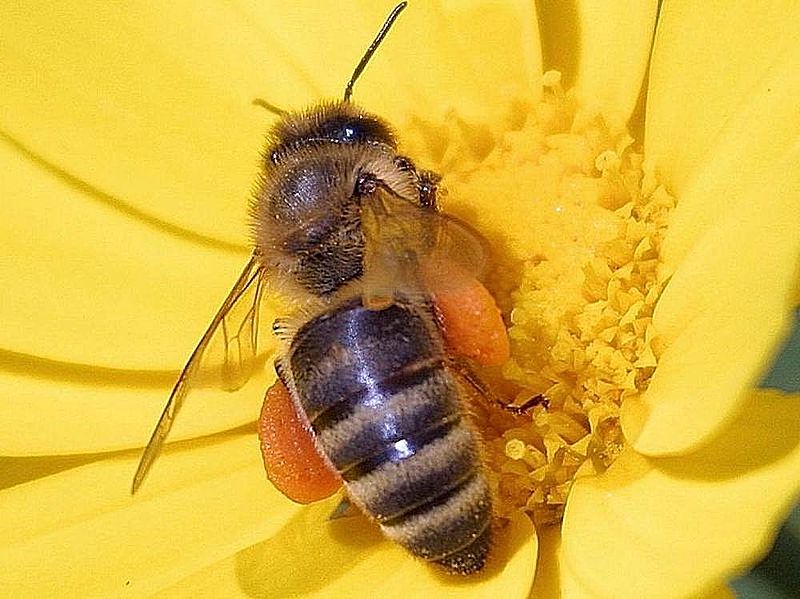
Bees are essential pollinators of plants thus playing a big role in biodiversity and improvements of crop yields. This is particularly valued in organic farming
Requires little land
Cost is low compared to other farm enterprises
Does not interfere with other agricultural enterprises in terms of resources
Labour required is low
Many products can be manufactured for supplementary income
Encourages environmental conservation
Most hive products have a therapeutic value
Bees in Organic Agriculture
There are two major aspects to remember when considering the role of bees in organic agriculture: the role in the whole ecosystem and the animal welfare aspects.
An organic agricultural system is dependent on natural processes. Pollination and the interaction between the different plants and the insects are crucial for the well-being of the ecosystem. The diversity in the system gives bees the best possibilities for a fair living, as opposed to a mono-cultural system where flowers are only available in a very limited time during the year.
Animal welfare aspects in organic agriculture live up to the organic principles of ecology, health, fairness and care. This also is crucial to the bees. One of the fascinating and interesting thing about bees is that they are individuals, but together they form a colony which can almost be regarded as “the organism”. It is not fair to the organism to split it in violent ways. in some cases, it can be a long term strategy to replace a queen, or to divide a hive, but mostly the natural processes in the colony will guide what the bees do in terms of swarming and establishing colonies. This is the gentle, care that we can give the bees, when we as humans take them into our households and live from their products: give them the best living conditions, and let them guide and choose as much as possible. The following issues related to bee welfare can therefore be emphasised:
Bees have a unique way of communicating and navigating, and it is not fair to them to move them over large distances. Like all animals, a stable life in surroundings where they can navigate and build up resistance and abilities to manoeuvre in these particular surroundings, is the most fair and healthy way to keep them. If the surroundings are not favourable for them, they will move themselves.
Health is also connected to stability. The massive migration of bee colonies seen in the agriculture-industry in some countries seems to be a very efficient way of exchanging diseases. The massive bee death problem seen in USA and parts of Europe is multifactorial, but strongly linked to the way in which bee colonies are violated, divided and moved around.
African bees are regarded as some of the most disease resistant and strongest bee races – keep them and maintain them well in Africa, and do not import bees based on arguments that other bee races can be more efficient.
Sometimes, the healthy honey of the bees is replaced purely by cheap and less healthy sugar. As organic bee keeper, it is fair to consider that bees should keep some of the honey, and/or honey can be harvested when there are still plenty of possibilities for the bees to take and make comb and honey.
Good health in the rabbits comes from keeping the environment clean, dry and well-ventilated and avoiding overcrowding.
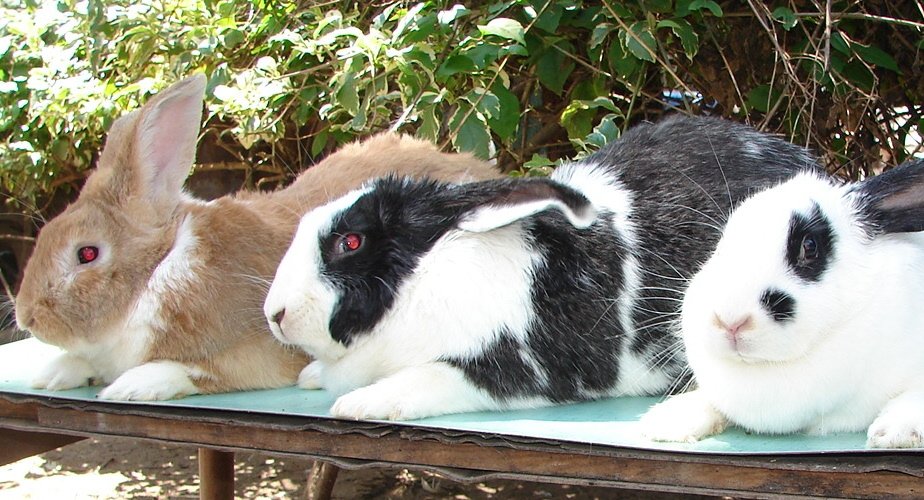
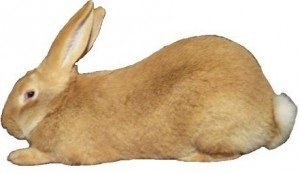
Understand rabbits as the animals they are
The big eyes situated at the sides of the head clearly indicate that rabbits are hunted animals, and many big and smaller predators want rabbit meat.
Rabbits are alert, awake or sleeping, and have very good senses, in particular hearing and smelling, but they can see both 360o around
them and in the air, but their eyes are very poor in bright sunlight.
Therefore, they forage in early mornings and in twilight. If living in
safer conditions they graze several hours every day. They can often
sense vibrations in the ground from other animals running or walking.
They have a peculiar flight behavior running in straight line and then
abruptly changing direction, to shake off the pursuer. When they sense
danger, they stomp their muscular hind legs in the ground to warn their
fellow rabbits.
They give birth to 4-12 kittens, which are well
hidden in a nest the first 8-10 days of their lives, blind and naked at
birth, and only need feed morning and evening. They can have several
litters during a one-year period. Rabbits are pure herbivores and born
to live on the ground; they forage and hide on the ground, and do not
like to be lifted, but they like to climb up on small hills or somewhere
where they can get a better overview. They are curious animals, even
though they have to be alert and are easily scared. Most rabbit breeds
live underground in holes and others in nests on the ground.
They are social animals, living in colonies or groups. They have been introduced to some environments where they did not live naturally, and have caused major problems because they did not have predators there and therefore spread all over the area, e.g. in Australia. Some rabbit breeds are quite sensitive to heat and do not tolerate temperatures more than 35oC.
Rabbit production with growing potential
Rabbit production is one of the livestock enterprises with the
greatest potential and room for expansion in Kenya. This is because of
their minimal investment requirements and ability to reproduce fast.
Their feed requirement is low, especially with regard to demand for
grain. Their housing and disease control management requirements are
also low. Yet their meat is highly nutritious and healthier source of
protein when compared with other sources of meat. Second to ostrich,
rabbit meat is the highest protein meat available. It is fat and
cholesterol free, so is not only highly nutritious but also very easily
digested. It is, therefore, much better value than chicken. The
potential for rabbit production is high, considering that other sources
of meat are often scarce and out of the financial reach of most
families.
Rabbit production has experienced a steady growth in the
past few years, with gender biases associated with its production
fading away. This is a significant change considering that for many
years, rabbit production in Kenya was confined to the youth, mainly 4-K
club members and young farmers. Though rabbit meat marketing is yet to
gain ground, there is hope that with the growing awareness of the
benefits of rabbit meat, it will be possible for rabbit meat to be
introduced into the regular meat market.
The realization that
rabbits are well suited to rapid production of protein has increased the
number of industrialized production units just like in poultry. The
most popular breeds used in the meat industry are the New Zealand White,
Californian, Flemish Giant, French Ear lop, Chinchilla and Dutch. Other
breeds include the Angora primarily kept for fur and as pets; most of
the locally available breeds are cross breeds.
Exotic breeding stock is not readily available, although for the small farmer, there is nothing wrong with local stock because they can stand the local conditions usually more easy than exotic breeds. Marketing is still a big hurdle for the small farmer and, before venturing into the business, prospective farmers should research the market before they start. As the market grows, better stock will inevitably become available and more efforts can be made to improve management (including feeding). There is a shortage of facilities that will accept pelts for tanning in East Africa which is a shame, as the rabbit pelts are a much sought after commodity in the fashion and fabric industries around the world.
Breeds and Breeding
It is interesting to note that East Africa does not have wild
rabbits. The brown creatures that are seen, mostly at night, on the
plains are hares, not rabbits. The rabbits used for meat production are
pure breeds of crosses of:
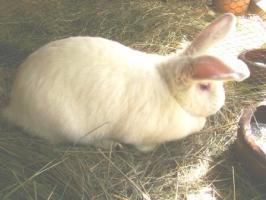
New Zealand White: has a good
growth characteristic, capable of attaining slaughter weight of 3 kg
live weight within 12-14 weeks depending on feeding regime. It is one of
the best commercial breeds that grows to a weight of about 5 kg and has
all-white colour making its fur marketable. It is considered a dam breed because of its excellent mothering instinct.
Californian
White: it is bred to have broad shoulders and meaty back and hips and
hence has a good meat breed with good dressing percentage. It is shorter
and stockier and is white except for its ears, nose, feet and tail
which are either dark grey or black. It is an ideal sire breed for
interbreeding with other rabbit breeds for purposes of meat production.
Flemish
giant: this is one of the largest rabbit breeds, weighing up to 7 kg
live weight. Though Kenyan farmers like it because of its size, this
breed is not an ideal meat breed because of its high bone to meat ratio
and its slow growth. Interbreeding it with other breeds may help improve
its characteristics
French Ear-lopped (sometimes referred to as
Belgian Flop): The Lop family shares the distinction of being one of
the oldest fancy breeds. The ear length, shape and size of the rabbit
are a major attraction with farmers. It is favoured for meat production because of its body weight.
Dutch: fairly small but compact rabbit with shorter forelegs. It often has characteristic markings.
Kenya White and crosses from them
Chinchilla: The Chinchilla is kept almost exclusively as a pet or for fur, which we do not support.
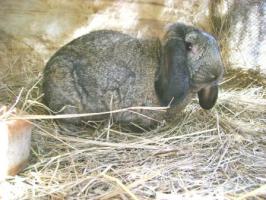
Lop eared rabbit buck (c) Valerie Corr, Naivasha, Kenya
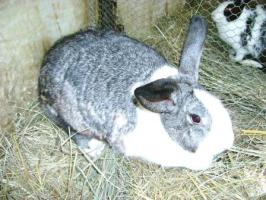
Large Kenya white crossed with Lop – note good size (c) Valerie Corr, Naivasha, Kenya
Kenyan x lop
(c) Valerie Corr, Naivasha, Kenya
Flemish giant (c) Nafis
Dutch (c) Nafis
Chinchilla (c) Nafis
Breeding from selection of animals, to weaning of the young rabbits
In rabbits, males are referred to as ‘Bucks’ and a females as ‘Does’
and their young are referred to as ‘kits; ‘kit’ is an abbreviation of
‘kitten’. It is important that you plan your breeding, otherwise you
could end up with more weanlings than you can cope with. It is very easy
to get over crowded very quickly as rabbits are very prolific breeders.
Plan how many weanlings you want to have in a year and how many does
you need to reach that goal. One doe can have 4 – 5 nests per year with
each time up to 8 kits. When they all stay alive one doe is able to
provide you with up to 40 weanlings per year.
It is advisable to keep a breeding sheet on the door of each doe pen. You should record the number of the doe, the date of birth, date of service, the buck used, the date of kindling (giving birth), number of kits reared, any deaths, as well as dates of deworming (You could include a column for ‘comments’ on the far right of the sheet – i.e., whether the doe adopted another’s young or, indeed, had so many kits that she had to foster some of them).
Example of headings on breeding sheet:
It is suggested that these should be posted on the door of every breeding doe, protected by a plastic bag and stapled where the rabbit cannot destroy it. Every breeding doe and buck should have a name and number, which would be at the top of the sheet. If these sheets are kept up to date it is very easy to keep track of your breeding program.
Doe number: 5 (Marie)
Date of birth (May 2013)
Date
Buck number (Name)
Kindling
Number of kits born
Number of kits weaned
Notes
11 May 2015
12 (Charles)
together for 10 minutes
11 June 2012
ok
7
+ 1 still born
15 August 2015
6
1 lost after 3 weeks
1 September 2015
12 (Charles)
15 minutes together, no mating
2 September 2015
12 (Charles)
together for 10 minutes
Temperature regulation in grown-up and newborn rabbits
Rabbits are very adaptable animals and are able to deal with changes in temperature because they have an inbuilt
mechanism for controlling temperature fluctuations. In cold climates
the rabbits will curl up to keep warm and in hot weather they will
stretch out (with the back legs stretched out behind them) so that they
can lose as much heat as possible by radiation and convection. At the
same time their ear temperature will increase for cooling the blood.
The ideal temperature is from 10degC – 26degC. They are able to survive
in temperatures as low as 0degC and as high as 33degC but their
efficiency will be compromised at these temperatures.
Heat
regulation of newborn rabbits is, however, different. Kids are born
blind, naked and helpless; and it is interesting to note that they are
born with teeth. To keep warm they huddle together in a nest made by the
mother with fur from her chest. If the temperature rises, the kits will
move apart. A sudden drop in temperature can disable their temperature
control before they can huddle together again, and a kit can die of cold
10 cm away from the group. The breeder must be watchful for such
instances. Rabbits are sensitive to humidity below 55%. They feel
comfortable if the humidity level ranges from 60 – 70%. The problem
arises during the rainy season when temperatures and humity
fluctuate. Air which is too hot and dry is even more dangerous. This is
why it is so important to have sufficient ventilation without draughts.
Gestation Period: On the average 30 – 32 days and the rabbits born on any day between the 28th and 34th
day after mating, usually survive. The duration of gestation is also
affected by the time of year, the size of the doe and, above all, the
size of the litter.
Pseudo Pregnancy: A doe may exhibit pseudopregnancy (behaves as if pregnant when it is not) but the symptoms do not usually last beyond the 18th day. The best way to confirm pregnancy is to palpate the abdomen gently on the 10th – 14th day.
Mating:
When a doe is ready to be mated she may become restless and nervous and
may have a red and swollen vulva and will be happy to join the bucks.
Rabbits are spontaneous ovulators,
so can be put in with the buck and covering will take place within
minutes. A receptive doe raises her tail and allows mating. The buck
will make a growling noise and fall to one side when mating has taken
place. The doe should be removed immediately. If mating has not taken
place in 15 minutes the doe should be removed and returned later. If
left with the buck they will both become bored and the buck will lose
interest.
Caring for the Doe: A pregnant doe
deserves special care and management if the farmer is to achieve the
best results. Although the general care of the doe is the same as that
for the entire flock, it involves a slightly different management
strategy. Special care should be taken in respect of feeding;
environment; kindling and housing as well as the diet.
A balanced diet will
ensure better fertilization, reduce the risk of embryonic deaths and
ensure better fetal growth; see feeding for more advice also on feeding
the pregnant rabbits.
Miracle births Cases of
“miracle births” have been observed. This takes place when a doe
produces young when it is absolutely certain that she has not been to
the buck. Some does who will not accept the buck may already be pregnant
even though they have not been with a buck. It has also been recorded
that a doe that is in kit is sometimes able to retain sperm from a
different covering, to produce another litter later.
Kindling:
The birth of young rabbits is known as ‘kindling’. This usually takes
place at night and the doe should not be disturbed by noise or
frightened by animals. This can cause her to eat or abandon her litter.
After birth, the mother will lick her young and let them suckle. The
earlier this happens the better their chance of survival. Most does are
good mothers and are very protective and careful of their litter. Occasionally
a doe will eat her young. There are factors that can be attributed to
this, such as shortage of water before kindling, or noise and fear. If,
however, she repeats this behaviour with subsequent litters she should be culled because this trait can be passed on to future generations.
Fostering:
This means taking kits to another doe. This could be an option if a
mother dies or abandons her litter or does not allow them to suckle. The
other reason is if the litter is bigger than 8 kits, when it is
advisable to foster the excess to mothers with less than 8 kits.
Litter size and frequency:
Under good management, a doe can produce 4 to 5 litters per year with 7
to 10 kits per litter. Usually smaller litters thrive better than
larger ones, but larger litters can be sustained with improved feeding.
It is essential, therefore, to ensure that your does receive adequate
concentrate feed, plenty of green fodder, supplements and plenty of
clean drinking water. It should be remembered that a doe has 8 teats. If
she produces more than 8 kits the smaller kits may not receive
sufficient food. It is very easy to put the weaker kits with a doe who
has fewer babies of the same age. Does are very accepting of
‘outsiders’.
First breeding: With good feeding
practices the well-developed doe should be ready to breed at 5 months of
age. With poor feeding practices this may not happen till 7 to 8 months
of age. Some first time mothers will eat their first litter, or abandon
them. The dead kits should be removed immediately and disposed of. The
doe should be rested for at least a week before being returned to the
buck. If a doe has three unsuccessful breedings, she should not be used for breeding and retire.
Breedings after wean: Mature does can be served one week after they wean.
Weaning:
At weaning (one month) the kits must be sexed and kept separate as they
are able to breed from a very young age. If you allow your rabbits to
breed too young the result will be small and weak off-spring. They could
even be born with birth defects and a young mother may not be able to
look after her offspring properly, or she may even eat them all at birth
or she herself may die.
If one month is gestation and one month
is for rearing young, the doe could not be taken to the buck more than
once in two months. But this way you could have a continuous supply of
meat. Depending on how many does you keep, you can work this out:
Gestation is one month
One month is with the mother
3 – 4 months to slaughter.
Production period:
when does and bucks perform well, they can be kept for 4-5 years after
which time their production should be assessed. If the doe is still
producing decent sized litters with healthy kits, it is possible to keep
her for a further year, after that she should retire and be kept as a pet. The same applies to the buck. It has been noted that older bucks may start to produce small or weak kits, in which case they should retire and kept as a pet.
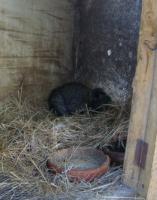
Care of the young:
A couple of days before giving birth the doe will start collecting hay
in her mouth to make a nest. She will then pull hair from her chest and
under her neck to line the nest. She will pull out more hair after haven
given birth and cover the babies. This is the time that the young have
to be watched carefully:
Kits are born blind and naked. The
first 35 days of their life are crucial. They are usually confined to
the nest for at least two weeks, sometimes longer. They should not be
separated from their mother before 4 weeks of age. If they are weaned
early they may die of separation shock.
For the first 20 days
the only food for the kits is their mother’s milk. The mother feeds her
young only once in 24 hours and only for 3 – 5 minutes. The doe must,
therefore, have access to plenty of good food and water to ensure that
she has enough milk for the litter.
It is essential that the
kits not get cold, especially in the first few days after birth. The
nest needs to be checked to ensure that the babies are not carried out
of the nest by the mother after feeding (check early mornings as feeding
normally takes place during the night). It is quite safe to handle the
young and return them to the nest.
If they are found outside the
nest and cold, (the kits will feel cold and the skin will be wrinkled
and ‘sticky’ to the touch) it is essential to warm them up quickly or
they will die.
Once they are warm (the kits will become a healthy pink colour,
warm to the touch) they can be returned to the nest. Warming them can
be done by wrapping them lightly in a cloth and putting this on top of a
hot water bottle in a box. Make sure that the kits are protected from
the plastic cover. They should be turned a couple of times to make sure
that they are properly warm.
They will start to squeak and wriggle once they are warm enough. Remember that every dead kit is a lost life.
The
kits will start coming out of the nest after 15 – 16 days and will
start trying to chew green matter and concentrate whilst still suckling.
They will gradually eat more solid food and suckle less.
At one
month the kits should be weaned and the males separated from the
females as they can start breeding at a very young age. Determining the
sex of the kits is not easy, but practice makes a master: Lay the kit on
its back in your hand and gently blow on the hair around the genital
area and, with 2 fingers, gently separate the genitalia towards the
tail. The males will show a small upwards protrusion while the females
will show a small opening. This is easier done by two people. One
holding the kit and one doing the sexing. Kits generally lie very still
when laid on their backs. It is essential that they are treated gently
to avoid injury.
The kits should then be put in separate
weaning houses. A double pen of 90 x 180 cm can comfortably house 6
young rabbit growers. Remember there are now more rabbits in each cage,
so they must be fed more food accordingly and given more water if they
are to grow well.
At weaning it is advisable to routinely (no preventive treatments in organic rabbit production) treat the weaners with coccidiostat (the same one used for chicken). 1 ml dawa/litre of water for 3 days will protect them from diarrhea and stress after weaning.
It is also advisable to deworm them a week later with 1/4 ml of Albendazole
administered by mouth with a small syringe (without needle) is enough
for each one month old rabbit. Be careful, not to put the syringe too
far into the mouth or you may damage the throat. Death will almost
certainly be the result of rough handling.
Although there are no regulations for organic rabbits as such, the general principles for organic production should be applied.
Rabbits should always be handled gently but firmly. If the rabbit feels
insecure or afraid it will damage itself and, in all probability, the
handler.
NEVER lift a rabbit by the ears. The most common and
safest method is to grasp the ears close to the head with one hand,
while the other hand takes the full weight of the rabbit. The hand
holding the ears restrains the rabbit and prevents it from struggling,
without damaging the joints where the ears meet the head.
When
handling kits, they should be picked up by placing the whole hand,
gently, over the kit and curling the fingers around it. Care should be
taken not to squeeze the kit as they are very fragile and it is very
easy to damage them.
When handling rabbits, of any size, for whatever reason, the easiest and safest way is to wrap the rabbit in a cloth and pick it up. The cloth or sack will give the rabbit a sense of security and it won’t struggle.
Viciousness in rabbits
It occasionally happens that a rabbit becomes vicious and attacks those
who attempt to handle it. A doe may become very aggressive when she has
young – this is a natural instinct and should be respected. Bucks can
also become aggressive for no obvious reason. However, aggression
is almost always as a result of bad handling or teasing. It can also be
the result of lack of water – so make sure that water is always
available.
There are instances where a rabbit may become aggressive for none of the above reasons. If this behaviour becomes habitual, culling should be considered. A rabbit has the ability to open its mouth very wide, their teeth are very sharp and their bites are deep and painful.
Slaughter
It is important that the rabbit is killed very quickly and in the most humane way possible.
The quickest and kindest way to do this is:
Hold
the rabbit in your left hand by its back legs. With your right hand
hold the rabbit’s head between your index and middle fingers, under the
chin and against the base of the skull. Lift your right hand to shoulder
height, stretching the rabbit, and pull the head quickly and sharply.
If you try to do this any other way it will not work.
When
the rabbit is dead, it should be hung by one back leg. The head is
removed. The feet are clipped off. A small slit should be made on the
inside of the back leg that is not attached to the slaughter post. The
skin is peeled off this leg. The skin is then gently loosened round the
body and front legs. You will then be able to take the skin off the
remaining back leg, and by pulling down, so that the skin is now inside
out, you will be able to peel the skin off like a sock. The rabbit is
then gutted and entrails removed.
The rabbit unit should be located in a peaceful environment, away from
the noise and bustle of human and animal noise. The unit must fulfill
the following function:
a) protection from extreme influences of weather and noise, which could interfere with the performance of the rabbits b) protection from predators including birds, snakes, insects and rats. While planning a unit, the following should be taken into consideration:
The exterior should provide protection against heat but at the same time it should be properly ventilated without draughts.
There
should be separate units for the does and bucks. Breeding stock should
be kept in one unit and the ‘meat’ unit should be separate.
Three
or 4 does and one buck would be more than sufficient to keep a
household supplied with meat all year round. You would therefore need:
A pen for the buck
A pen for each doe
At least 2 weaning pens – one for females and one for males
If
there are more does, you need more pens for the does but also more
weaning pens. When the weaners are growing not so fast because of lower
feed quality, they stay longer and more weaning pens are needed.
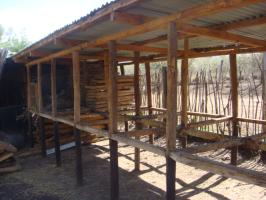
Unfinished rabbit units (c) S. Fontana, BioVision
To grow healthy, rabbits must be kept clean because dirty rabbits are unhealthy rabbits. It is best to house them off the ground as follows:
The house should be 90 cm off the ground, should be 90 cm high
and 90 cm wide. As roofing sheets come in 2.5 meter lengths it makes
sense to build blocks of houses 1.8 m wide so one roofing sheet can be
used to cover 2 houses.
The floors should consist of chicken
wire (with the smallest size holes) so that droppings and urine fall
through to the ground. This can then be swept up daily and used to mix
with compost.
The house should have a layer of hay/dried grass
or straw as bedding. This is a very important part of the rabbit’s diet.
They will eat a lot of this bedding during the night.
Rabbits
do not tolerate windy conditions, so houses should be placed in
sheltered areas and windbreaks provided where appropriate.
Rabbit
houses should be cleaned every day. Wet bedding should be removed and
replaced with dry material. If rabbits are left with soiled beddingt,
hey will not eat the bedding material and it will encourage flies and
diseases to multiply.
Dirty or wet houses will result in a very
strong ‘rabbit’ odour which will taint the meat. A soiled pen is
stressful for the rabbit and it will also mean that the pelts become
soiled and ‘felted’ which makes them unusable.
Mud hutches and thatched houses can also be constructed but they should be off the
ground and kept clean as described above.
NEVER
be tempted to try and save space by constructing houses in ‘tiers’ (one
on top of another). This will lead to all kinds of problems as the
lower houses will become fouled by the droppings and urine from the
upper level.
Exposure to light plays an important role in
reproductive efficiency. Bucks exposed to light for 8/24 hours are more
sexually active. It also improves the productivity of the doe. It is
possible to make up this light requirement using artificial light, but
this is an expensive way of solving the problem.
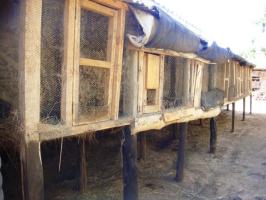
Rabbits housing (c) S. Fontana, Biovision
Rabbit house floor consisting of chicken wire (c) S. Fontana, Biovision