Credit: Su Kahumbu
What is Vermiculture
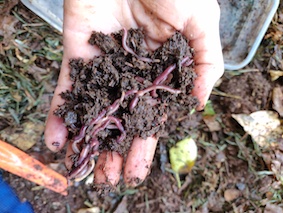
Vermiculture is the process of farming earthworms
How does it benefit productivity
Earthworms eat, digest and decompose organic matter like vegetable waste, food waste, livestock bedding materials, weeds and crop residue. The end product from the worms is their excretion which is called vermicast which is rich in minerals like nitrates, phosphorus , magnesium, potassium and calcium. In effect, earthworms efficiently unlock the nutrients held in complex organic matter making them readily available to be taken up by plants.
The process of farming earthworms, called vermiculture, allow us to capture these nutrients and reuse them to fertilise new crops. This is a very safe and cost effective way of ensuring safe and strong crops.
How do we capture the nutrients in the worm excretion or vermicasts?
There are two ways to do this
- Grow the worms in your cropping beds.
- Grow the worms in a special vermiculture enclosure.
- Growing the worms in cropping beds in the field.
The best way to improve soil fertility is to continually feed your soil. Your soil in turn will feed your crops. The most efficient way to do this is to feed your soil with composted material. Hot composting is the process of breaking down organic material in a compost pile. Organic material is added in layers and may include adding effective microorganisms. The compost pile heats up and the materials break down into rich humus with nutrients readily available for plant uptake. Due to the heating process, earthworms cannot survive in a compost pile, they take part in cold composting where instead of using micro organisms, the earthworms themselves break down the organic materials.
In a field growing environment, this can done by digging one foot deep trenches and filling them with the waste organic materials, including farm yard manures and other material you would like to compost, then covering the trenches with a layer of soil. The earthworms will be drawn to the material and will break it down. After about one month you can then grow your crops along the top of the trenches, and they will benefit from the nutrients that have been released below, by the earthworms.
2. Grow the worms in a special vermiculture enclosure.
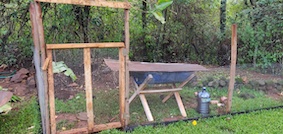
Growing the worms in a special vermiculture enclosure allows you to collect the vermicast nutrients directly from the worms and use it as a foliar feed or top dressing fertiliser. This is done by creating a confined environment where you can grow the worms. To do this you need to simulate the conditions they like, and feed them every so often so that they grow , breed and produce the vermicasts in volume. We can do this using a plastic tank or drum. The drum is filled with materials that the earthworms like to eat and the earthworms are introduced to this space where they now live in confinement.
The worms need a dark moist environment with plenty food.
To extract the nutrients from the worms, 20 lt of water is poured over the system once a month, and collected. This water will have dissolved nutrients from the vermicast and can now be diluted 1:10 and used as a top dressing or foliar feed.
It is of great importance to feed the worms at least once a week. To do this, take a few hand fulls of kitchen waste or other degradable organic material and burry it in the drum. The worms will make their way towards it. You can also add a couple of Kg of livestock manures every month too. And always check that the worm bedding is moist. Add a little water every week if necessary. You will notice the worm bedding begins to resemble soil.
After a few months 6-12 you will need to remove all the bedding from the system and rebuild it a new. To do this you will need to separate the worms from the soil so you can use them again.
The best way to do this is to withhold feeding for at least 2 weeks, then add feed in the top area of the tank. The worms will all head in that direction and begin to feed. After about 5 days, remove the lower 3/4 bedding materials and add this to your garden crop beds. You can now rebuild the worm bedding again without removing them or you can put them in a bucket whilst you rebuild.
Caution:
- Keep you vermiculture tank covered during the rains and protected from other challenges like birds and ants which will try to eat the worms. You can do this by painting the legs of the structure that holds the tank, with used engine oil, and by covering the top with a small piece of shade netting or a mabati sheet or even banana leaves.
- Do not let the vermiculture system dry out. This will kill the worms. They need to live in a moist environment.
Do not worry if you put earthworms into your soil in the garden, they will not harm your crops at all. Earthworms do not eat growing material unless there is no dead material available. They also create great passages for air and water filtration. This allows your soil to capture and retain rainwater and allows oxygen to reach your plant roots. Both of these benefits ensure your pants have deep root penetration and are more resilient to weather related issues like flooding and drought. In a nutshell earthworms are soil manufacturers. They are great for our soils and we should use them and appreciate their free ecosystem services that help us produce sustainable, safe and nutritious foods. Using earthworm juice as a fertiliser means we no longer need to go to the expense of purchasing synthetic fertilisers, many of which damage our soils, often creating acidic soils that are hazardous to earthworm life and may result in toxins in our foods and growing systems.

Go to “How to make a worm Composter” for a step by step lesson on how to start vermiculture.