Forage production and management
Inadequacy of high-quality forages on the farm is one of the major constraints limiting dairy production in East Africa. Various types of forages have been recommended for different agroecological zones (Table 4.1) depending on the climatic conditions and soils. They are cultivated on arable land and are either grazed or cut and fed either as fresh green fodder or conserved as hay or silage. The specific agronomic recommendations for growing of forages differ from species to species and may be site specific. Table 4.1 gives examples of different forages and their production potential in different agroecological zones.
Establishment and management of ley pastures
Pasture establishment can be by direct sowing, undersowing or oversowing.
Direct sowing
Direct sowing is establishing pasture grasses without a nurse or cover crop.
Seedbed preparation: On previously cropped land, plough towards the end of the preceding rainy season. Follow with dry-season ploughing and harrowing for weed control. On virgin land, three ploughings and two harrowings may be required to make a good seedbed.
Sowing time and method
- Sow as early as possible in the rainy season. In areas that recieve bimodal rainfall areas, sow during the short rains to eliminate annual weeds.
- Sow seeds close to the surface to get them in contact with moist soil so they will absorb moisture and germinate. Do not bury the seeds deep since initial vigour is not sufficient to push through a heavy cap of soil.
- Either broadcast grass seeds or drill in rows 30–40 cm apart.
- Mix the seeds with sawdust, rough sand or phosphate fertilizer for even distribution. If the seed is mixed with fertilizer, plant immediately to prevent the fertilizer from scorching the seed.
- Grass seeds are most effectively sown with a wheat drill. Hand sowing is recommended for small acreages.
- Immediately after sowing compact the seedbed to enhance germination of the grass seed by improving contact with the soil. Use tree branches or trample by foot on small plots. In mechanized farms, use a roller.
Table 4.1. Recommended forage species for different regions in East Africa
| Region; altitude (m); rainfall (mm/yr) | Suitable forages | |||
| Legumes | DM yield (t/ha) | Fodder & ley grasses | DM yield (t/ha) | |
| 1 Semi-arid; 1000–1800 m; < 650 mm |
Siratro | 1.5–2.0 | GRASSES | |
| Stylosanthes scabra | 0.6–15.0 | Andropogon gayanus | 5.30 | |
| Cenchrus ciliaris | 9.83 | |||
| Chloris roxburghiana | 10.33 | |||
| Eragrostis superba | 4.33 | |||
| Panicum maximum | 10.0 | |||
| 2 Warm, wet, medium altitude; 1200–1850 m; 1000–2500 mm (bimodal or unimodal) |
Calliandra calothyrsus | 2.5–6.0 | FODDERS | |
| Desmodium spp | 6.3–8.4 | Giant panicum | 11.8 | |
| Dolichos lablab | 0.5–1.5 | Giant setaria | 9.1 | |
| Leucaena spp | 3.9–6.0 | Ipomea batatas (sweet potato) |
8.0 | |
| Neonotonia wightii | 0.4 | Napier grass | 17–25 | |
| Sesbania sesban | 3–5 | Sorghum almum (Columbus grass) |
15.0 | |
| Stylosanthes guianensis | 2.7–3.35 | Sorghum sudanense (Sudan grass) |
12.0 | |
| Trifolium laxum (Guatemala grass) |
8.4–10.3 | |||
| GRASSES | ||||
| Chloris gayana (Boma, Elmba Rhodes) |
10.0–18.0 | |||
| Coloured guinea | 12.0–18.0 | |||
| Panicum maximum | 9.0–14.0 | |||
| Setaria sphacelata (Nandi, Nasiwa) |
10.0–16.0 | |||
Fertilizer application at planting
Apply phosphate fertilizer or farmyard manure to promote strong root development. The recommended rates of fertilizer application are as follows:
- SSP 2–4 bags/ha or t TSP 1–2 bags/ha or t DAP 1–2 bags/ha or
- 10 t/ha of farmyard manure—should be broadcast and harrowed in before planting
- topdressing with 5 bags CAN/ha or 5 t farmyard manure/ha per year
Note: To prevent scorching the seed, use DAP only when rainfall is adequate, and use only well-decomposed farmyard manure.
Undersowing
Undersowing is establishing pastures under a nurse or a cover crop. The nurse crop is grown together with pasture for economical land use. The nurse is harvested after maturity and the pasture left for 2 to 3 years.
For successful undersowing observe the following:
- Broadcast or drill pasture seed mixed with fertilizer 3 days after planting wheat or barley.
- Where maize is the nurse crop, broadcast pasture seed mixed with phosphate fertilizer in the maize field after the second weeding of maize (4 to 5 weeks after planting maize) or when maize is knee high.
- After the nurse crop is harvested remove stovers or straws and cut back the weeds using a panga or slasher.
- During the establishment year, grazing is not recommended to avoid grass still with weak roots being uprooted by the livestock.
Oversowing
Oversowing is the introduction of improved pasture species (grasses or legumes) to a natural pasture. Oversowing increases forage quality and productivity of natural pastures. It is the easiest and most cost-efficient strategy for improving natural pasture. Although both grasses and legumes may be oversown, legumes are more suitable, as grasses do not establish readily, especially on soils that are not loose. Oversowing should be done in areas where soils are light and loose. Benefits become evident after about 2 years.
Advantages of oversowing
- land preparation is minimal hence cheap
- less seed and labour are required
- minimal management is needed
- forage output is improved
- soil erosion is controlled
- soil fertility is improved
Fodder crops
Fodder crops are annual or perennial or permanent crops, cultivated on arable land and grazed or fed to stock either green or in a conserved form like hay or silage. Fodder crops are usually grown in rotation with cultivated cash crops. They are characterized by their high productivity per hectare (dry matter yield) compared with permanent pastures. Further, these crops are grown as supplementary feed during the dry months of the year.
Fodder crops have been identified as the most important feed on smallholder farms in East Africa due to their high forage yield per unit area. The most common are
- Napier grass (Pennisetum purpureum)
- sweet potato vines (Ipomea batatas)
- oats (Avena sativa)
- fodder sorghums (Sorghum sudanense)
1. Napier grass
Varieties
Commonly grown Napier grass varieties
- Bana grass: leafy and with few silica hairs, which cause irritation during handling. However, it is susceptible to Napier grass headsmut disease (Ustilago kameruniensis).
- Clone 13: resistant to white mould disease. It is a high yielder but its thin stems make it difficult to establish. It is also susceptible to Napier grass headsmut disease.
- French Cameroon: a high yielder, established easily from canes. Susceptible to Napier grass headsmut disease.
- Kakamega 1 and 2: both are tolerant to Napier grass headsmut disease. High yielders. Kakamega 1 has a higher growth rate than Kakamega 2 or Bana.
- Pakistan hybrid: does well in dry areas.
Planting
Napier grass can be established from root splits or canes. It can also be planted alone or intercropped with forage legumes. Two methods of planting Napier grass are the conventional method and the tumbukiza method.
Conventional method
The conventional method involves planting one cane (with 3–4 nodes) or root split in holes 15–30 cm deep. The spacing is 0.5 m x 0.5 m in areas with over 1400 mm of rainfall. In areas with 950–1400 mm rainfall the spacing is 1 m x 0.5 m. When cane cuttings are used, bury the nodes, leaving one node above the soil surface. See Figure 4.1.
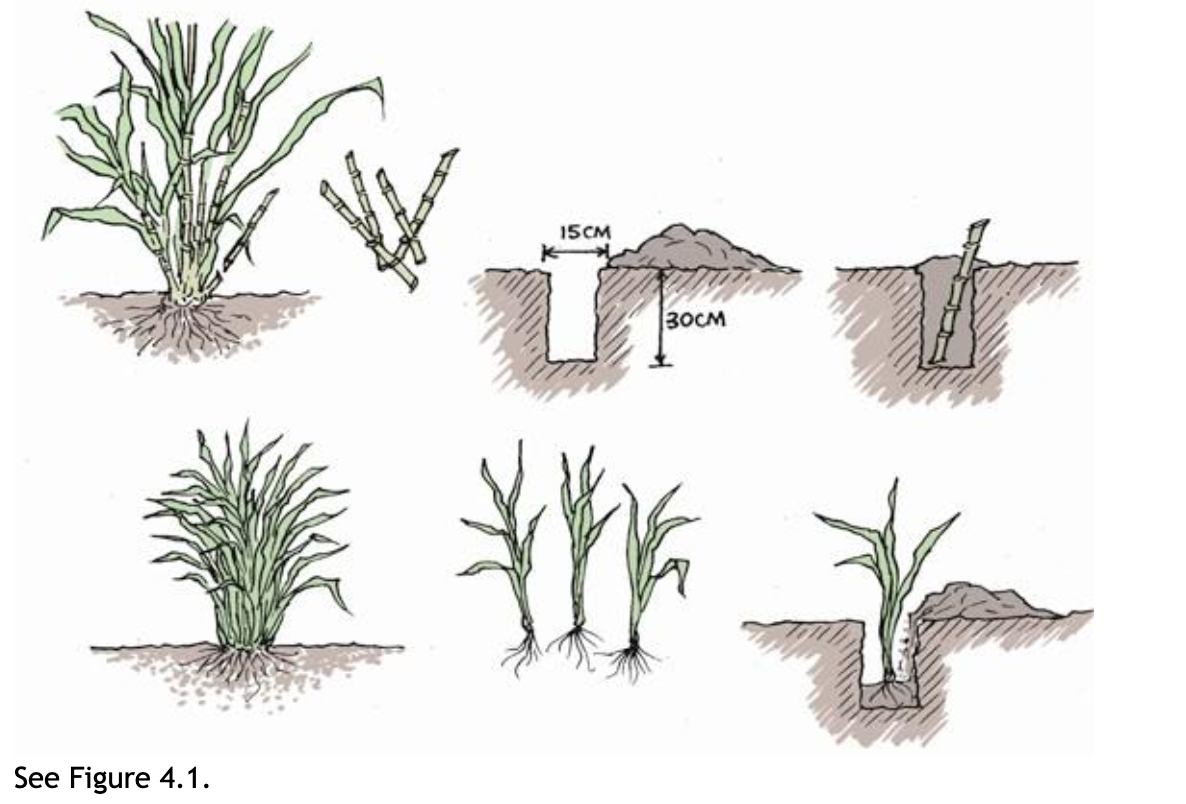
Planting Napier grass.
Forage legumes like silverleaf (Desmodium uncinatum), greenleaf (Desmodium intortum) and stylo (Stylosanthes guianensis) can be intercropped with Napier grass to improve the quality of the feed and reduce the cost of nitrogen fertilizer. Legume seeds at the rate of 3–5 kg/ha can be drilled along the Napier grass rows or between the rows when the Napier grass is planted.
Fertilizer and manure management practices
Four fertilizer and manure management practices are recommended for Napier grass. The choice depends on the financial resources of the farmer.
- Use 1–2 bags of TSP or DAP fertilizer per hectare at planting followed by 5–7 bags of CAN fertilizer in three split applications per year, applied after harvesting and weeding in subsequent years.
- Use 10 t/ha of farmyard manure at planting. In the following years apply the same amount, preferably after every harvest.
• Use ½–1 bag of TSP or DAP plus 5 t/ha farmyard manure at planting and apply 5 t/ha farmyard manure plus 2–3 bags of CAN in three split applications per year in subsequent years.
- Apply 60 kg of slurry in furrows at planting followed by split application of the same quantity twice a year or more frequently if possible after harvesting.
Management
- Weed after each harvest to maintain high productivity.
- Harvest when 1 m high or every 6–8 weeks to obtain optimal quality and quantity.
- Maintain a stubble height of 5–10 cm from the ground level at each harvest to avoid weakening the root system, which leads to low production in subsequent harvests.
- To increase yields during the dry season, one of the split applications of the recommended rate of nitrogen fertilizer should be done 1 or 2 months before the end of the rainy season.
Tumbukiza method
‘Tumbukiza’, a Kiswahili word meaning ‘placing in a hole’, is a new planting method started by farmers to increase productivity per unit of land. The method, which involves planting cuttings or root splits in well-manured holes, produces more herbage yields than the conventional method. Hence less land is required for one dairy cow.
Step 1: Dig round or rectangular pits 60 cm (2 ft) deep and 60–90 cm (2–3 ft) wide. Alternatively, make trenches 60 cm (2 ft) deep and 60–90 cm (2–3 ft) wide and of various lengths depending on the farmer’s preference.
Step 2: Separate topsoil from subsoil as you dig the pit or trench.
Step 3: Mix every 20-litre container (‘debe’) of topsoil with 1–2 debes of farmyard manure and put it into the pit. For the trench, place topsoil and farmyard manure mixture every metre along the pit.
Step 4: Leave about 15 cm (6 in.) unfilled space at the top of each pit.
Step 5: Plant 5–10 cane cuttings or single root splits in the round and rectangular pits. In trenches plant 5–10 cane cuttings or single root splits every metre.
Step 6: Plant sweet potatoes or forage legumes between the pits to increase the quality of forage and to control weeds.
The initial labour cost for digging pits and trenches is higher than for the conventional method. See Figure 4.2.

Figure 4.2. Planting Napier grass using the tumbukiza method.
Benefits of the tumbukiza method
- less land is required
- regrowth is faster in the dry season
- feed is available even during the dry season
2. Sweet potato
Sweet potato vines have a higher nutrient content than does Napier grass and are normally fed to cattle as a supplement. They are particularly recommended for calves as they increase the growth rate and promote rumen development. They are also good for recently calved and sick animals. They increase milk yield when fed to lactating cows.
Their main setback is high moisture content.
Varieties
The main local sweet potato vines varieties include
- Kiganda
- Muibai
- Sandak
- Mugande
| Variety | Category | Yield t/ha (fresh weight) | ||
| Roots | Foliage | CP (%) | ||
| Kemb 23 | dual purpose | 10 | 24 | 16.6 |
| Kemb 36 | dual purpose | 7 | 27 | 15.3 |
| Musinyamu | fodder | 2 | 70 | 18.5 |
Yields of some improved varieties are listed in Table 4.2. Table 4.2. Yield of sweet potato varieties
CP – crude protein
Establishment
Plant sweet potato vine cuttings (30 cm long) at a spacing of 90 cm between rows and 30 cm within rows. Vines may be planted in ridges, mount or flat. For fodder production ridging or mounting has no advantage.
Apply 2 bags TSP fertilizer per hectare at planting.
Management
The first harvest is done when the vines cover the ground about 4–5 months after planting. There are three methods of harvesting.
- Harvest forage at intervals of 6 to 8 weeks leaving a stubble length of 25 cm for dual-purpose varieties and 5 cm for fodder varieties.
- Selectively pluck vines at the length of ½–1 metre from the tip at an interval of 3–4 weeks.
- For vines planted on ridges, cut those extending beyond the ridges.
Feeding
Cut and carry to the cow and feed up to 15 kg fresh material per day, as a supplementary feed to Napier grass or other basal feeds.
3. Oats
Oats are recommended as a fodder crop for the high-altitude regions of Kenya (over 2100 m) and may be grown in pure stand or as a mixture with vetch.
Establishment
- Drill oat seeds in rows 30–40 cm apart.
- When oat is being grown as a pure stand, 70–80 kg of seed per hectare is recommended. When grown as a mixture with vetch, 30–40 kg of oats and 20 kg vetch seed per hectare is recommended.
- Apply 2–3 bags TSP fertilizer per hectare at planting.
Management
- Hand weed or spray with herbicide 2,4-D amine 72% at the rate of 2.5 litres per hectare (spraying is done when oat is grown as a monocrop but not when grown with vetch).
- Cut at milk stage (4 weeks) leaving a stubble height of 5 cm from ground level.
- Topdress with 3 bags of CAN/ha to enhance growth and subsequent fodder yield.
Feeding
- Cut oats at milk stage and wilt it before feeding to prevent bloat.
- Oats can be cut and conserved as hay or silage.
- If being conserved either as silage or hay, oats should be cut when the grain is at milk or dough stage.
2. Fodder sorghums
Sorghums are drought resistant and grow well in dry areas. Sudan grass and Columbus grass varieties are recommended for the drier parts of the East African region.
Establishment
- Sorghums require a well-prepared seedbed to ensure even germination.
- Planting should be at the start of the rains.
- At planting drill 25–35 kg of sorghum seed per hectare at a spacing of 30–40 cm from row to row or broadcast.
•Use 1 bag of TSP fertilizer per hectare during planting and topdress with 2–3 bags of CAN fertilizer per hectare after cutting or grazing to stimulate new regrowth.
Management
- Sorghums should be cut every 6–8 weeks.
- After 5–6 cuttings it becomes uneconomical to maintain the crop and it should be ploughed.
- Do not graze sorghum earlier than 6 weeks to avoid prussic acid poisoning.
Feeding
The quantities required to feed a dairy cow per day are the same as for Napier grass.
3. Forage legumes
Forage legumes play an important role in the smallholder farming system as they
- improve soil fertility through nitrogen fixation.
- have high crude protein in the leaves and foliage, which can be used as a protein supplement for cattle. Legumes have high crude protein levels in the range of 15–34%, as compared with grasses, which are in the range of 5–19%.
- are rich in minerals (calcium, phosphorus) and vitamins A and D.
1. Desmodium
Desmodium can be grown as a sole crop or as an intercrop with grasses (Figure 4.3).

Figure 4.3. Planting desmodium.
Establishment
Two methods of establishing desmodium are common: from seeds and from cuttings.
Establishment from seeds
- Desmodium requires a fine, firm and weed-free seedbed.
- Seedbed preparation should be done well before the onset of rains.
- Use 3–5 kg/ha (2 kg/acre) desmodium seeds.
- During planting, mix seed with 2 bags of TSP or 4 bags of SSP fertilizer. Farmers can also use 5–10 t/ha of well-decomposed farmyard manure.
- Drill the seed into shallow furrows 2.5 cm deep spaced at 30 cm or 50 cm; cover with little soil.
- For intercropping with Napier grass, make furrows between or along the Napier rows and drill desmodium seed and fertilizer mixture in the furrows.
Establishment from cuttings
- Use mature parts of desmodium vines.
- Use freshly cut vines.
- Bury 2 nodes leaving 1 or 2 nodes above the ground.
- Space at 30 cm or 50 cm from row to row and 15–30 cm from vine to vine.
- Use the same rates of fertilizer as for seed but place it in holes.
- To maximize germination, ascertain that the amount of rain before planting has been adequate.
Management
- Keep the stand free of weeds, especially during the early stages before the crop covers the ground, by using hoe or herbicide 2,4-D amine 72% at the rate of 2.5 litres per hectare.
- Topdress with 2–4 bags of TSP or SSP fertilizer every year to maintain high yields of desmodium herbage and seed.
- For herbage production, make first cut 3–4 months from planting. Subsequent cuttings should be at intervals of 6–8 weeks.
- Spray against harmful pests, especially when producing desmodium seed.
- Harvest seed when the pods have turned brown by hand stripping the ripe pods and store in a dry place after threshing to avoid rotting.
Use
- Cut and feed in green form.
- Cut and conserve as hay, whole or chopped.
Yields
Yields of 9–10 t/ha dry matter per year of 18–20% crude protein have been reported under good management. An acre can produce 30–60 kg of seed.
Other benefits
When intercropped with maize it will
- provide nitrogen to the crop
- inhibit the growth of striga weeds
- reduce damage by the maize stemborer
- control soil erosion

2. Lucerne

Dairy farmers in the high-rainfall areas of East Africa prefer lucerne over any other forage legume, primarily because of its palatability and high nutritive value that can sustain high milk production levels when fed to dairy cattle. Commonly grown lucerne varieties:
- Cuf 101
- Hunter River
- Hairy Peruvian
Hairy Peruvian does well in high altitudes while Hunter River and Cuf 101 are suited to lower altitudes. Others that have been tested are shown in Table 4.3.
Table 4.3. Lucerne varieties
| Lucerne variety | Agroecological zone | Altitude (m) | Average rainfall (mm) |
| SA Standard | Dry highland (LH5) | 2190–2280 | 800–900 |
| KKS9595, WL625HQ | Wet highland (LH2) | 2070–2400 | 1000–1200 |
| WL414, WL625HQ | Wet midland (UM4) | 1830–2100 | 1000–1200 |
| KKS3864, WL625HQ | Dry midland (UM4) | 1840–2010 | 800–900 |
LH – lower highland, UM – upper midland
Seedbed preparation
Lucerne requires a fine, firm seedbed, prepared well before the onset of the rains. The subsoil should be well broken with a forked hoe. Apply 10 t of well-decomposed farmyard manure or compost manure and dig it in down to the subsoil (Figure 4.4).
Lucerne is deep rooted and requires deep soil.

Figure 4.4. Preparing the seedbed for lucerne.
Planting
- Make furrows 30–40 cm apart and 2.5 cm deep.
- Mix 10–15 kg seeds with 4–6 bags of SSP fertilizer or 2–4 bags of TSP fertilizer and drill into the furrows; cover with a little soil.
- Use 10–15 kg/ha lucerne seed.
- In areas where lucerne has never been grown use lucerne inoculants (available from the Faculty of Agriculture, University of Nairobi).
- If inoculant is not available, collect soil from areas where lucerne has been previously grown and mix with the seeds before planting.
- In acidic soils (pH less than 4.9) liming with agricultural lime is recommended at the rate of 10 t/ha.
Phosphate, inoculant and liming promote root development, nodulation and nitrogen fixation, respectively.
Management
- Weed control: hand weed at least 4–6 weeks after planting and thereafter whenever weeds appear.
- Spray against aphids and other pests with insecticides such as dimethoate at intervals of 2–3 weeks if necessary.
- Continue applying farmyard manure to lucerne field to improve soil fertility, structure, texture and herbage yields.
•Apply 1 bag of TSP fertilizer per hectare annually.
- Harvest lucerne when it starts flowering (about 30 cm high) to a stubble height of 4–5 cm from ground level. One can obtain 6–8 cuts in a year.
- The crop can last up to 4 years under good management.
Use
- Cut and feed lucerne in green form after wilting it to avoid bloating.
- Conserve the excess lucerne as hay, whole or chopped.
- Conserve as silage when combined with other types of fodder such as maize.
Yields
Yields of 5–6 t/ha dry matter per year of 20–25% crude protein have been reported under good management.
3. Dolichos lablab
A short-lived perennial or annual legume, Dolichos lablab is cultivated as human food, green manure, cover crop and animal fodder. Dolichos has several advantages:
- It provides better late-season grazing because it is tolerant to seasonal drought.
- It is more compatible than cowpea with forage sorghum or maize when intercropped.
- It gives higher yield of materials for conservation than do forages such as cowpea when drought sets in.
- It has better resistance to diseases such as phytophthora rust and stem rot, which wipe out many cowpea crops.
- It has better resistance than other forages, such as cowpea, to attack by insects like the bean fly.
Seedbed preparation
- Dolichos has a large seed thus does not require a fine seedbed as does lucerne.
- Highest yields are obtained on land that has not been previously cultivated (fallow land).
- It grows well on acidic soils.
Planting
- Space at 45 cm between rows and 30 cm from plant to plant, placing 2 seeds per hole.
- Use 60 kg/ha seed.
- Use 1–2 bags TSP per hectare or 5–10 t/ha of well-decomposed farmyard manure.
Management
- Harvest for fodder at an interval of 6 weeks (1½ months) leaving a stubble height of 15 cm from ground level.
- Weed as required.
- To get optimal yields in quantity and quality, harvest at early flowering stage.
Use
- Dolichos can be conserved as hay or ensiled.
- It can be fed green to dairy cattle as a legume supplement.
Dolichos analysed as a whole plant contains 16.8% crude protein with a dry matter yield of about 6 t/ha. The seed yield ranges from 1.1 to 3.4 t/ha with 20.25% crude protein content.
4. Stylosanthes guianensis
Stylo (Stylosanthes guianensis) performs well in wetter and warmer areas and on sandy soils. Its ability to grow well on soils of low fertility is particularly valuable both to provide good-quality grazing on these soils and to improve the fertility of the soil. It is useful for weed control and grows well in pasture mixtures containing Rhodes grass. It grows rather slowly in early establishment stages but persists better in grass–legume mixtures than does desmodium (see Figure 4.5).
Seedbed preparation
Prepare a firm, fine seedbed.
Planting

Figure 4.5. A mature crop of stylo in the field.
- Drill at a spacing of 30–40 cm rows or broadcast the seed, especially when oversowing.
- Sow 3–4 kg/ha of seed.
- Apply 1–2 bags TSP per hectare.
Management
- Weed as required.
- When grown in a grass–legume mixture, graze to reduce the shading effect of grass during the early establishment stage.
- Harvest or graze at 6 weeks at intervals of 1½ months, leaving a stubble height of 5 cm.
Use
- Graze or cut and carry.
- Cut and conserve as hay.
Yields
The whole stylo plant has a crude protein content ranging from 12.1% to 18% and dry matter yields ranging from 4.1 to 6.7 t/ha per year.
5. Fodder trees
Fodder trees are used by small-scale dairy farmers as a cheap source of protein for dairy cows.
Common types of fodder trees:
Calliandra—does well in upland areas with medium to high rainfall (700–2000 mm). It regrows well after cutting and harvesting (Figure 4.6).
Leucaena—also does well in upland areas with medium to high rainfall. It is slightly more drought resistant but is more subject to attack by insect pests. Regrows well after cutting and harvesting (Figure 4.7).

Figure 4.6. A flourishing crop of calliandra in the field.
Sesbania—grows better in high-rainfall areas and does better than other fodder trees in higher, cooler areas. In its early stages, it grows faster than calliandra or leucaena but it does not regrow as well after harvesting.
Use of fodder trees
- Leaves, pods and soft young twigs provide good feed for cows.
- They are a good supplement to straw, stover and poor grass diets.
- They provide high-quality forage in the dry season.
Establishment
- To achieve good germination, place the seeds in boiling water for 4 seconds then soak them in cold water for at least 12 hours before planting them.
- Sow the seeds either directly into hedge rows at a spacing of 30–60 cm from plant to plant or in a nursery for later planting when they have reached a height of 60 cm

Figure 4.7. Leucaena in the field
- Plant on the hedgerows around the homestead, on contour lines in the field, or as part of soil conservation structures.
- Apply 5 g (1 teaspoonful) of TSP fertilizer per hole during planting.
Management
- Protect young trees from livestock.
- Cut trees when they are about 2 m tall, leaving a row of hedge 1 m high.
- Harvest every 3–4 months.
- Leave a few trees to grow tall for firewood and seed.
- For seed, collect pods when they start to turn brown, before they split open.
- Dry pods on a sheet or gunny bag.
- Store collected seed in a tin or plastic container with a strong lid.
Feeding
- Can be either fed fresh cut or dried for later feeding.
- To encourage intake, mix with mineral salts or other feeds.
Other benefits
- Improves soil fertility by providing green mulch or by fixing nitrogen.
- Supplies fuelwood.
- Supplies wood for building.
- Provides live fencing.
- Furnishes food for bees.
Yields
Leucaena. Start harvesting at the beginning of the second wet season by cutting back to 50 cm above ground level. Cut twice during the wet season when the regrowth is 50–60 cm, or once at the end of the wet season, and conserve as dry leaf meal. Grazing or harvesting intervals can be 6 to 8 weeks or 12 weeks in less favourable conditions. When well managed, leucaena can yield up to 2 t/ha dry matter per year.
Calliandra. A well-established stand can be harvested 4 to 5 times a year with the harvesting interval varying with the rainfall. Cut again when the regrowth is 50–60 cm. Depending on rainfall and soil fertility, dry matter yields range from 5 to 10 t/ha per year. The edible fraction of calliandra has a crude protein level of 20–25% of the dry matter.
4. Forage conservation
Why conserve forage?
Because rain-based pasture and fodder production is seasonal, there are times of plenty and times of scarcity. It is thus imperative to conserve the excess for use in times of dry- season scarcity. The aim of conservation is to harvest the maximum amount of dry matter from a given area and at an optimum stage for utilization by animals. It also allows for regrowth of the forage.
The two main ways of conserving fodder are by making hay or making silage.
Haymaking
Hay is fodder conserved by drying to reduce the water content so that it can be stored without rotting or becoming mouldy (reducing the moisture content slows down the rate of growth of spoilage microorganisms). The moisture content should be reduced to about 15%.
Not all grasses and fodder are suitable for haymaking. Table 4.4 gives examples of fodders that can be conserved as hay in East Africa.
Table 4.4. Forages suitable for conservation as hay
| Fodder type | Agroecological zone | Dry matter yield* (kg/acre) | 20-kg hay bales (no.) |
| Boma Rhodes grass | LH3 | 4868 | 243 |
| Elmba Rhodes grass | LH3 | 3944 | 197 |
| Lucerne | LH3 | 2718 | 136 |
| Vetch | UH1 | 1432 | 72 |
LH – lower highland, UH – upper highland
* Yields of Elmba and Boma Rhodes grass are based on 2 harvests a year, lucerne on 3 harvests a year and 1 harvest a year for vetch
Harvesting and curing
- Harvest the fodder for haymaking when the crop has attained 50% flowering. At this stage protein and digestibility are at maximum, after which they decline with age.
- The fodder should be harvested after 2 to 3 days of dry weather so that drying will be possible.
- Where possible, drying should be done under shade so that the dried fodder retains its green colour, which is an indicator of quality.
- Turn the fodder using a farm fork to ensure even drying.
- Check the dryness by trying to break the stem. If it bends too much without breaking, there is still too much water.
•Legumes and grasses can be mixed to make better-quality hay, e.g. Rhodes grass
+ lucerne.
Baling hay
Baling the hay allows more material to be stored in a given space. A good estimate of the amount stored makes feed budgeting easier. Baling can be manual or mechanized, manual baling being more economical for small-scale dairy farmers.
Manual hay baling is done using a baling box with dimensions 85 cm long x 55 cm wide x 45 cm deep, open on both ends (Figure 4.8). If the hay is well pressed, the box will produce an average bale of 20 kg.
Figure 4.8. Box baling.
Hay can also be stored without baling by heaping it into a dome-shaped stack and covering it with a polythene sheet or a tarpaulin.
Storage
Hay should always be stored in a sheltered enclosure away from direct sunlight and rainfall, e.g. in hay barns. Rats and other rodents should be controlled as they can damage the hay.
Characteristics of good-quality hay
The quality of the hay should be evident on physical examination. Good-quality hay should
- be leafy and greenish in colour
- have no foreign material mixed with it
- have no smell
Feeding
A dairy cow weighing 400 kg will consume an equivalent of about 3% of its body weight in dry matter (12 kg dry matter) per day. Since hay contains 85% dry matter, if the cow consumes nothing else, it will require 14 kg of hay per day.
Leaf meal
Leaf meal is conserved material from the protein-rich fodder legumes, which include lucerne, calliandra, leucaena and dolichos.
How to make leaf meal
- Harvest the leaves and dry them on a clean floor (under shade).
- Collect the dry leaves and put them in a gunny bag.
- Store the leaf meal in a dry place and away from the sun.
- Feed as a supplement. The meal should not form more than 30% of a daily ration.
- Wet the leaf meal with water before feeding to reduce wastage through spillage.
Silage
Silage is high-moisture fodder preserved through fermentation in the absence of air. These are fodders that would deteriorate in quality if allowed to dry. Silage can be made from grasses, fodder sorghum, green oats, green maize or Napier grass.
An ideal crop for silage making should
- contain an adequate level of fermentable sugars in the form of water-soluble carbohydrates
- have a dry matter content in the fresh crop of above 20%
- possess a physical structure that will allow it to compact readily in the silo after harvesting
Crops not fulfilling these requirements may require pre-treatment such as
- field wilting, to reduce moisture
- fine chopping to a length of 2–2.5 cm to allow compaction
- use of additives, to increase soluble carbohydrates
Dry matter yield of common fodders used for silage making is 4–12 t/acre for Napier grass, 6.8–8.8 t/acre for sorghum E6518 and 9.6 t/acre for maize.
Harvesting stages
Napier grass should be harvested when it is about 1 m high and its protein content is about 10%. Maize and sorghum should be harvested at dough stage, that is, when the grain is milky. At this stage, maize and sorghum grains have enough water-soluble sugars so it is not necessary to add molasses when ensiling, However, when ensiling Napier grass, it is necessary to add molasses to increase the sugar content. To improve silage quality, poultry waste and legumes like lucerne and desmodium may be mixed with the material being ensiled to increase the level of crude protein. However, since protein has a buffering effect that increases the amount of acid required to lower pH, poultry waste and legumes should be incorporated within limits. Poultry litter should not exceed 5% and legumes should not exceed 25% of the total material ensiled.
Types of silos
A silo is an airtight place or receptacle for preserving green feed for future feeding on the farm. Silos can be either underground or above ground, the qualification being that the silo must allow compaction and be airtight. Five types are described here: tube, pit, above-ground, trench and tower.
- Silage can be made in large plastic sacks or tubes. The plastic must have no holes to ensure no air enters. This is popularly referred to as tube silage.
- Silage can also be made in pits that are dug vertically into the ground and then filled and compacted with the silage material.
- An above-ground silo is made on slightly sloping ground. The material is compacted and covered with a polythene sheet and a layer of soil is added at the top. When finished, it should be dome shaped so that it does not allow water to settle at the top but rather collect at the sides and drain away down the slope.
- The trench silo is an adaptation of the pit silo, which has long been in use. It is much cheaper to construct than a pit silo. Construction is done on sloping land. A trench is dug and then filled with silage material. This method is ideal for large-scale farms where tractors are used. Drainage from rain is also controlled to avoid spoiling the silage.
- Tower silos are cylindrical and made above-ground. They are 10 m or more in height and 3 m or more in diameter. Tower silos containing silage are usually unloaded from the top of the pile. An advantage of tower silos is that the silage tends to pack well due to its own weight, except for the top few metres.
Tube silage
- Chop the wilted material to be ensiled into pieces not more than 2.5 cm long (Figure 4.9).
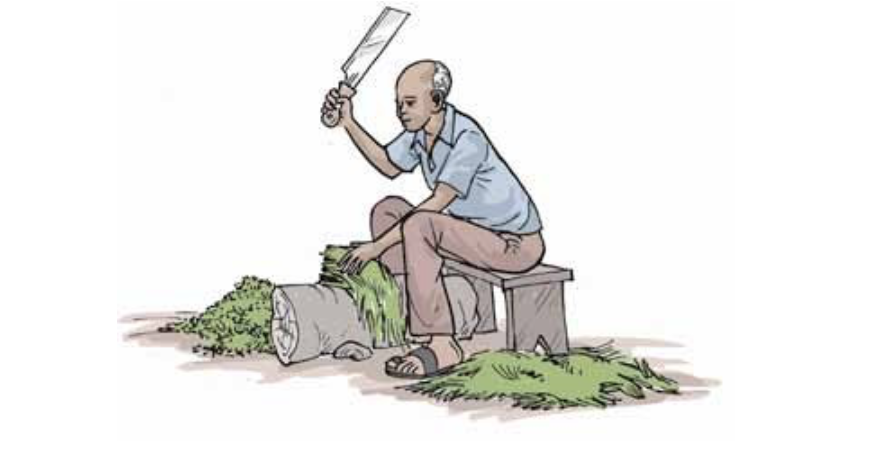
Figure 4.9. Chopping fodder for ensiling.
- Sprinkle the chopped material with a molasses and water mixture; for every sack use 1 litre of molasses mixed with 2–3 times as much water. This is especially for material like Napier grass that has low sugar content. Maize bran or cassava flour can be added to improve the carbohydrate (energy) content (Figure 4.10).
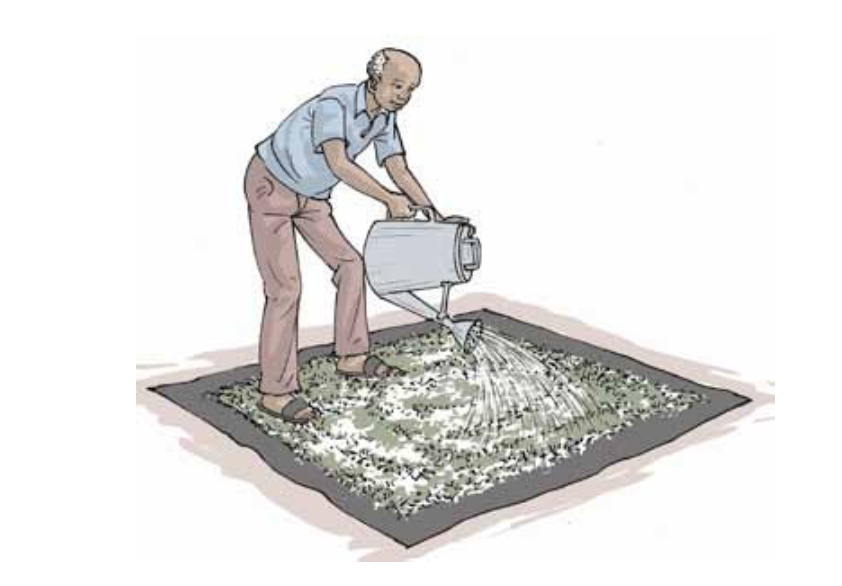
Figure 4.10. Adding molasses.
• Place the chopped material, sprinkled with the molasses and water mixture, into the plastic tubing (1000 gauge) with a width of 1.5 m. Cut a 2.5-m length, tie off one end and fill with the material, compressing it well, then tie the other end to seal. Stack the filled sacks until needed. Fermentation is usually complete after 21 days (Figure 4.11).
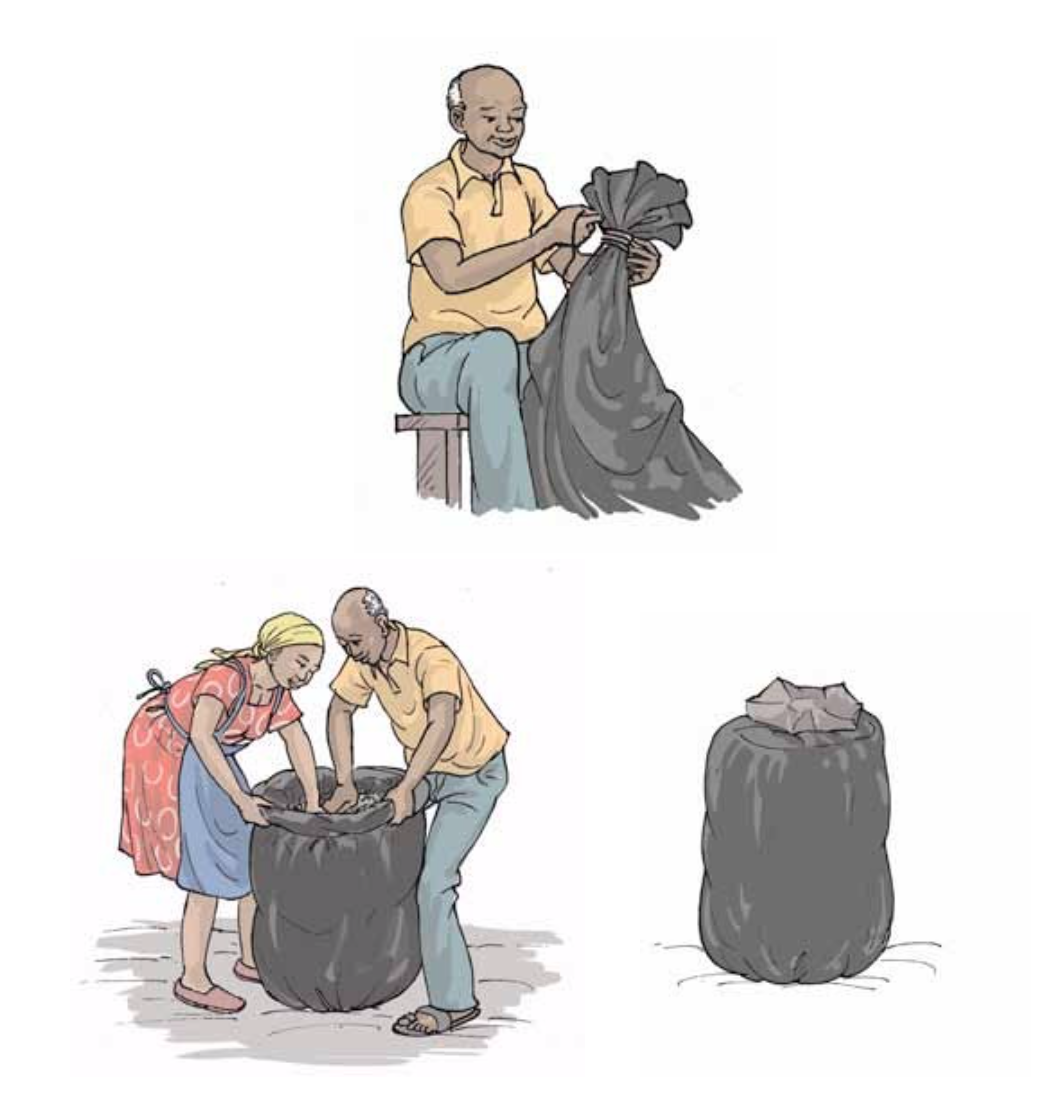
Figure 4.11. Steps in making tube silage.
Qualities of good silage
Well-prepared silage is bright or light yellow-green, has a smell similar to vinegar and has a firm texture. Bad silage tends to smell similar to rancid butter or ammonia.
Natural microorganisms ferment the sugars in the plant material and in the added molasses into weak acids, which then act as a preservative. The result is a sweet-smelling, moist feed that cattle like to eat once they get used to it.
Storage and feeding
Tube silage should be stored under shade, for example in a store. Rats and other rodents that could tear the tube need to be controlled. When feeding, open the tube and scoop a layer and remember to re-tie without trapping air inside.
When feeding from the pit, scoop in layers and cover after removing the day’s ration, making sure the pit is airtight. Drainage from the top should be guided to avoid rainwater draining into the pit.
When feeding from the above-ground method, open from the lower side of the slope, remove the amount you need for the day and re-cover it without trapping air inside.
To avoid off-flavours in milk, feed silage to milking cows after milking, not before, or feed at least 2 hours before milking.
Losses
Nutrient losses may occur during silage making. In the field during cutting, losses due to respiration during wilting will be about 2% per day. If it rains, leaching may cause some loss.
- Overheating due to poor sealing gives a brown product, which may smell like tobacco and result in severe damage to nutrients, e.g. proteins.
- Effluent losses of 2–10% that occur from moisture seepage contain soluble and highly digestible nutrients; seepage should be avoided by wilting the herbage.
Silage additives
During silage preparation, different types of additives can be incorporated to improve the quality. These include fermentation stimulants. Some crops may not contain the right type or the right number of lactic acid bacteria. Bacterial inoculants and enzymes can hasten and improve fermentation by converting carbohydrates to lactic acid. Most inoculants contain Lactobacillus plantarum.
Fermentation inhibitors include acids such as propionic, formic and sulphuric. Inorganic acids are more effective but are strongly corrosive thus not recommended. Of the organic acids, formic is more effective than propionic, lactic or acetic.
Substrate or nutrient sources (grains, molasses, urea or ammonia) are used when there are insufficient soluble carbohydrates in the material to be ensiled (e.g. legumes, Napier grass, crop residues). They are also used to increase the nutritive value of the silage. Molasses can be added at the rate of about 9 kg/t of silage.
Note: Use of additives is not a prerequisite for making good silage, but it is good for crops such Napier grass, lucerne and grasses such as Cynodon dactylon (star grass),
Brachiaria brizantha (signal grass), and Setaria sphacelata (bristle grass) because it improves fermentation and nutritive value of the resultant product.
In these two videos, Jos shows us how to make silage.
Fodder banks
Fodder banks refer to fodder left standing in the field to be used during times of feed scarcity. They can be used all year but are meant to cushion the farmer against forage scarcity expected during dry seasons. Fodder banks do not supply 100% of nutrients required but supplement the available dry-season forage. Suitable fodder bank species are shown in Table 4.5.
Table 4.5. Fodder bank species suitable for different agroecological zones
| Arid and semi-arid tropics | Humid tropics | Highland tropics |
| Cajanus cajan | Cajanus cajan | Calliandra calothyrsus |
| Sesbania sesban | Calliandra calothyrsus | Leucaena diversifolia |
| Leucaena diversifolia | Sesbania sesban | |
| Leucaena leucocephala | ||
| Sesbania sesban |
-
-
Crop by-products
Definition
-
Crop by-products are fibrous plant materials left behind after harvesting human food crops and are available in many areas where crop agriculture is practised. They are generally high in fibre, low in digestibility and low in crude protein. On small farms in developing countries they form the principal feed of ruminant livestock during dry seasons.
Crop residues include straw and chaff from cereal grains (rice, wheat, barley, oats), stover (maize, sorghum), maize cobs, bean haulms, and sugar cane tops and bagasse (see also Table 4.6).
Crop by-products have common characteristics:
- poor palatability
- low in crude protein (mostly below 6%)
- high in cellulose and other structural carbohydrates (crude fibre)
- low digestibility
- low in calcium and phosphorus
Straw has no vitamin A (carotene content, related to green colour of the plant.
Table 4.6. Typical nutrient content of some crop by-products
| By-product | DM (%) | CP (%) | CF (%) |
| Sugar cane bagasse | 95 | 3.0 | 43.1 |
| Rice straw | 92 | 4.2 | 42.3 |
| Maize stover | 91 | 6.0 | 42.0 |
| Cassava leaves (dried) | 90 | 24.7 | 17.3 |
| Wheat straw | 86 | 4.0 | 42.0 |
| Barley straw | 86 | 4.0 | 42.0 |
| Sugar cane tops | 26 | 5.0 | 32.6 |
| Sorghum stover | 25 | 6.0 | 28.1 |
| Banana stem | 5 | 3.2 | 19.1 |
| Lucerne hay (for comparison) |
90 | 19.0 | 25.0 |
DM – dry matter, CP – crude protein, CF – crude fibre
Crop residues can be used for feeding dairy cattle but cannot supply adequate nutrients without supplementation. Because of their low digestibility they remain in the rumen for a long time, limiting intake. The other major limitation is they do not contain enough crude protein to support adequate microbial activity in the rumen. It is therefore advisable to feed them with a true protein source (as opposed to a non-protein source, e.g. urea) such as fodder legumes or commercial supplements such as cottonseed cake.
Crop residues should not be fed in large amounts to growing animals. If used, they should make up no more than 25% of the diet with the remainder comprising high- quality feeds.
Improving the quality of crop residues
Several methods have been developed to improve the quality of crop residues, but chemical treatment has received the most attention.
Physical methods
Chopping straw to 5 cm or a little longer before feeding is a common practice. Scientific tests have shown that chopping does not improve straw digestibility, but it does increase intake, reduce wastage and make it easy to mix the straw with other feed components.
There is also the salting method, in which chopped straw is soaked in a dilute salt solution before feeding. Although this method has not been scientifically tested, many farmers practise it, considering it effective.Supplementation
Supplementation of crop residues with grasses, legumes or concentrate feeds significantly improves feed intake and animal performance. In dryland farming systems where forages are scarce, crop residues are supplemented with concentrate feeds. Supplementation of the basal diet with good-quality forage or concentrates helps to overcome the problem of low palatability.
Urea treatment
Treating crop residues with 4% urea solution at 45–50% moisture improves the nutritive value by increasing the digestibility, palatability and crude protein content. The process is simple and farmers can easily practise it. The chopped material is soaked in urea solution mixed at the rate of 4 kg urea (fertilizer grade) in 100 litres of water (4%). The urea-water solution is sprinkled on batches of the chopped material as it is added to the pit. After each addition, the mixing should be thorough. The mixing can be done in the pit or on a plastic sheet on the ground before packing the pit. It is commonly recommended that the pit remains closed for at least 3 weeks and preferably 1 month, but treatment times longer than necessary do not have adverse effects.
The urea is converted to ammonia, which then breaks down some of the bonds in the fibrous material, making them accessible to microbial enzymes.
Urea–molasses blocks
Urea–molasses blocks provide both energy and nitrogen to the microorganisms in the rumen and thus improve the digestion of crop residues such as straw.