Credit:CADEP-SFM is implemented by the Ministry of Environment and Forestry, Kenya Forest Service(KFS), Kenya Forestry Research Institute(KEFRI) and Japan International Cooperation Agency (JICA).
CH 1:
Intro
1.1 Melia volkensii and its Natural Distribution
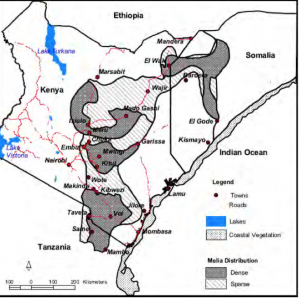
Melia volkensii is a multipurpose deciduous tree that is endemic to drylands of EasternAfrica with natural distribution range in Ethiopia, Kenya, Somalia and Tanzania (Figure 1). It grows in sandy-clay and shallow stony soils but prefers sandy soils with good drainage from 0-1,700 m above sea level in areas with mean annual rainfall of between 300 – 800 mm and temperature range of 26-38oC. The species belongs to the Meliaceae family and is locally known as Mukau (Kamba, Tharaka, Mbeere), Tile (Boran), Bamba (Oromo), Maramarui (Samburu), Boba (Somali) and Kirumbutu (Taita) (Kamondo et al., 2016).
1.2 Importance of Melia
Melia is a fast-growing tree attaining a height of up to 20 m and 40 cm diameter in 10 to 18 years, depending on site conditions. It is highly preferred in the drylands because of its drought tolerance, high quality and termite resistant timber. Other products of Melia include poles, posts, fodder, medicine, firewood and bee forage (Luvanda et al., 2015). However, a supply of these products has declined over the years because of over- reliance on natural Melia populations, over-exploitation, and conversion of woodlands into farms.
1.3 Objectives of the Guidelines
Initial attempts to promote plantingof Melia on-farm were constrainedby propagation challenges. However, with breakthroughs in breaking of its seed dormancy, development of technologies for raising seedlings and tree establishment, and promising Melia enterprises, the species is increasingly being adopted as a plantation species in semi-arid areas of Kenya.
The potential for forest and tree growing expansion is more in the arid and semi- arid lands (ASALs) of Kenya. This is unlike high potential areas where there is intense competition for land between forestry and agriculture. This document will be continuously updated as new research and/or information emerge.
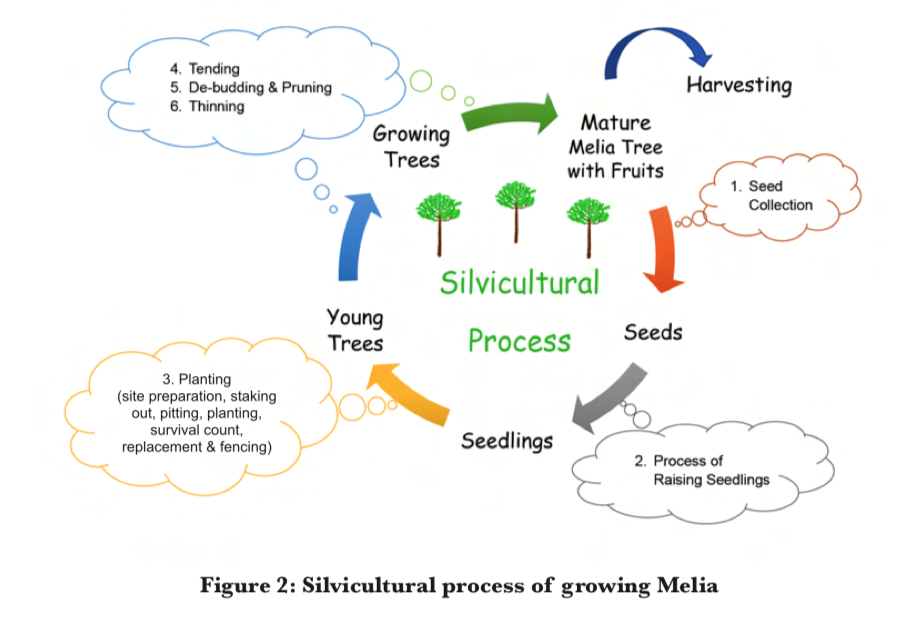
The Guidelines outline the entire process of growing Melia including: seed collection, seed processing and handling for production of healthy seedlings. More emphasis is laid on the field management aspects of site selection, land preparation, planting, tending and all silvicultural treatments of Melia to its harvesting (Figure 2). The Guidelines also provide a cost-benefit analysis of growing Melia for income generation to facilitate farmers or tree growers to make informed investment decisions.
CH 2:
Collection and processing of melia seed.
2.1 Collection of Melia Fruits
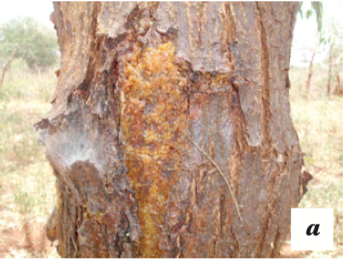
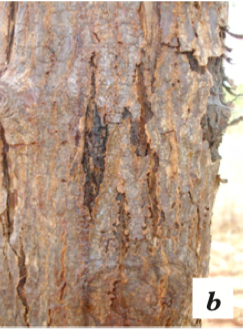
Melia fruits should be collected from the tree crown when they are ripe. While yellowish in colour, fruits may be mature but not ready for collection until they have developedbrown patches (Plate 2a and b). Collection is done from the crown by either hand-picking, use of looping shears to cut branchlets bearing ripe fruits or shaking with a Y-forked stick. Fruits that fall on shaking should be sorted to remove: over-mature fruits that are blackish; immature fruits that are dark green; undersize fruit; and fruits that show sign of rotting (Plate 2c). Naturally fallen Melia fruits should be avoided as they are either immature or infested. During fruit collection, they should be put in bags, which are not air-tight to avoid rotting. The fruits are temporarily stored under shade before being transported for processing.
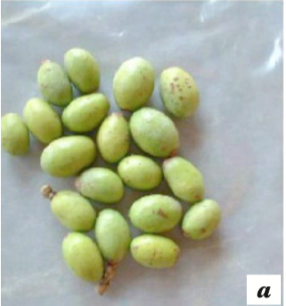
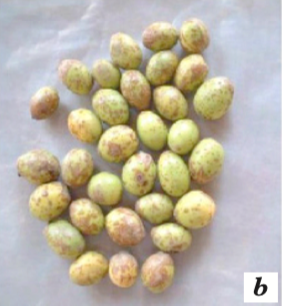
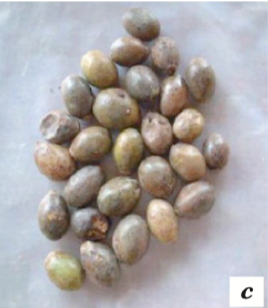
maturity (a) Mature but not ripe, (b) Ripe and ready for collection (c) Over-ripe
2.2 Seed Processing
2.2.1 De-pulping
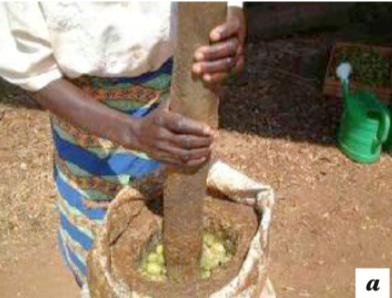
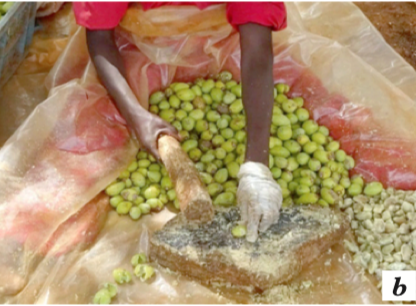
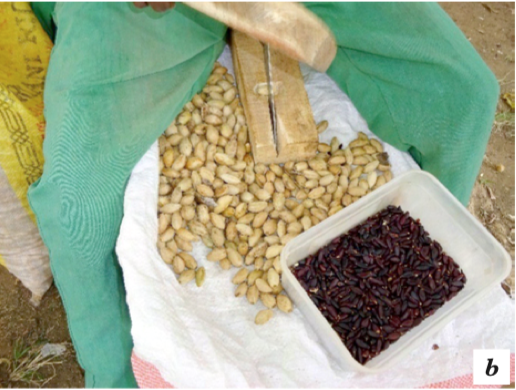
Immediately after harvesting, Melia fruits are de-pulped using a pestle and mortar (Plate 3a). Alternatively, de-pulping can be done by placing an individual fruit on a piece of timber or stone and hitting with a plank of wood (Plate 3b).
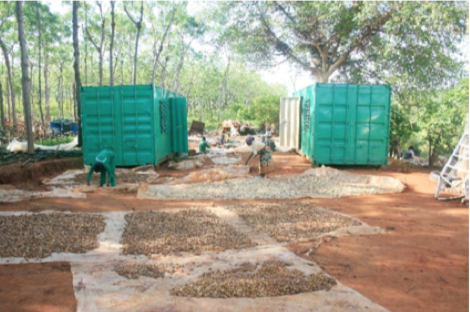
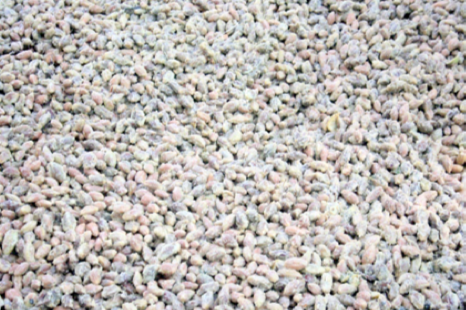
The nuts are then washed thoroughly, and sun dried for at least two days (Plates 4 and 5). Seven (7) kg of fruits yield about one (1) kg of clean nuts.
2.2.2 Seed extraction and packaging
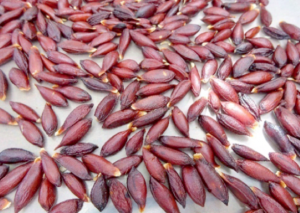
Melia seeds are extracted from nuts using either a Melia nut cracker (Plate 6a) or a knife and wooden plank (Plate 6b). The Melia nut cracker is a tool developed by KEFRI and has adjustable mechanism for cracking nuts of different sizes. When a knife and wooden plank are used in extracting seed, the nut is placed in a groove carved out on the plank of wood. Different sizes of grooves may be made on one plank of wood to accommodate nuts of different sizes. The nut is placed in the groove and a cut is made at right angle, i.e. perpendicular to the nut length, slightly off-centre near the blunt end of the nut. Seeds extracted from freshly de-pulped ripe fruits are brown while those extracted from old de-pulped nuts are black (Plate 7).

It is recommended that extracted seeds are sown immediately. It is advisable to extract seeds only by order, so that any extracted seeds are packed and dispatched without delay. The seeds should be used within one month to avoid loss of viability.
Tree growers are encouraged to source their improved certified Melia seeds from the KEFRI Tree Seed Centre in Muguga or Kitui. The current prices of Melia seeds at KEFRI are Ksh. 4,000 per kg for local type and Ksh. 6,000 per kg for improved type as of March 2018.
The advantages of using improved certified seeds are: clean seeds, guaranteed quality assurance, new genetics (better yields, drought tolerance, pest resistance), faster growth and high germination rates.
For any further information, please access KEFRI’s website: www.kefri.org/wpcontent/uploads/PDF/SEED%20CATALOG.pdf.
CH 3:
Raising of melia seedlings
Activities involved in raising of Melia seedlings include: locating and preparing a nursery; seed pre-treatment and sowing; potting and pricking out; and management of the seedlings in the nursery including protecting the seedlings from pests and diseases.
3.1 Nursery Location
The size of the nursery will depend on number of Melia seedlings being raised. It is important that the site selected for the nursery has adequate land to raise the number of Melia seedlings required and for future expansion. Generally, the nursery should besited in an accessible open space that is well protected and secure from animals andcold winds as Melia prefers high temperatures. A reliable water supply is a prerequisite. The topography should preferably slope gently to allow for drainage since Melia cannot withstand water-logging conditions.
3.2 Nursery Seedbeds
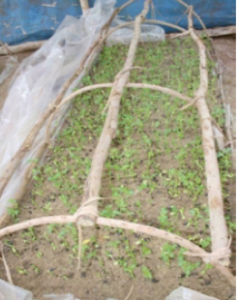
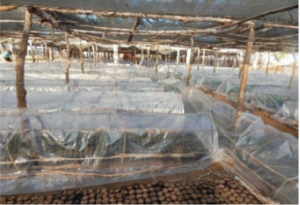
Melia seed should be sown in a seedbed filled with sterilised river sand. The sand can be sterilised by drenching it using 450 millilitres (ml) of sodium hypochlorite e.g. JIK in20 litres of water and sprayed with a fungicide. Melia is best sown in raised seedbeds covered by clear polythene sheet. A non-mist propagator can also serve as a suitable substitute. A non-mist propagator consists of a simple frame of timber covered withclear polythene sheet (Plate 8).
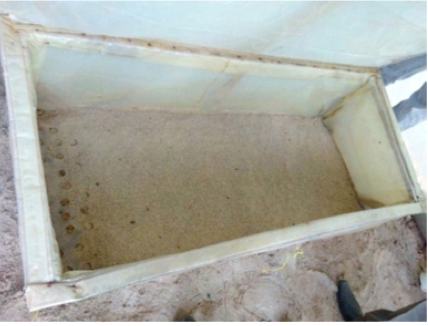
Plate 8: Non-mist propagators for Melia seed sowing
The propagator is filled with the clean river sand to a depth of 15-20 cm and its lid closed to avoid contamination. Small propagators can also be improvised using perforated washing basins covered with polyethylene sheet and tightly wrapped with rubber-band to hold the sheet in place. Tunnels can also be used (Plate 9).
3.3 Seed Pre-treatment
To break dormancy and improve germination (Figure 3),
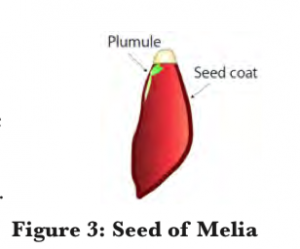
Melia seeds are pre-treated as follows (Figure 4):
Step 1: Nipping the seeds by breaking the sharp tip of the seed between the fingers.
Step 2: Soaking the seeds in cold water for 12 to 24 hours.
Step 3: Slitting the seed coat longitudinally.
As Melia seeds are very sensitive to fungal attack. It is important to maintain a clean sterile environment during the pre-treatment process. Slitting is achieved by cutting the seed coat longitudinally from the tip that was nipped downward to the other end with a clean sterile sharp blade, taking care not to injure the radicle and endosperm.
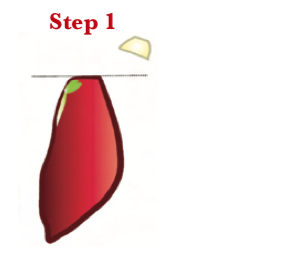
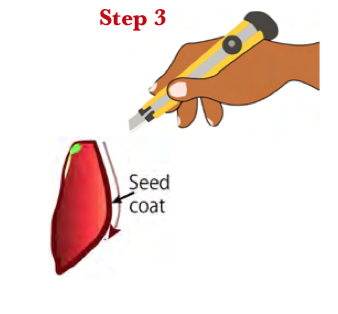
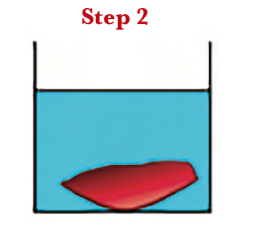
Figure 4: Steps of Melia Seed pre-treatment
3.4 Seed Sowing
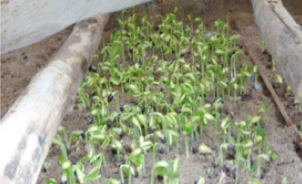
Sowing in the seedbed is done immediately after slitting the seed coat. The pre-treated seeds are spread on clean river sand that has been thoroughly watered and covered with a layer of sand equal to double the thickness of the seed. After sowing, the seedbed is drenched with suitable fungicide. The propagator is closed tightly to ensure that the chamber inside the seedbed remains humid. The months of June, July and the rainy seasons are not favourable for Melia germination due to low temperatures. Germination of Melia seeds occurs within 3-6 days (Plate10).

3.5 Potting and Pricking Out
Suitable potting media consists of a well-drained mixture of soil, sand and manure in the ratio of 3:1:1. The media is filled into seedling containers and watered thoroughly. The recommended pricking out (transfer of germinated seedlings to the planting containers) time is 1-3 days after germination. Delayed pricking out of seedlings may cause high mortality and deformed seedlings.
3.6 Management of Melia Seedlings in the Nursery
3.6.1 Shading young seedlings
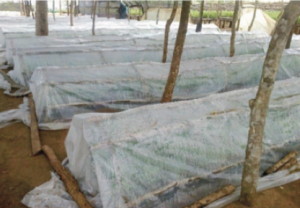
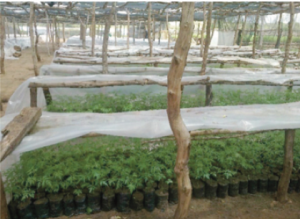
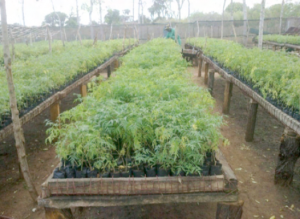
At the time of removing the young seedlings from the seedbed, they are tender and may suffer desiccation and mortality if exposed to direct sunlight. They should be shaded with a shade net or any other suitable material. Initially, a heavy shade (70%) is recommended within the first two weeks. This shall be reduced for 4 weeks after which the seedlings shade should be removed completely. During the rainy season, seedlings should be covered to avoid water-logging that could lead to fungal attack.
Seedlings can also be put in a tunnel during the first 2-3 weeks to protect them against cold spells at night (Plate12). Tunnels are opened during the day and closed at night to observe right temperature and moisture levels.
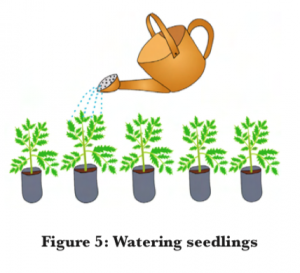
3.6.2 Watering
Melia seedlings are sensitive to water-logging. Therefore, they should be watered only when the potting media is dry. It is good to water seedlings using a watering can or something with small watering holes to reduce the power of water drops which may cause soil erosion and damage the young tender seedlings. The soil should be maintained moist by giving adequate amount of water. Watering of seedlings should be done either early morning or late afternoon (Figure 5).
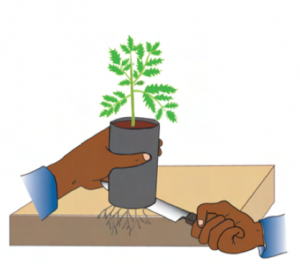
3.6.3 Root pruning and hardening-off
Root pruning refers to cutting of roots that extend from the potting container to the ground. Unpruned roots is confirmed by seedlings sticking on the ground. Root pruning can be achieved either by lifting seedlings off the ground, systematic transfer of seedlings or cutting any roots that have penetrated the ground with a clean sharp knife (Figure 6), (TEAC; FAO, 2013).
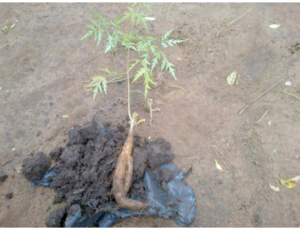
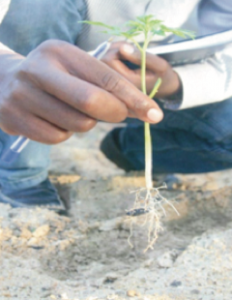
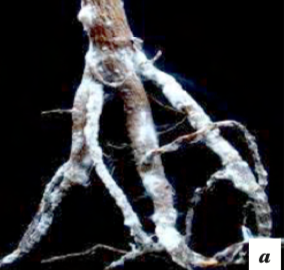
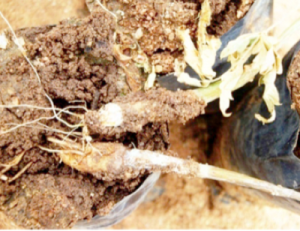
Melia seedlings develop a carrot-likeroot which is full of nutrients andoils that allow them to survive dry circumstances (Plate 13).
Hardening-off is the gradual exposure of seedlings to field conditions just before out-planting. This is achieved by reducing the watering frequency and exposing the seedlings to full sunlight. Seedlings are ready for planting out in the field when they are 30 cm tall.
CH 4:
Diseases and Pest management of Melia in the nursery
Early and prompt monitoring of diseases and pests is important to avoid their spread in the nurseries and in the field.
4.1 Diseases of Melia Seedlings
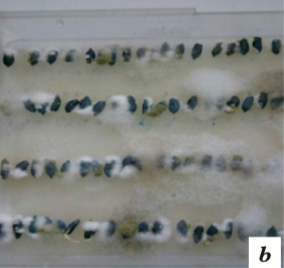
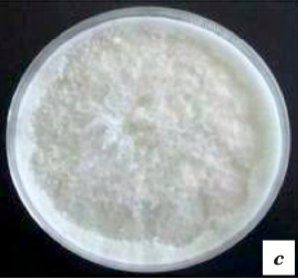
Diseases of Melia seedlings in the nursery are caused by fungi mainly Fusarium spp (Plate 15a). Fungal attack causes seed rot (Plate 15b), root rot (Plate 15c) and eventually no germination or death. Depending on severity of the attack, impacts vary from losses of just a few seedlings to 100% seedling loss. Melia seedlings are also affected by powdery mildews, which attack the surface of leaves and interfere with photosynthesis, resulting in yellowing and stunted growth of seedlings.
4.2 Pest Problems Associated with Melia Seedlings
Nematode attack in Melia nurseries is often characterized by soft rot of roots and root- collar rot, yellowing and death of seedlings mainly due to over-watering. Other pests that attack Melia seedlings are spider mites (Plate16). Mites suck sap from the leaves of Melia seedlings, which turn yellowish grey or whitish grey and sometimes cause death. Mite infections are favoured by hot and dry weather.
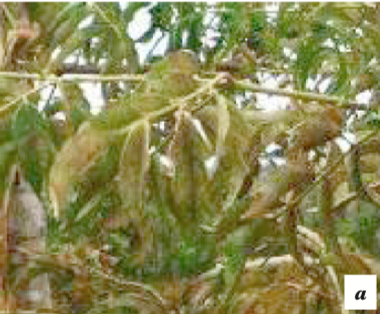

Plate 16: Red spider mite infection on: (a) Melia leaves and (b) Rotten Melia seedling11
4.3 Managing Nematodes in the Melia Nursery
In the nursery, the following steps should be undertaken to reduce or prevent seriousincidences of nematode attack:
• Sterilize nursery media by subjecting it to high temperatures by heating/baking (over 70OC). Allow the soil to cool before it is used for sowing of seeds.
- Fumigate soils infected by nematodes.
- Cover the soils with black polythene and leave it undisturbed for 2 months. Alternatively,drench the soils with nematicides twice orthrice before planting.
- Add nematicide powder such as Nemacuror Mocap to nursery pots during thetransplanting of seedlings (Plate 17).
- Avoid over-watering of Melia seedlings.
- Mixing Neem extract with the media to actas a repellent to the nematodes.
4.4 Managing Spider Mites on Melia Seedlings
In managing spider mites, the following steps can be undertaken:
- Spray seedlings with termiticide or acaricide at 10 to 14-day intervals until the mite population goes down.
- Spray a solution of wettable Sulphur (cheap and non-toxic to humans).
- Change the chemicals used after about 4 sprays to avoid the mite developingresistance.
4.5 General Management of Pests and Diseases in Melia Seedlings Production
The following steps can be used to reduce incidence of pests and diseases:
• Pre-soak Melia seed in fungicide solutions for 12 – 24 hours before sowing.
• Pre-treat the nipped seeds first with dilute sodium hypochlorite e.g. JIK beforesowing and subsequently spray them every 14 days during the first month.
• Control mildews by spraying with Copper oxychloride or Agrocop 50 wp (Copper based fungicides) 45g/20 litres of water at intervals of 21 days until the mildew clears.
• Rotate the nursery site to reduce build-up of pests and diseases.
• Use of biological control agent (BCA), Trichoderma against Fusarium.
Trichoderma can be purchased from some companies, such as Real IPM Ltd. (Thika, Kiambu County), Dudutec (Naivasha, Nakuru County) and JUANCO (Ngong, Nairobi County).
• As a rule of thumb, plant only healthy seedlings and avoid seedlings from areas of infestation.
CH 5:
Management of melia plantations
5.1 Selection of Planting Site
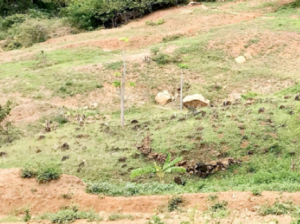
An appropriate site for Melia planting should be gently sloping such that no water logging can take place. The species requires well drained soils that are either sandy, sandy loam or sandy clay. The tree is fast growing and therefore, requires soils with high plant nutrients. Rocky and poor sites should be avoided (Plate 18).
For the purpose of management, thesites should be accessible to facilitate theimplementation of the various silvicultural operations such as the site preparation, delivery of seedlings, planting, weeding, de-budding, pruning, thinning and harvesting of the trees.
5.2 Preparation of Planting Site
Most sites in the drylands are normally underlain by a hardpan that may interfere withthe survival and growth of out-planted seedlings. For Melia, the hardpan limitation is mitigated by deep-ripping the site to break the hardpan. Deep ripping is also effective as an integral part of complete weeding of the site before out-planting the seedlings, as it improves water infiltration and reduces early root growth resistance. The uprooted shrubs and bushes may be used as dead fence to protect young seedlings.
5.3 Methods of Site Preparation
Site preparation can be done in patches (spot hoeing), strips or complete cultivation. Strip cultivation is practiced where some natural vegetation is to be conserved especially on sloping ground to prevent soil movement. It involves clearing strips 1-3 m wide along the contours and spaced at 10 to 30 m depending on the objective of the management. Bushes are cleared along strips followed by ploughing depending on the site conditions. In areas where complete or strip cultivation is not possible, spot hoeing should be done.
The site preparation can be carried out manually or mechanically. The manual preparation involves use of machetes to clear the bushes and shrubs, and hoes to dig out their stumps. After bush clearing, the site is tilled manually by hoe to loosen the soil ready for planting. However, this is time consuming and only possible for a small-scale planting programme. Alternatively, it may be done mechanically using oxen ploughs, tractors and earth moving equipment (bulldozers, excavators). The latter require heavy capital outlay and are applicable in large-scale plantings though they are more appropriate than the others because they enhance the breaking of the hardpan and deep sub-soiling, which greatly improves survival and growth of seedlings. Any planting site can be sprayed with a weed-killer, as pre-planting land preparation. A chemical like glyphosate, is suitable for spraying. This is a cheaper way of land preparation.

5.4 Fencing
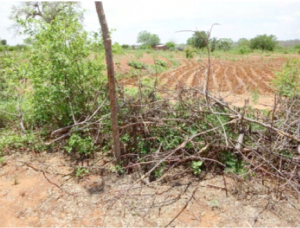
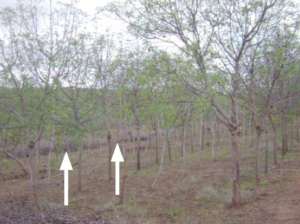
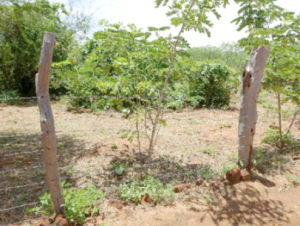
The selected site should therefore, be fenced to protect the young seedlings from browsing animals. There are different types of fences that can be used for Melia plantation (Plates 19-22). Donkeys, goats and cows are known to de-bark Melia trees, hence it is recommended that the fence should be maintained throughout the life of the plantation/woodlot.
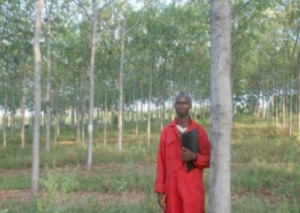
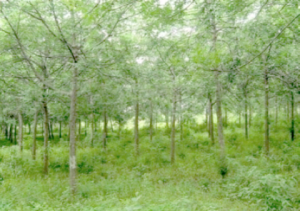
5.5 Spacing
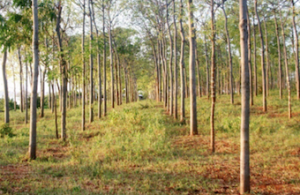
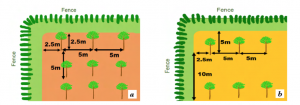
Tentatively, Melia should be planted at a spacing of 5 m x 5 m, giving a stock density of 400 trees per hectare (Figure 7a). At this density, canopy closes at around 6-7 years, necessitating thinning operation to commence.
Farmers interested in intercropping Melia with legumes or short period crops such as the green gram and cow peas, can adopt a spacing of 10 m between rows and 5 m between trees. The spacing will result in 200 trees per hectare (80 trees per acre) (Figure 7b). Intercropping is beneficial to trees as they are clean-weeded until harvesting.
Spacing can also be influenced by lopping off branches to provide dry season fodder for livestock. Repeatedly lopped trees tend to grow a narrow canopy of columnar shape, which is more conducive to smaller spacing, hence more trees per hectare.
5.6 Planting
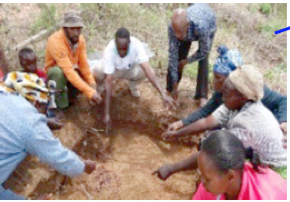
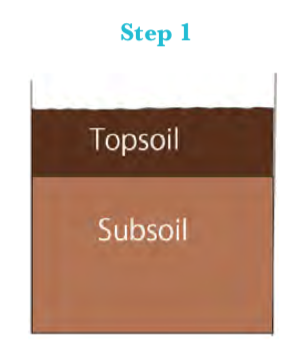
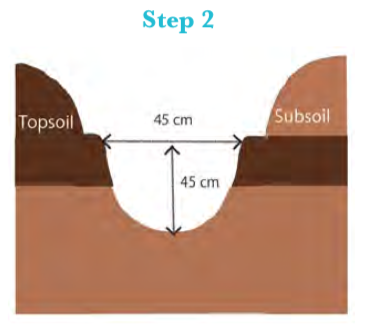
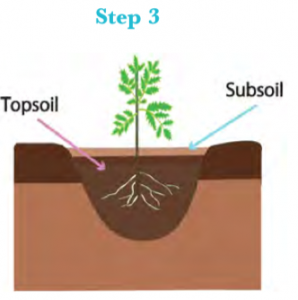
The process of planting starts with staking out the prepared site at the recommended spacing and digging out the holes or pits. The purpose of digging the planting hole is to make the soil loose so that the roots of Melia can easily penetrate into the soil. The loose soil can also hold and retain more moisture. Planting holes should be prepared during the dry season and be at least 45 cm x 45 cm x 45 cm in size. Larger pits are however, advantageous during the initial stages of tree growth as they collect, store more rain water and avail it to the growing seedling for a longer period. When digging the pit, the top soil should be put on one side and the subsoil on the opposite side (Plate 23a).
After attaining the required depth of the pit, top soil should be used to refill it first. Subsoil is then used to top up the pit (Plate 23b) to the ground level. If manure is available, this should be mixed with subsoil and used to refill the pit. This enhances the amount of plant nutrients available to the seedling directly to the roots. Once the hole has been refilled, the stake should be returned at the centre of the pit.
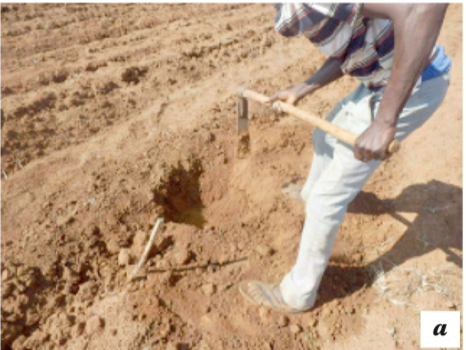

Plate 23: The pitting process: (a) Digging up the pit and (b) Refilling the pitThe above process is shown diagrammatically in Figure 8 below.
Transplanting of the seedlings in the field should be as early in the rains as possible, but not before adequate moisture build-up has taken place (this is determined by squeezing the soil into clumps without disintegrating one day after a rain incidence). Early planting ensures the seedlings experience a prolonged wet season for proper establishment and initial growth.
During planting, the seedling container is removed at the pit by slitting one side from the top to the bottom. The root plug (the mass of roots and the soil) should not be broken during the removal of the container. However, once the seedling is placed in the pit, the root plug should be gently squeezed to loosen the soil and to ensure water moves freely into the root plug of the planted seedling.
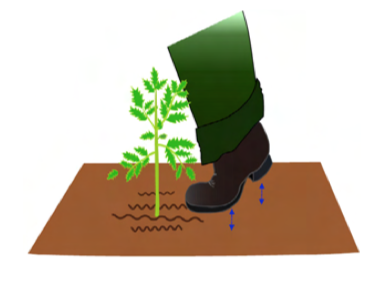
Root collar of the seedling should be maintained at the ground level while the roots are maintained in a downward position without bending them. The top soil is returned into the small pit and squeezed firmly by hand initially and then by foot while holding the seedling in an upright position.
The firm contact of the soil particles and the root hairs enhances the uptake of nutrients and moisture from the soil.
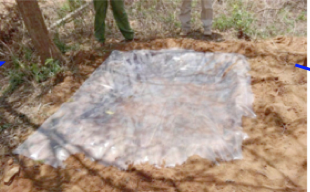
In the dry areas, water is the major limiting factor. It may therefore, be necessary to construct water harvesting structures to enhance survival and rapid early growth following cessation of the rains. Due to the sensitivity of Melia seedlings to even temporary water logging conditions, seedlings can only be planted on the downward side of the structure, approximately 15 to 20 cm outside the barrier.
Melia seedlings should not be planted inside the water harvesting structures, including in those areas receiving very limited amount of rainfall. On sloping ground, farmers are encouraged to make soil conservation structures along the contours spaced appropriately. An example is a “fanya-chini” terrace where soil is put on the lowerside of the contour trench. The resulting embankment can be used to grow fodderfor livestock. It is useful not only to conserve soil but also to divert water. If possible, the soil to fill the pit can be mixed with manure (fertilizer), ashes (lots of Potassium for drought resistance) or charcoal dust (fixing humidity), in a ratio of soil: manure: ashes: charcoal dust of 6:2:1:1.
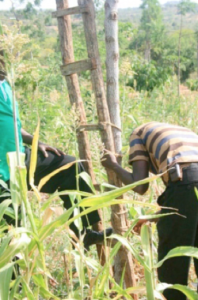
5.7 Tending
Melia is sensitive to both vegetative competition and water logging conditions, especially during the early stages of its development. It is therefore, recommended that the planted seedlings be clean-weeded as this encourages fast growth. However, the weeding requirements vary with the site conditions, age of the trees as well as existing weed species in a given area. The annual weeding requirement shall be high if the spacing between planted seedlings is large enough to allow sufficient light to penetrate and facilitate the rapid growth of weeds.
In the areas where intercropping is practiced, trees are weeded alongside the food crops. However, in the other systems where intercropping is not practiced, seedlings should be clean-weeded at least twice during the first two years, where the operations shall be carried out immediately after the short and long rains. Use of oxen ploughs to cultivate is recommended before onset of rains to create furrows that enhance infiltration. Oxen should, however, not plough within 0.5 m of the stem to avoid damage to superficial roots. The subsequent weeding should be done towards the end of the rains to remove developing weeds. Great care should be taken to avoid breakage and injury to the young trees.

If there is low survival of the planted seedlings due to unreliable weather conditions or any other cause, it is important to carry out beating-up (replanting of the dead seedlings) in the next rainy season.
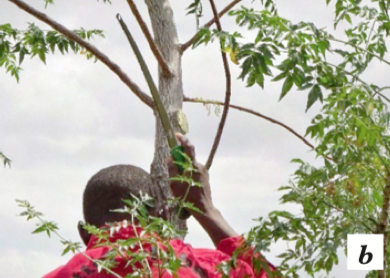
5.8 De-budding
De-budding of Melia should only be done during the first year of planting. The tiny developing buds (Plate 25a) should be removed by hand while preserving the branchlets up to half height of the tree (Plate 2b and c). This exercise should be done as soon as the buds appear during the first year, after which de-budding should be stopped. Whenever it becomes difficult to remove the buds by hand, use of secateurs is recommended
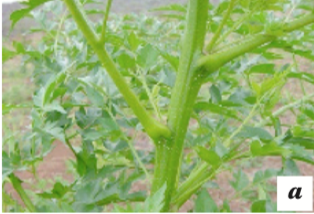
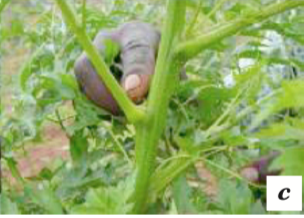
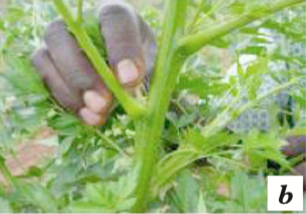
Plate 25: De-budding process: (a)Before de-budding (b) De-budding, and (c) De-budded stem
5.9 Pruning
Pruning of Melia should be from the second year. It should be carried out after considering three factors; 1) trees with double leaders; 2) possession of large branches (relative to stem diameter and height, e.g. larger than 1 inch); and 3) presence of whorls. If double leaders are observed, it is recommended to remove one of them as early as possible. This is to ensure that the tree has only one main leader. Removal of branches is applied selectively, by considering their size in relation to the main stem. If the branches are of large diameter and appear to be competing with the main stem, they should be pruned irrespective of their location on the tree. Smaller branches should be left as they have little effect on the main stem.
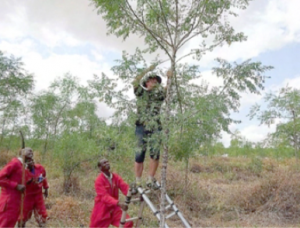
Reduction of branches at the whorls is encouraged to retain an appropriate number that leaves the tree balanced on all sides. The branches that develop from the same position on the tree should be gradually removed. Selective pruning to remove all branches with diameters above 2.5cm should be undertaken as appropriate until the trees attains a clear bole of at least 8 m orup to age 5 years (Plate 26). Selective pruning of individual trees should be up to a maximum of two thirds of their total height.
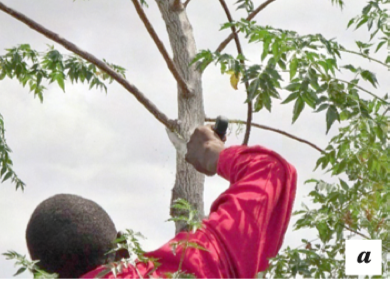
Pruning should be carried out just before the onset of the rains to enhance growth and healing of the wound. Pruning tools should be disinfected by use of disinfectants, e.g. Hydrogen peroxide every time a tree is pruned. The operation should start by making an under-side cut (Plate 27a) and finish with an upper side cut (Plate 27b) to ensure there is no tearing of the bark.
Over-pruning a tree will result in production of epicormic shoots that have to be removed again and will stimulate the tree to grow more branches higher up the stem, where less pruning takes place because it is more difficult to attain. This often results in trees with a clean bole of 3 m high and a dense canopy, while the potential length of the clean bole could be 5-6 m. This results in a serious financial loss for the grower. In particularly good sites, a clean bole of 7-8 m length can be achieved. Most pruning is achieved by year 4, and it is important to prune high up the stem, using a ladder (Plates 26 and 29). In addition, Text Box 1, provides a case study on pruning instruction by Better Globe Forestry (GBF).
CASE STUDY: Pruning Instruction by Better Globe Forestry
Main objectives:
- Producing a clean bole of minimum 5 m longwith 10 cm DBH by year 4. All pruning scars must be inside this inner core of 10 cm diameter.
- Produce a stout, fat stem for the young seedling (1-2 years) that is not top-heavy and that does not bend over through a gust of wind.
Steps:
- Year one: no pruning, except for removing double leaders and whorls.
- Year two: pruning after rains (May/Jun and Nov/Dec)
- Year three: 2-4 passages
- Year four: 2-4 passagesNotes:2 Branches are removed selectively with the biggest ones (2.5 cm) going and the smaller ones staying. This goes also for whorls.
- 2 Take care to leave branches along the stem to allow for increased diameter growth so that the stem gets stronger and will not bend easily in the event of strong winds i.e. DO NOT REMOVE BRANCHES LESS THAN 2.5 CM
- 2 This is NOT the cleaning of the stem of branches like in the case of pine or cypress trees.
- 2 Special attention to reduce branch density towards the TOP of the tree.
5.10 Thinning
The main objective of thinning is to enhance the growth of the remaining trees for optimum production of timber.The 1st thinning should be carried out
at 6-7 years by removing 25% of the original planting density of 400 to leave 300 stems/ha. The 2nd thinning should be carried out approximately 3 yearsafter the 1st thinning or when the canopy closes up. The 2nd thinning reduces the tree density from 300 to 200 stems/ha. During the thinning operation, the dead, weak, diseased, deformed or crooked trees should be removed. In relatively poor sites, the thinning operation may be delayed as the trees grow slowly before canopy closure.
In situations where the criterion applied above does not attain the required density, the remaining trees should be removed in such a way that the trees left are uniformly distributed in the plantation. The removed materials can be utilized as poles, firewood or timber depending on their size. The best time for thinning operation is during the dry seasons when the trees are not growing actively. This period is also off-farm season and easy to get human resources for the operation.
5.10.1 Types of thinning
There are several types of thinning operations that could be employed during theoperation:
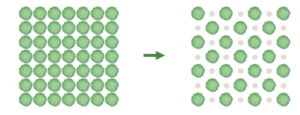
a) Qualitative thinning
In qualitative thinning operation, trees with unfavourable characteristics such as the dead, weak, diseased, deformed or crooked are removed. This is the first option to be taken in thinning operation. It is also recommended to classify the standing trees according to a criterion such as good, fair and inferior to mark those trees to be removed before starting the thinning operation (Figure 10). In case the tree spacing after the theoretical removal of the marked trees is considered as relatively high, some of the marked trees can be left standing even though their characteristics are not very good. After qualitative thinning operation, the stock density should be assessed, and if the number of trees is relatively high to create sufficient spaces for remaining trees, some good trees should be removed in order to achieve the target stock density in such a way that the trees left are uniformly distributed in the plantation.

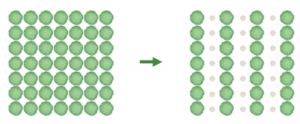
b). Quantitative thinning
Quantitative thinning operation is conducted based on the pre-determined standing density or the number of trees to be left. Most often, selection of the trees to be removed will be done mechanically without considering the quality of trees. Some inferior trees might be retained (Figure 11a). Alternatively, thinning may involve the removal of every other row of trees (Figure 11b). However, this will not require expertise during tree selection and will reduce the cost for the survey in tree selection. Marking of trees might still be necessary to ease the cutting operation.
The contractor buying the thinned material should not be allowed to carry out thinning without proper supervision. However, this can only be done where trees to be thinned are clearly marked and these are the only trees to be cut.
5.11 Harvesting
It is advisable that when the planted trees attain a diameter at breast height (DBH) of at least 30 cm, the trees can be harvested. In sites with moderately poor soil conditions and very low rainfall, it may take about 18 years to reach such diameters. However, the same diameters can be attained earlier in sites that have more favourable conditions and with better management practices. Generally, it is recommended to harvest Melia trees from the age of 12 years because wood properties for timber do not change significantly with age after this. From a sawmilling point of view, bigger diameters like 40-50 cm are more advantageous, and will produce planks of bigger sizes, that command a premium price. On a good site, these diameters will be achieved after 15-20 years.
5.12 Pests and Diseases of Mature Melia Trees
Melia trees have few significant pest and diseases in the plantations. However, there are reported cases of cankers, mites and fungal attack on the main stems (Plate 31). Cases of hear rot have also been observed in the field, and they seem to be stimulated by stress conditions (extended periods of drought, unfertile soils). While there may be no known remedies to these cases, any cases of pests and diseases should be reported immediately to the nearest Forest office. Old trees of 20 years and above are susceptible to the disease which affects heart wood, hence the quality of timber. Unfortunately, there is no economically feasible fungicide to use on a heart rot hosting tree. The best way to prevent heart rot is to keep your tree healthy using proper management techniques such as:
- Minimize pruning wounds that expose large areas of wood.
- Prune trees at an early age so that no major branch will be removed later.
- Remove broken branch stubs immediately after they are noticed.
- Have trees in the plantation checked regularly by a Forester to ensure infected treesare removed early when they still have sound timber that can be utilised.
CH 6: Cost and benefit analysis of growing Melia
6.1 Advantages of Growing Melia for Timber Production
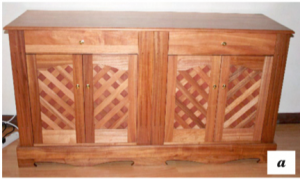
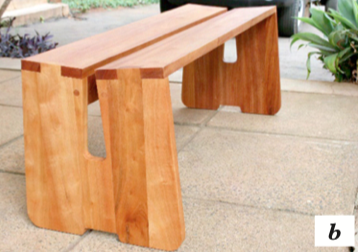
Melia wood has many advantages, similar to the other high quality of hardwoods, such as mahogany, teak (Tectona grandis) and mvule (Milicia excelsa). Its timber compares well with those of other important valuable indigenous tree species such as Meru Oak(Vitex keniensis) and East African Camphor (Ocotea usambarensis). The timber is suitable for different purposes, such as furniture, panelling, door and window framing, floor parquets and poles. In Kenya, the current timber demand greatly exceeds supply. Dealing with a high quality and valuable timber such as that of Melia will be good business investment as the country meets the high timber demand.
6.2 Costs and Benefits of Growing Melia
A tree grower has the option of selling the trees as round wood (standing trees) or convert them into timber for domestic and/or commercial use.
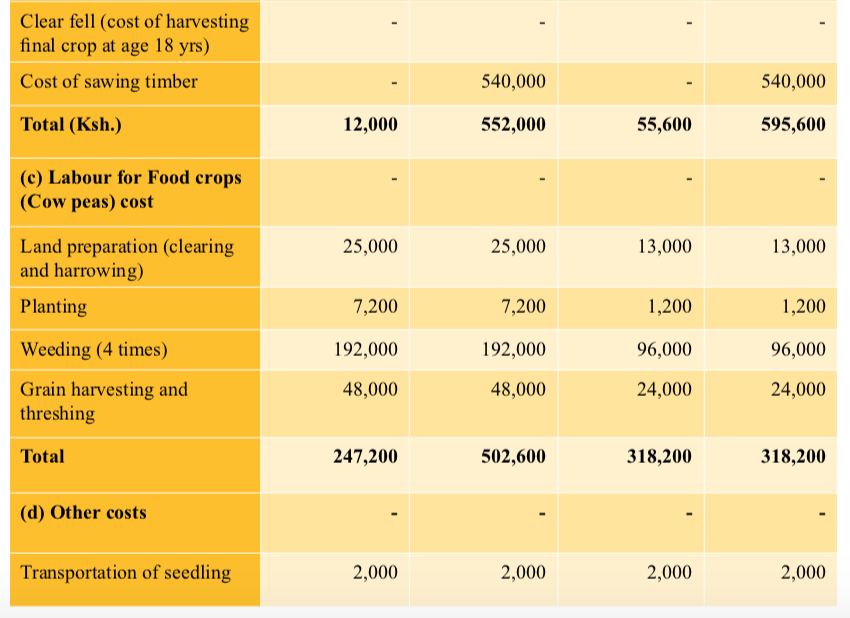
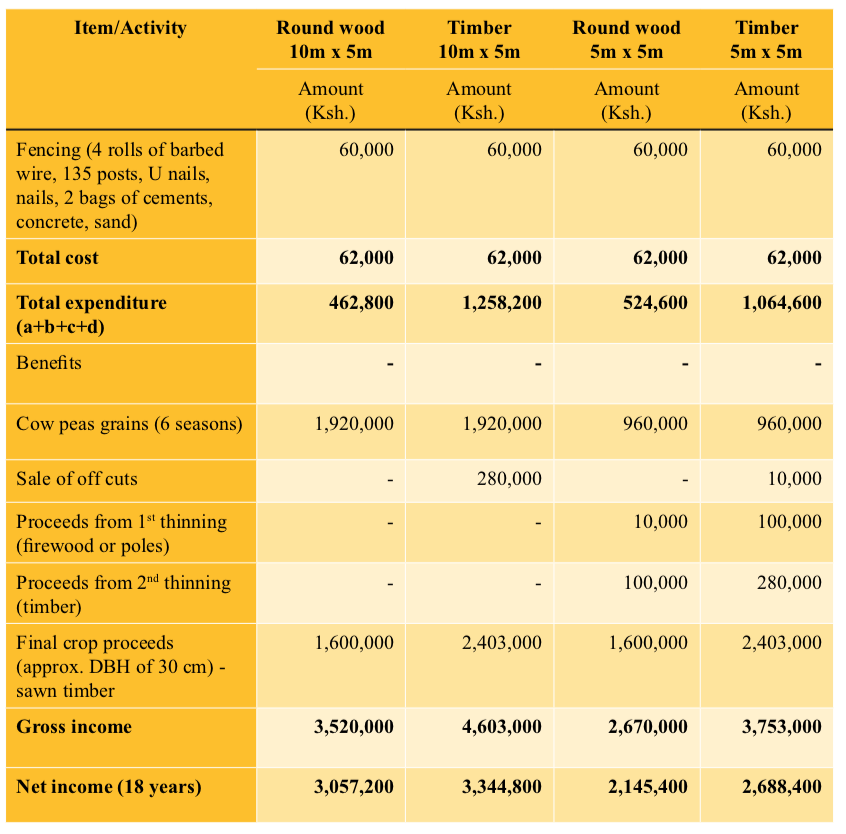
With the correct silvicultural treatments, Melia is expected to attain an average DBH of 30 cm with a height of 9 m in 18 years. The current farm-gate price per tree is Ksh. 5,000 as compared to the expected Ksh. 8,000 from a well-managed plantation with a rotation age of 18 years. However, if the tree grower opts for the sawn timber option, each tree is expected to fetch Ksh. 9,300 after deducting sawing cost. Tree growers are advised whenever possible to sell the final product as sawn timber as this will fetch better returns. The details are described in Appendices 1-2. The summary of the expected revenue from the various Melia enterprise options are shown in the Tables 1 to 3.


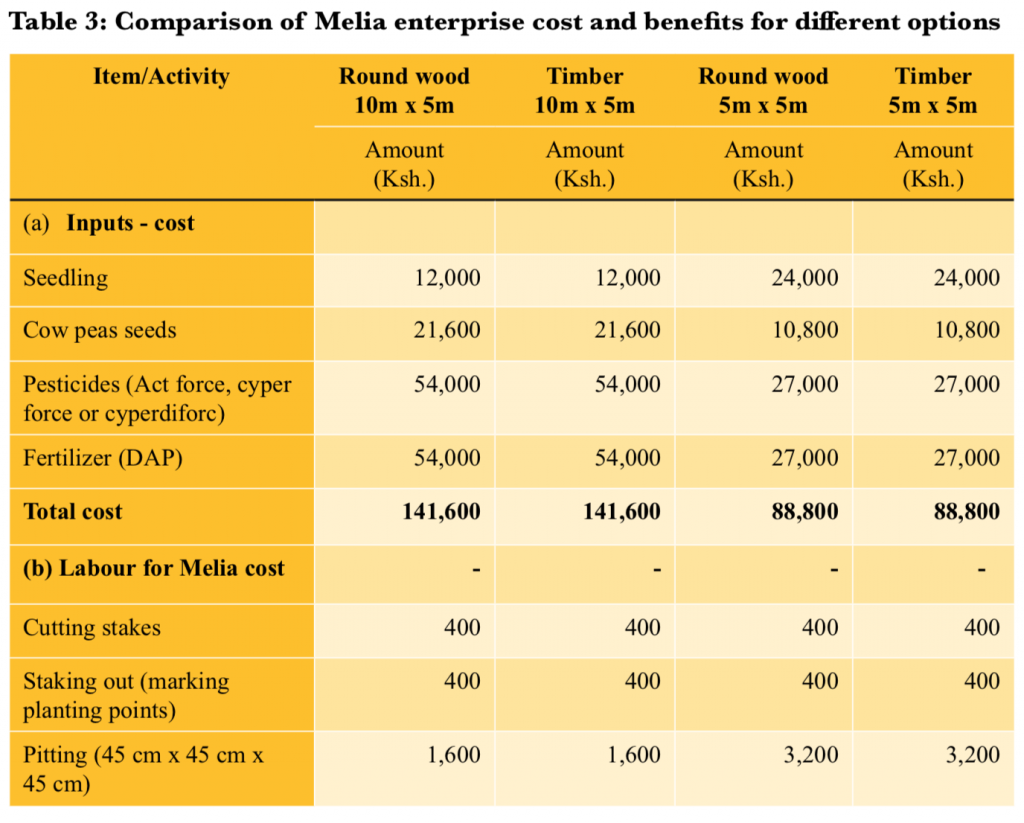
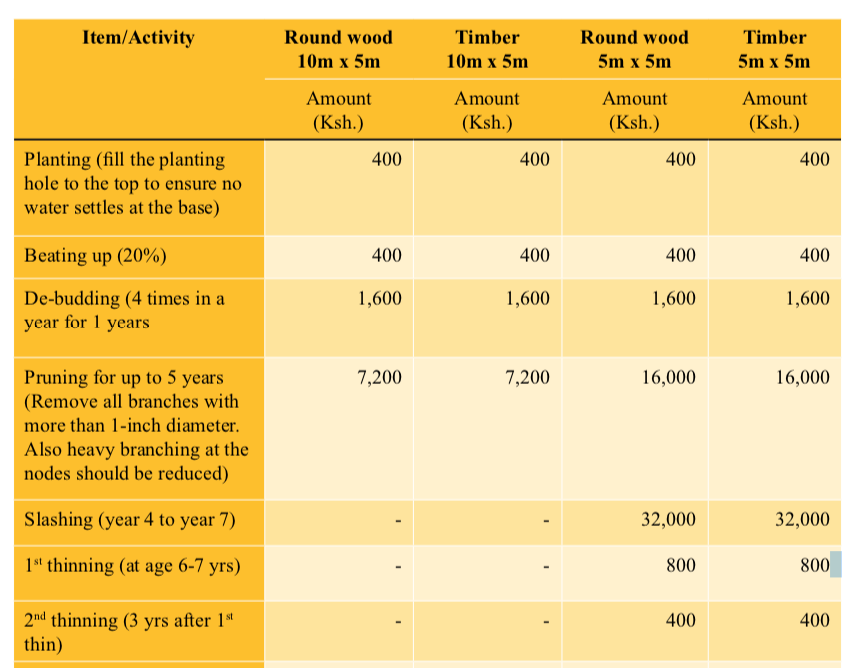
*The figures in Table 3 are not based on any research but were generated through field visits to the Melia growing areas and interviews with timber sawyers and merchants.
Assumptions
- The tree grower will undertake the silvicultural operations, i.e. weeding, pruning and thinning in the Melia plantation as per the prescribed instructions.
- The cover crop (e.g. cow peas) shall be grown using the recommended agricultural practices.
- Rainfall during the growth period, will be moderate and not extremely low.
- The Melia stand with a 10 m x 5 m spacing option and where thinning operationswill not be undertaken, will grow uniformly to maturity.
Recommendations
- Tree growers are advised to saw timber rather than sell standing trees as these will earn them better returns.
- The10mx5mspacingoptionisrecommendedforfarmerswhohavelimitedland as this will allow them grow agricultural crops for a longer period before the canopy closes.
- Aspacingoptionof5mx5misrecommendedforcommercialtreegrowersasit will ensure quality and fetch more returns from the enterprise.
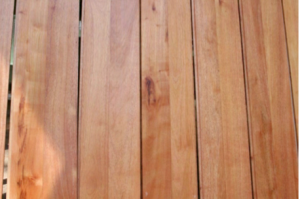
Plate 32: Flooring boards (2 cm thickness) made
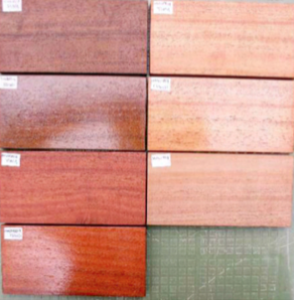
Plate 33: Vanished samples of out of Melia timber (1-inch thickness), by H-Tes Melia timber
Ltd. Current price for a mahogany wooden floor
is about is Ksh. 1,200/m2 (US$ 12)